RoundCube Configuration
STEP BY STEP “ROUNDCUBE” 0.2-beta CONFIGURATION
By AdNovea – Dec 2008 – version 1.2
This page is a section of XDove configuration
RoundCube Webmail
RoundCube is an IMAP webmail developed in PHP that can be installed in any e-mail server.
RoundCube requires the Dovecot IMAP server to be activated otherwise it will fail.
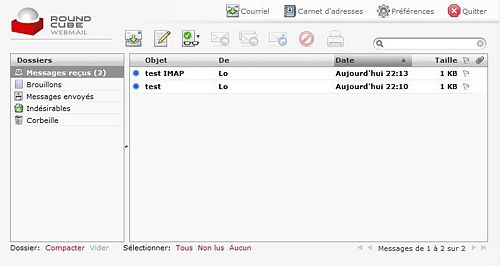
Automatic installation of RoundCube (IMAP)
Open the RoundCube IMAP mail client and follow the instruction under Manual configuration.

To re-run the automatic installation You must ONLY have the initial db.inc.php.dist and main.inc.php.dist file into the roundcube/config directory. You may have to delete the previous configuration files db.inc.php and main.inc.php
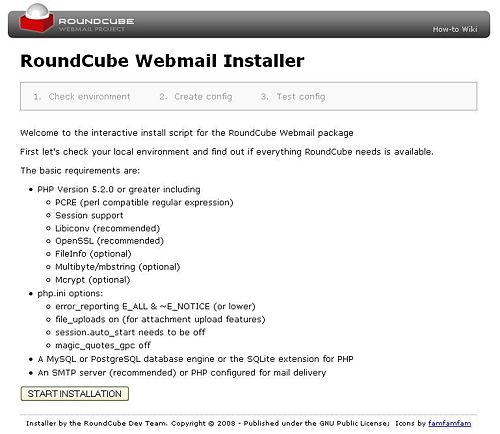
Start the installation
Click on START INSTALLATION
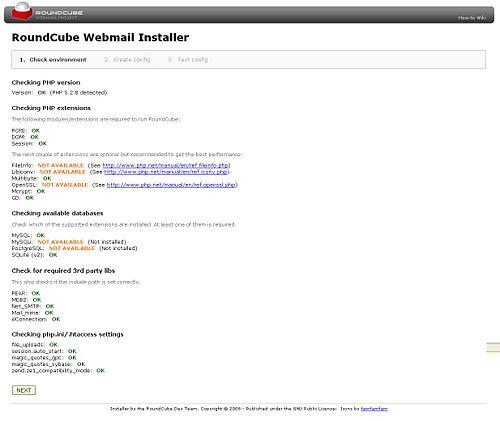
Checking the environment
Some PHP extensions are requires, some are optionals (there is no information about it). Not having all extensions does not allow standard installation by just pressing the NEXT button. Nevertheles, with the screenshot here below I was able to run the installation anyway.
Create the configuration
If you have some extensions that are NOT AVAILABLE, DONT CLICK ON NEXT button
It will bring you to the "Test config" and skip the Configuration step but instead click on the "Create config" button.

Fill the screen with you parameters
You may change the product_name and set your own des_key
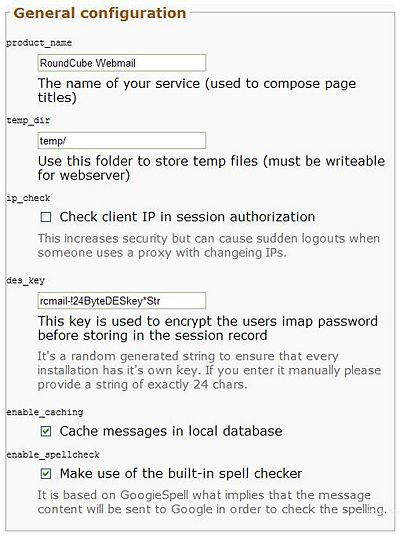
Keep going down the list...
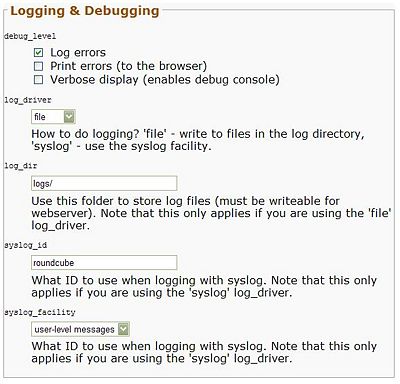
Be carefull when filling the database setup.
The server is your NAS (localhost, server_name or IP are valid)
The database name is roundcubemail
The installer requires your MySQL admin account for database connection (If you have the chance to do it, create your own roundcube user)
The QNAP MySQL serveur shall be enabled. Default username and password are 'root' and 'admin' .
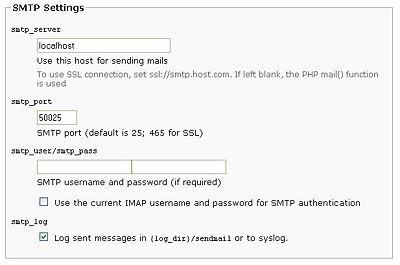
Fill the fields as mentioned on the screenshot
Leave "smtp_server" empty to use the PHP mail() function (It'll make your life easier to start with RoundCube).
You can edit the SMTP parameters later on.
MANDATORY: With XDove using XMail ESMPT set port to 50025
NOTE: You may also use your ISP SMTP (e.g. smtp.aol.com). Your ISP shall allow you with outgoing SMTP (smtp port shall be opened). Some ISP does not allow this port by default. The SMTP port will certainly be port 25 instead of the XDove SMTP port 50025. Please setup accordingly.
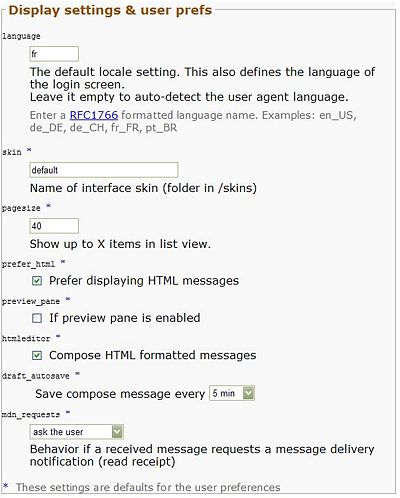
Select your language and enable HTML editor.
The HTML editor is Tiny-MCE which is a simple and nice WYSIWYG editor.
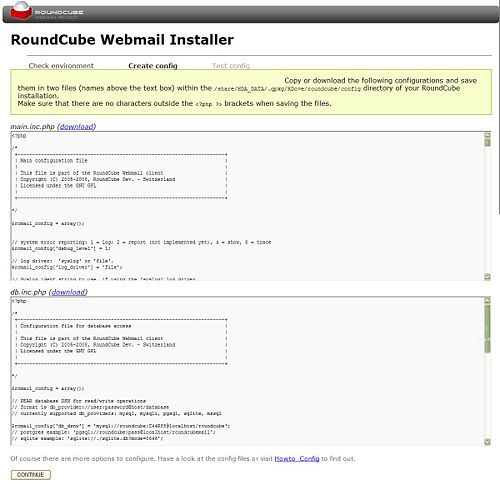
When done, press UPDATE CONFIG, the page is displayed again with, at the top, the content of the 2 configuration files.
You should manually copy (or download) the content of the two windows respectively into the main.inc.php and db.inc.php files
Then press CONTINUE (located just below the second configuration file windows) to reach the Test Config screen.
Testing your configuration
This screen enables you to do some tests to send message (STMP) and access the IMAP server.
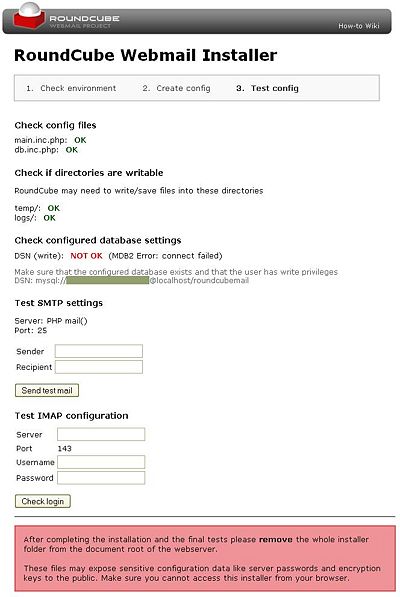
The automatic (or rather semi-automatic) installation is completed
Manual Installation of RoundCube (IMAP)
RoundCube configuration requires 2 steps:
1- MySQL database creation and configuration
2- Setup of the 2 configuration files
Database configuration
=> Roundcube needs a Database.
With MySQL you should open phpMyAdmin and create a database.
- 1. Fire up phpMyAdmin http://<your_nas>/phpMyAdmin
- 2. Click on the SQL icon on the left panel
- 3. In the pop-up window enter the following commands to create the database and the account
– Replace ‘password’ by ‘<your_password>’
- phpMyAdmin SQL Window
- CREATE DATABASE roundcubemail;
- GRANT ALL PRIVILEGES ON roundcubemail.* TO roundcube@localhost IDENTIFIED BY 'password';
- FLUSH PRIVILEGES;
- 4. Select the “roundcube” database in the left panel
- 5. Click on the SQL icon on the left panel again
- 6. In the pop-up select the tab “file import” and navigate to:
- <your_nas>/.qpkg\XDove\roundcube\SQL/mysql.initial.sql
- 7. Press “Execute”
Database preparation is completed.
Roundcube configuration
- Go into: <your_nas>/.qpkg\XDove\roundcube\config
- Rename the files config/*.inc.php.dist to config/*.inc.php (if not yet done)
- Modify the files in config/* to suit your local environment
Change the files in config/* according your to environment and your needs.
Details about the config paramaters can be found in the config files. - Especially you must set the access to the database
Decide which database backend to use. The most common is MySQL but others are PostgreSQL and SQLite. Choose the username and password you want to use, as well as a name for a database. Write the data as mentioned below:
$rcmail_config['db_dsnw'] = 'mysql://roundcube:password@localhost/roundcubemail';
In "main.inc.php" we should set the caching level to false. This is only advisable when the mail server is on your server; however, some issues have arisen with caching enabled. So for now, we'll disable it and you can enable it later if you feel:
$rcmail_config['enable_caching'] = FALSE;
There are two options to set up the mail server: multiple hosts or single hosts. Multiple hosts will be within an array. We'll go over a single mail server setup here.
Replace the inside the "" you need to put your mail server. Normally this would be "imap.domain.com" or "mail.domain.com". Either one will work, as long as the server is an IMAP server, not a POP3 server. An example would be:
$rcmail_config['default_host'] = 'imap://domain.com';
For an SSL connection, just use "ssl://imap.domain.com". The next setting is the port to use. IMAP defaults to port 143. Set this to your port number. If it's SSL, the default is 993.
$rcmail_config['default_port'] = 143;
With that you need to put the SMTP server inside the "".It may be your ISP SMTP too (e.g. smtp.my_isp.com) so a simple example would be:
$rcmail_config['smtp_server'] = 'smtp.domain.com';
Once again, if it's over SSL use "ssl://smtp.domain.com". Again change the port in the next setting. Default is 25 (50025 with XDOVE), and SSL default is 465 (no additional info so far).
$rcmail_config['smtp_port'] = 50025;
The next two settings (SMTP User and SMTP Password) need to be set (if you want to send from Roundcube). They are simple, so it's better to just give them to you:
$rcmail_config['smtp_user'] = ; $rcmail_config['smtp_pass'] = ;
To have access and display the default folder, you must set the corresponding variable accordingly
$rcmail_config['create_default_folders'] = TRUE;
Finally change (or add if not available) the language
$rcmail_config['locale_string'] = 'fr';
Save this file now as "main.inc.php"
You can also modify the default .htaccess file. This is necessary to increase the allowed size of file attachments, for example:
php_value upload_max_filesize 2M
With MySQL database, be sure to flush the users’ privileges when you add a new user or you will get a database connection error: FLUSH PRIVILEGES;
Connect to Roundcube
Now you are ready to connect to roundcube using YOUR mail account (not the roundcube/password)
The login screens may be of different types according to the selected installation options.
Except if you have set a username_domain (Automatically add this domain to users names for login), your login string shall be of the type here mentioned below.
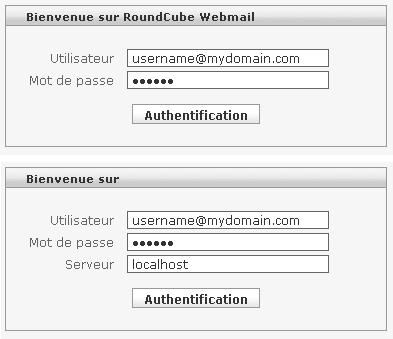
You will be prompted to remove the installer directory

Troubleshooting
Q: Cannot connect to the database
A: Check that you have always used the same option “localhost” or “your_nas”. Don’t mix, it will fail
A: Check the password in phpMyAdmin and .qpkg/XDove/roundcube/config/db.inc.php
A: Check the name of the database "roundcubemail"
Q: Cannot connect to IMAP
A: Do you have forwarded port 143 for IMAP?
A: Is the Dovecot server running? (ps –ax | grep –I dovecot)
Q: Cannot see my mails
A: You are NOT correctly connected (for example you have used
- ID = whosname and PWD= mypass
But you should use
- ID= whosname@mydomain.com and PWD= mypass
Q: Cannot send mails
A: check your SMTP: in roundcube/config/main.inc.php look for
 $rcmail_config['smtp_server'] = "smtp.myisp.com"
$rcmail_config['smtp_port'] = 25
or
 $rcmail_config['smtp_server'] = "localhost"
$rcmail_config['smtp_port'] = 50025
A: leave $rcmail_config['smtp_server'] empty to use the php mail() function to check
Q: Cannot see the 'Drafts', 'Sent', 'Junk' and 'Trash' folder
A: They are not automatically created on login. You must go into roundcube/config/main.inc.php and set to TRUE
$rcmail_config['create_default_folders'] = TRUE;
Q: Cannot some folders and some others are not visible
A: With RoundCube you can set which folders are visibible or not in "Preferences/Folders".
RoundCube can create the folders Trash, Spam and Send. An other client such as Outlook will create others folders (eg spam mails). You must select or renamed the folders as you want them to be displayed.
Q: Messages are not send in the right folder
A: With RoundCube you can set which folders is used for what in "Preferences/Folders". Select in the drop lists which folder shall be devoted for what.
Security
By default, any user that connect to RoundCube will automatically create a user account.
This is MANDATORY to enable the creation of your new user's accounts.
But once the user creation is done, it will be better to disable this function, to avoid anyone to open an account into RoundCube and create directories. Shall these accounts may be not allowed to send any mails.
You must set in config/main.inc.php this variable to FALSE.
$rcmail_config['auto_create_user'] = false;
I have some problem with login, I can access my roundcube login webpage, but when i try to login a new user it load message "Your browser does not accept cookies".
Anyone know how to solve this problem? Please kindly help me.