Memory Test: Difference between revisions

From QNAPedia
Jump to navigation Jump to search
No edit summary
→‎Applied QNAP NAS models: - Added Zhaoxin to list, verified using TVS-675.
Tag: visualeditor
 
(17 intermediate revisions by one other user not shown)
Line 1: Line 1:
This page will detail how to run a full test of the NAS memory using the Memtest86+ utility.  


This procedure only applies to NAS models with Intel CPU.  
This procedure only applies to NAS models with Intel and AMD CPU.  


== '''Memory Test SOP for x86-based NAS'''  ==
== '''Memory Test SOP for x86-based NAS''' ==
 
=== '''Applied QNAP NAS models'''  ===
 
TS-x39 Series, TS-x59 Series, TS-x69 Series, TS-509, TS-809, TS-809U<br>
 
=== <u>Instructions for Performing the Memory Test</u>  ===
 
<br>'''A. How to create a Memtest USB boot disk.'''<br>
 
----
 
1. Go to http://www.memtest.org/#downiso and download the latest "Auto-installer for USB Key" file
 
2. Plug a USB flash drive to your PC and run the Memtest Auto-Installer to create a bootable USB
 
<br> <br>'''B. How to use the Memtest USB boot disk to test the NAS memory'''
 
----
 
1. Power off the NAS.<br>
 
2. Remove all the hard disks.<br> [[Image:Remove HDDs.jpg]]
 
3. Connect the NAS with a VGA monitor, USB keyboard, and the bootable USB disk.
 
[[Image:Monitor&Keyboard.jpg]]
 
4. Power on the NAS and press F11 key repeatedly.
 
[[Image:Pressing button F11.jpg]]
 
5. Select the USB flash drive as your boot device. If you didn’t the menu and the system continues to process with the command line mode, please reboot the NAS and repeat the step 4. <br>[NOTE]: If there are two USB devices, don't select “USB DISK MODULE PMAP”.<br>[[Image:Select USB drive.jpg]]
 
6. The memory test will begin automatically.
 
[[Image:Memory OK.jpg]]<br>
 
<br>
 
== '''Memory Test SOP for TS-x79, TS-x70 Series, TS-451+&nbsp;NAS''' ==


=== '''Applied QNAP NAS models''' ===


TS-x79 Series, TS-x70 Series, TS-451+
NAS models with Intel, AMD or Zhaoxin CPUs (x86 models)


=== <u>Instructions for Performing the Memory Test</u> ===
Line 64: Line 24:
----
----


1. Power off the NAS.<br/>2. Remove all the hard disks.<br/>[[File:RemoveDrives x79.jpg|RTENOTITLE]]
1. Power off the NAS.<br/>


3. Connect the NAS with a VGA monitor, USB keyboard, and the bootable USB disk.
 
[[File:Monitor Keyboard x79.jpg|RTENOTITLE]]


2. Remove all the hard disks.<br/>[[File:RemoveDrives x79.jpg|350px|RTENOTITLE]]&nbsp;[[File:TVS-673 Front.png|350px|RTENOTITLE]]


3. Connect the NAS with a VGA/HDMI monitor, USB keyboard, and the bootable USB disk.


4. Power on the NAS and press the &lt;DEL&gt; or &lt;F2&gt;&nbsp;key when you see the message to enter setup.&nbsp;
[[File:Monitor Keyboard x79.jpg|500px|RTENOTITLE]]&nbsp;[[File:TVS 673 rear02.jpg|350px|RTENOTITLE]]


[[File:Bios 0.JPG|RTENOTITLE]]
4. Power on the NAS and press the &lt;DEL&gt;&nbsp;key to enter BIOS setup.&nbsp;


5. You will enter the BIOS Setup.&nbsp;Press the right arrow key to navigate to the Boot settings screen, and select "Hard Drive BBS Priorities"
5. Press the right arrow key to navigate to the Boot settings screen and configurechange the boot order.


[[File:Bios 2.JPG|RTENOTITLE]]
[[File:bios boot 01.jpg|RTENOTITLE]]
<br/>
6. Reconfigure the first boot device to your USB flash drive. Select your USB flash drive name. (Ex: choose "Patriot Memory PMAP" here)<br/>


6. Select "Boot Option #1"<br/>[[File:Bios 3.JPG|RTENOTITLE]]
[[File:bios boot 02.jpg|RTENOTITLE]]


7. Select "Generic USB Flash Disk" or similar name showing your USB disk<br/>&nbsp; &nbsp; [NOTE]: If there are two USB devices, don't select “USB DISK MODULE PMAP”. Similar for TS-451+, except you have to change boot order to specify USB flash first by using +/- keys. DON'T&nbsp;select UEFI USB flash device.<br/>[[File:Bios 4.JPG|RTENOTITLE]]
[[File:bios boot 03.jpg|RTENOTITLE]]


8. Press &lt;F4&gt; and select "Yes" to save and exit. On TS-451+. press &lt;F10&gt;&nbsp;to save and exit.
[NOTE]: If there are two USB devices, don't select “USB DISK MODULE PMAP”.<br/>


[[File:Bios 5.JPG|RTENOTITLE]]
7. Press the right arrow key to navigate to Save and Exit to save configuration and exit. <br/>


9. The memory test will begin automatically
[[File:bios boot 04.jpg|RTENOTITLE]]
<br/>
8. The memory test will begin automatically


[[File:Memory OK.jpg|RTENOTITLE]]
[[File:Memory OK.jpg|RTENOTITLE]]
[[Category:Troubleshooting]]
[[Category:Troubleshooting]]


<br>  
<br>
 
== '''Memory Test SOP for TVS-x63 and TVS-x73 Series&nbsp;NAS''' ==
 
=== '''Applied QNAP NAS models''' ===
 
TVS-x63 and TVS-x73 Series
 
=== <u>Instructions for Performing the Memory Test</u> ===
 
<br/>'''A. How to create a Memtest USB boot disk.'''
 
----
 
#<span style="line-height: 20.8px;">Go to&nbsp;</span>[http://www.memtest.org/#downiso http://www.memtest.org/#downiso]<span style="line-height: 20.8px;">&nbsp;and download the latest "Auto-installer for USB Key" file.</span>
#Extract the zip file to the folder you downloaded it to.
#<span style="line-height: 20.8px;">Plug a USB flash drive to your PC and run the Memtest Auto-Installer file extracted from the step above&nbsp;to create a bootable USB</span>
 
 
'''B. How to use the Memtest USB boot disk to test the NAS memory'''
 
----
 
1. Power off the NAS.<br/>
 
2. Remove all the hard disks.<br/>
[[File:TVS-673 Front.png|RTENOTITLE]]


3. Connect the NAS with a HDMI monitor, USB keyboard, and the bootable USB disk.
 
[[File:TVS-673 Rear.png|RTENOTITLE]]


4. Power on the NAS and press the &lt;DEL&gt;&nbsp;key until it gets into the BIOS screen.
 
 
5. Navigate to the "save & Exit" tab and choose the USB flash drive from the boot override option and click &lt;Enter&gt;&nbsp;key to boot from USB flash drive.


6. The memory test will begin automatically
 
[[File:Memory OK.jpg|RTENOTITLE]]
[[Category:Troubleshooting]]

Latest revision as of 01:32, 24 September 2021

This page will detail how to run a full test of the NAS memory using the Memtest86+ utility.

This procedure only applies to NAS models with Intel and AMD CPU.

Memory Test SOP for x86-based NAS

Applied QNAP NAS models

NAS models with Intel, AMD or Zhaoxin CPUs (x86 models)

Instructions for Performing the Memory Test


A. How to create a Memtest USB boot disk.


  1. Go to http://www.memtest.org/#downiso and download the latest "Auto-installer for USB Key" file.
  2. Extract the zip file to the folder you downloaded it to.
  3. Plug a USB flash drive to your PC and run the Memtest Auto-Installer file extracted from the step above to create a bootable USB


B. How to use the Memtest USB boot disk to test the NAS memory


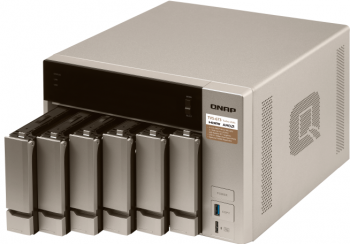
1. Power off the NAS.

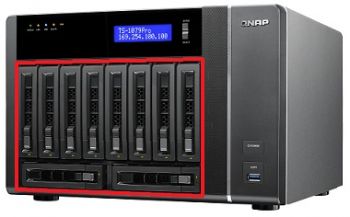
2. Remove all the hard disks.
RTENOTITLE RTENOTITLE

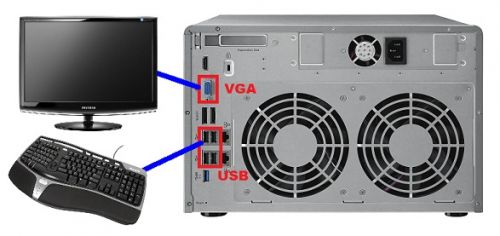
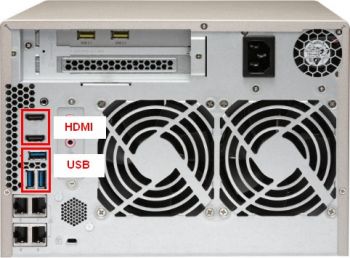
3. Connect the NAS with a VGA/HDMI monitor, USB keyboard, and the bootable USB disk.

RTENOTITLE RTENOTITLE

4. Power on the NAS and press the <DEL> key to enter BIOS setup. 

5. Press the right arrow key to navigate to the Boot settings screen and configurechange the boot order.

RTENOTITLE
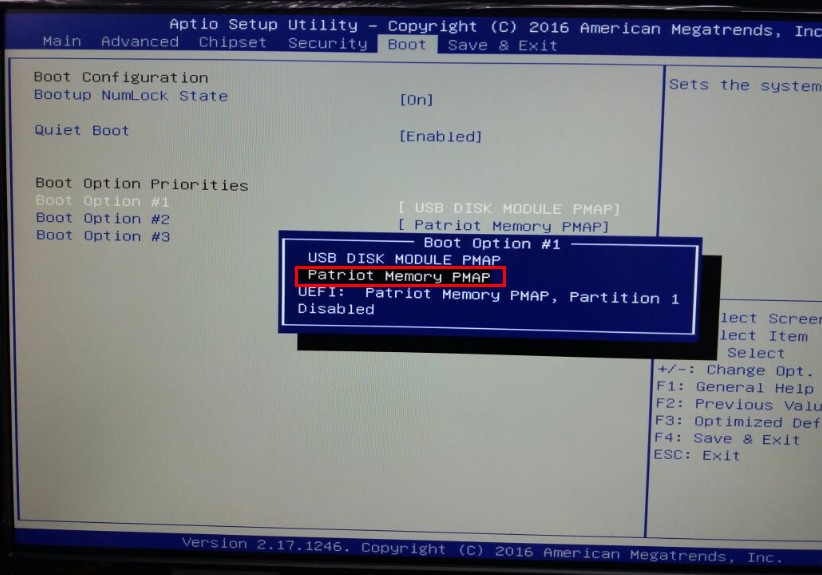
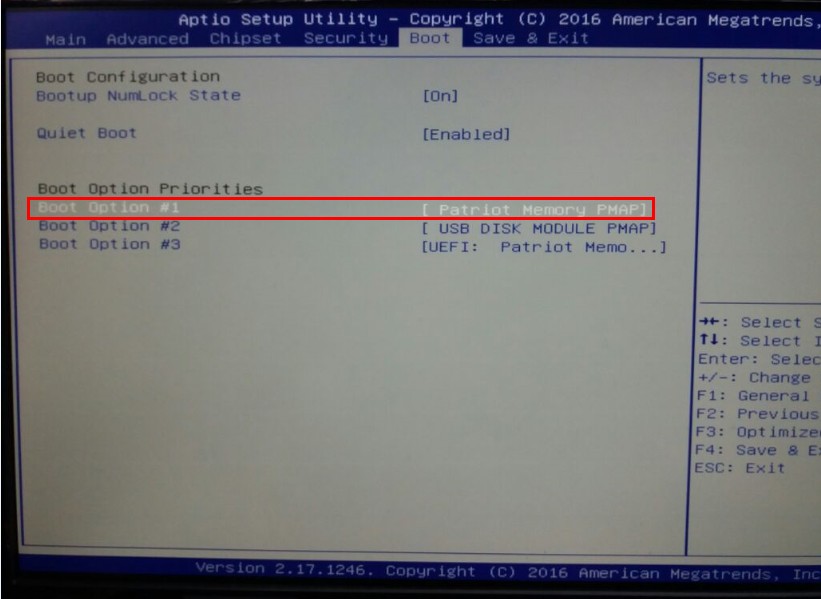
6. Reconfigure the first boot device to your USB flash drive. Select your USB flash drive name. (Ex: choose "Patriot Memory PMAP" here)

RTENOTITLE

RTENOTITLE

[NOTE]: If there are two USB devices, don't select “USB DISK MODULE PMAP”.

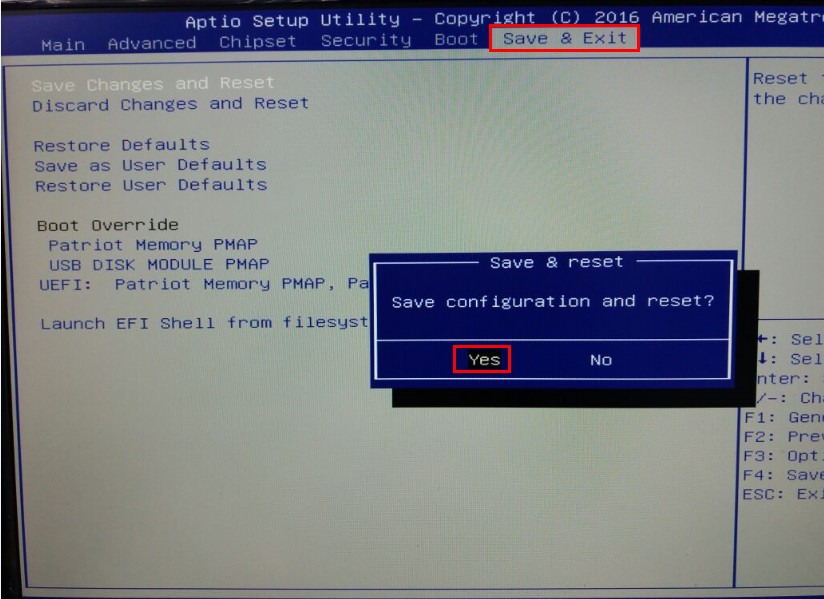
7. Press the right arrow key to navigate to Save and Exit to save configuration and exit.
RTENOTITLE
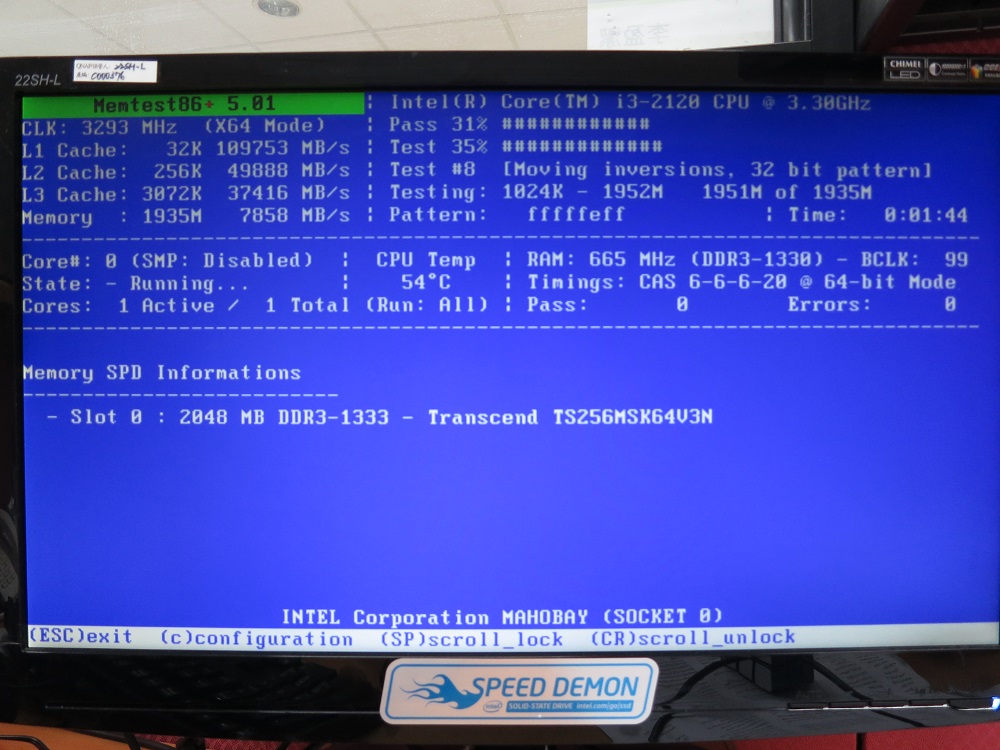
8. The memory test will begin automatically
RTENOTITLE