|
|
| (23 intermediate revisions by 7 users not shown) |
| Line 1: |
Line 1: |
| Some advanced uses of your NAS may require you to run custom applications at boot-time. Even though QNAP NAS are Linux-based, you cannot use the usual Linux methods for launching an application at startup: default config files are reset on every startup.
| |
|
| |
|
| <br>
| | Some advanced uses of your NAS may require you to run custom applications at boot-time. Even though QNAP NAS are Linux-based, you cannot use the usual Linux methods for launching an application at startup: default config files are reset on every startup. |
|
| |
|
| == Skills required ==
| | |
|
| |
|
| *must be able to remote login via ssh or telnet (e.g. use '''SSH PuTTY''')<br>
| | == Skills required == |
| *must know how to edit files using nano, vi, or edit via SFTP (e.g. use '''WinSCP''')<br>
| |
|
| |
|
| == MTD-based method ==
| | *must be able to remote login via ssh or telnet (e.g. use '''SSH PuTTY''') |
| | *must know how to edit files using nano, vi, or edit via SFTP (e.g. use '''WinSCP''') |
|
| |
|
| autorun.sh is a script which will be executed on every startup of the TS-x09, TS-x19 and TS-x39. Editing this file allows you to start your own programs or overwrite config files with your own copies.
| | |
|
| |
|
| === Manual edit of autorun.sh === | | == MTD-based method == |
|
| |
|
| #Log into your QNAP device using SSH or Telnet, for instance by using Putty
| | autorun.sh is a script which will be executed on every startup of the TS-x09, TS-x19 and TS-x39. Editing this file allows you to start your own programs or overwrite config files with your own copies. |
| #Optional: install nano; use '''ipkg install nano''' & edit with nano instead of vi
| |
| #TS-201: Mount the config ramblock /dev/mtdblock4: <pre># mount -t ext2 /dev/mtdblock4 /tmp/config </pre>
| |
| #TS-109, TS-109P, TS-110, TS-119, TS-209, TS-209P, TS-212, TS-219 (TS-219P II: since the new firmware update you maybe have to use ext4 instead of ext2), TS-409 (Marvell ARM), TS-412, TS-419P: Mount the config ramblock /dev/mtdblock5:: <pre># mount -t ext2 /dev/mtdblock5 /tmp/config</pre>
| |
| #TS-439, TS-509, TS-639, TS-809, TS-809U (x86): Mount the config ramblock /dev/sdx6:<pre># mount -t ext2 /dev/sdx6 /tmp/config</pre>
| |
| #TS-269L: Mount the config ramblock /dev/sdc6:<pre># mount -t ext2 /dev/sdc6 /tmp/config</pre>
| |
| #Create/Edit /tmp/config/autorun.sh .
| |
| ##either using vi: <pre># vi /tmp/config/autorun.sh</pre>
| |
| ###Get vi editor into edit mode: '''press a'''
| |
| ###Edit whatever you need to
| |
| ###Exit edit mode: '''press ESC'''
| |
| ###Save and exit: '''press ZZ'''
| |
| ##or editing it using a desktop PC and e.g. SFTP
| |
| #Ensure that /tmp/config/autorun.sh is executable: <pre># chmod +x /tmp/config/autorun.sh</pre>
| |
| #'''IMPORTANT:''' Unmount the mounted flash partition: <pre># umount /tmp/config</pre>
| |
|
| |
|
| === editautorun.sh: script to ease autorun.sh edit ===
| | |
|
| |
|
| If you edit this file regularly you can save some time by creating a shell script (e.g. editautorun.sh) to automate the process. You can call the script by either putting it in the environment path, or add its folder to the path or call it by an alias.
| | |
|
| |
|
| The script contents are:
| | === Manual edit of autorun.sh === |
|
| |
|
| For TS-201 use ...
| | #Log into your QNAP device using SSH or Telnet, for instance by using Putty |
| <pre>mount -t ext2 /dev/mtdblock4 /tmp/config
| | #Optional: install nano; use '''ipkg install nano''' & edit with nano instead of vi |
| vi /tmp/config/autorun.sh
| | #Mount config ramblock by finding your specific model below: |
| chmod +x /tmp/config/autorun.sh
| |
| echo .
| |
| echo "unmounting /tmp/config..."
| |
| umount /tmp/config
| |
| </pre>
| |
| For TS-109, TS-109P, TS-119, TS-209, TS-209P, TS-219, TS-412, TS-409 (Marvell ARM) use ...
| |
| <pre>mount -t ext2 /dev/mtdblock5 /tmp/config
| |
| vi /tmp/config/autorun.sh
| |
| chmod +x /tmp/config/autorun.sh
| |
| echo .
| |
| echo "unmounting /tmp/config..."
| |
| umount /tmp/config
| |
| </pre>
| |
| TS-439, TS-509, TS-639, TS-809, TS-809U (x86) use ...
| |
| <pre>mount -t ext2 /dev/sdx6 /tmp/config
| |
| vi /tmp/config/autorun.sh | |
| chmod +x /tmp/config/autorun.sh
| |
| echo .
| |
| echo "unmounting /tmp/config..."
| |
| umount /tmp/config
| |
| </pre>
| |
| === autorun.sh: one script to rule them all ===
| |
|
| |
|
| Frequently mounting and editing autorun.sh on the flash could be an annoying task. More important, it may reduce the lifetime of some flash blocks. Flash blocks have limited write/erase cycles, and the mtdblock device driver does little to prevent their wear. Read more on this on the [http://www.linux-mtd.infradead.org/faq/general.html#L_ext2_mtd Linux mtd] web site.
| | '''TS-201: ''' Mount the config ramblock /dev/mtdblock4: |
|
| |
|
| To avoid this, you could configure autorun.sh to launch another script located in the inner drive: in this way there no need to always mount and modify the file inside the flash. but only edit the script file located on your drive.
| | #mount -t ext2 /dev/mtdblock4 /tmp/config |
|
| |
|
| Create the directory /share/HDA_DATA/.qpkg/autorun and file autorun.sh with:
| | '''TS-109, TS-109P, TS-110, TS-119,TS-209, TS-209P, TS-212, TS-219 '''(TS-219P II:since the new firmware update you maybe have to use ext4 instead of ext2)''', TS-409 (Marvell ARM), TS-412, TS-419P:''' |
| <pre>mkdir /share/HDA_DATA/.qpkg/autorun
| |
| cd /share/HDA_DATA/.qpkg/autorun/
| |
| touch autorun.sh
| |
| chmod +x autorun.sh
| |
| </pre>
| |
| The autorun.sh located on the flash could be something like this (just two lines that won't need many changes!):
| |
| <pre>#!/bin/sh
| |
| /share/HDA_DATA/.qpkg/autorun/autorun.sh &
| |
| </pre>
| |
| and then edit the file /share/HDA_DATA/.qpkg/autorun/autorun.sh to be used to launch all your startup scripts.
| |
|
| |
|
| <br> | | Mount the config ramblock /dev/mtdblock5: |
| | <pre>mount -t ext2 /dev/mtdblock5 /tmp/config</pre> |
|
| |
|
| === IMPORTANT Notes! ===
| | '''TS-439, TS-509, TS-639, TS-809, TS-809U (x86):''' |
|
| |
|
| 1. Never put any larger files on your flashboot devices and ramdisk; instead, create symbolic links to whatever you want to put there, e.g.: <br>''Create a link from /usr (which is in ramdisk) to /share/MD0_DATA/jre1.6.0_10 (which is on a hard disk) at the mountpoint /usr/java''
| | Mount the config ramblock /dev/sdx6: |
| <pre># ln -sf /share/MD0_DATA/jre1.6.0_10 /usr/java</pre> | | <pre>mount -t ext2 /dev/sdx6 /tmp/config</pre> |
| <br> 2. Always use the full system path because locations like /opt/bin or /opt/sbin might not have been exported yet when Autorun.sh is executed, e.g:<br> <br>
| |
|
| |
|
| No good.
| | '''TS-269L: ''' Mount the config ramblock /dev/sdc6: |
| <pre>svnserve -d --listen-port=4000 -r /share/subversion</pre>
| | <pre>mount -t ext2 /dev/sdc6 /tmp/config</pre> |
| <br> This is better.
| |
| <pre>/opt/bin/svnserve -d --listen-port=4000 -r /share/subversion</pre>
| |
| <br> <br> If it still fails to start svnserve, you might try adding this line to your autoexec script:
| |
| <pre>/bin/ln -sf /opt/bin/ /share/HDA_DATA/opt/bin/</pre> | |
| <br> 3. Many startup scripts in /etc/init.d overwrite their corresponding configuration files in /etc. In this case overwriting the config file using autorun.sh is not enough; we also have to overwrite the startup script itself. Moreover, many startup scripts get excecuted before autorun, such that we also have to restart the service. In this case an autorun.sh may look like this: | |
| <pre>#!/bin/sh
| |
|
| |
|
| cp /share/MD0_DATA/admin/nfs /etc/init.d/nfs
| | '''TS-212P3, TS-230: ''' Mount the config ramblock /dev/mmcblk0p5: |
| cp /share/MD0_DATA/admin/exports /etc
| | <pre>mount -t ext2 /dev/mmcblk0p5 /tmp/config</pre> |
|
| |
|
| /etc/init.d/nfs restart
| | '''All HAL-based Intel and AMD NAS:''' |
| </pre>
| |
| Very ugly, indeed! However, it seems this is the only way to make it work (unless you want to throw out the QNAP OS and install a 'better' OS on your NAS).
| |
|
| |
|
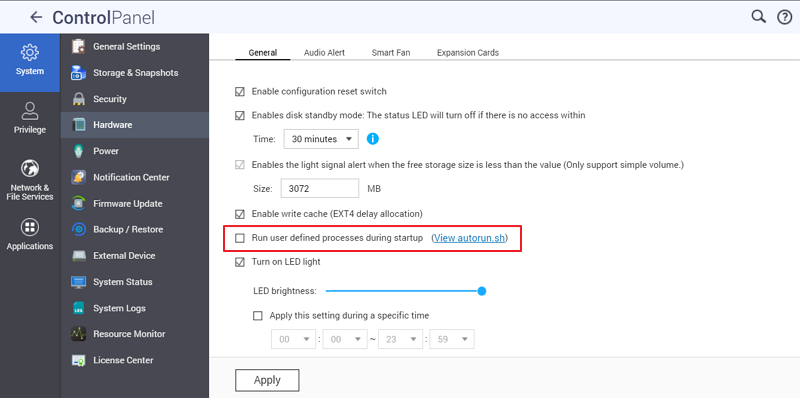
| 4. On our QNAP TS-879 Pro we were not able to run | | Starting from QTS 4.3.3 it's required to enable the autorun.sh processing in the Control Panel -> Hardware -> General: Run user defined startup processes (autorun.sh) |
| <pre>/opt/bin/rsyncd-acl.sh start | | <pre>mount $(/sbin/hal_app --get_boot_pd port_id=0)6 /tmp/config</pre> |
| </pre> | |
| from the autorun.sh as /opt is not the one from Optware but a directory containing one file, i.e. nasconfig_fs.img.tgz.
| |
|
| |
|
| Thus we modified /tmp/config/autorun.sh to
| | |
| <pre>#!/bin/sh
| |
| log=/share/MD0_DATA/.qpkg/Optware/var/log/autorun
| |
| date > $log
| |
| # removing bogus /opt
| |
| /bin/rm /opt/nasconfig_fs.img.tgz /opt 2>> $log >> $log
| |
| /bin/rmdir /opt 2>> $log >> $log
| |
| # link correct /opt
| |
| /bin/ln -s /share/MD0_DATA/.qpkg/Optware /opt 2>> $log >> $log
| |
| # run autorun.sh
| |
| /opt/etc/autorun.sh 2>> $log >> $log
| |
| </pre>
| |
| created a log file directory
| |
| <pre>mkdir -p /opt/var/log
| |
| </pre>
| |
| and created /opt/etc/autorun.sh on the disk
| |
| <pre>#!/bin/sh
| |
| /opt/bin/rsyncd-acl.sh start
| |
| </pre>
| |
| thus no mounting of the flash partition is necessary anymore.
| |
|
| |
|
| == QPKG-based method ==
| | '''''Create/Edit /tmp/config/autorun.sh'''''. |
|
| |
|
| With firmware 3.8.2, the [[#MTD-based_method]] was broken. With the next firmware update, this bug was corrected, but in the meanwhile, the below workaround has been devised.
| | #either using vi: <pre># vi /tmp/config/autorun.sh</pre> |
|
| |
|
| This method consists of declaring a dummy QPKG which launches your script at startup.
| |
|
| |
|
| *Log into your QNAP device using SSH or Telnet, for instance by using Putty
| | |
| *Edit QPKG config file:
| |
|
| |
|
| # vi /etc/config/qpkg.conf
| | #Get vi editor into edit mode: '''press a''' |
| | ##Edit whatever you need to |
| | ##Exit edit mode: '''press ESC''' |
| | ##Save and exit: '''x''' |
| | #or editing it using a desktop PC and e.g. SFTP |
| | #Ensure that /tmp/config/autorun.sh is executable <pre># chmod +x /tmp/config/autorun.sh</pre> |
|
| |
|
| *Declare a new dummy package by adding something like that in this file, but take care about the order. e.g. if you would like to start a service from a optware package, be sure optware is initialized before:
| |
|
| |
|
| [autorun]
| | |
| Name = autorun
| |
| Version = 0.1
| |
| Author = neomilium
| |
| Date = 2013-05-06
| |
| Shell = /share/MD0_DATA/.qpkg/autorun/autorun.sh
| |
| Install_Path = /share/MD0_DATA/.qpkg/autorun
| |
| Enable = TRUE
| |
|
| |
|
| As you can see, '''Shell''' is the interesting variable: at boot-time, QNAP OS will launch each QPKG's '''Shell''' variable content.
| | #'''IMPORTANT:''' Unmount the mounted flash partition: <pre># umount /tmp/config</pre> |
|
| |
|
| Note: if your NAS doesn't have /share/MD0_DATA (i.e. is a one-drive NAS), put the right directory into the '''Shell''' and '''Install_Path''' variables and adapt the following commands to your needs.
| |
|
| |
|
| *Create the dummy package directory:
| | |
|
| |
|
| # mkdir /share/MD0_DATA/.qpkg/autorun
| | |
|
| |
|
| *Create the autorun script with the contents of your choice:
| | === '''editautorun.sh: script to ease autorun.sh edit''' === |
|
| |
|
| # vi /share/MD0_DATA/.qpkg/autorun/autorun.sh
| | If you edit this file regularly you can save some time by creating a shell script (e.g. editautorun.sh) to automate the process. You can call the script by either putting it in the environment path, or add its folder to the path or call it by an alias. |
|
| |
|
| Note: don't forget "#!/bin/sh" at the beginning of script.
| | The script contents are: |
|
| |
|
| *Set the execute bit:
| | For TS-201 use ... |
| | <pre>mount -t ext2 /dev/mtdblock4 /tmp/config |
| | vi /tmp/config/autorun.sh |
| | chmod +x /tmp/config/autorun.sh |
| | echo . |
| | echo "unmounting /tmp/config..." |
| | umount /tmp/config |
| | </pre> |
|
| |
|
| # chmod +x /share/MD0_DATA/.qpkg/autorun/autorun.sh
| | For TS-109, TS-109P, TS-119, TS-209, TS-209P, TS-219, TS-412, TS-409 (Marvell ARM) use ... |
| | <pre>mount -t ext2 /dev/mtdblock5 /tmp/config |
| | vi /tmp/config/autorun.sh |
| | chmod +x /tmp/config/autorun.sh |
| | echo . |
| | echo "unmounting /tmp/config..." |
| | umount /tmp/config |
| | </pre> |
|
| |
|
| *Reboot and enjoy!
| | TS-439, TS-509, TS-639, TS-809, TS-809U (x86) use ... |
| | <pre>mount -t ext2 /dev/sdx6 /tmp/config |
| | vi /tmp/config/autorun.sh |
| | chmod +x /tmp/config/autorun.sh |
| | echo . |
| | echo "unmounting /tmp/config..." |
| | umount /tmp/config |
| | </pre> |
|
| |
|
| == MTD-based method (old) ==
| | TS-230 use ... |
| | <pre>mount -t ext2 /dev/mmcblk0p5 /tmp/config |
| | vi /tmp/config/autorun.sh |
| | chmod +x /tmp/config/autorun.sh |
| | echo . |
| | echo "unmounting /tmp/config..." |
| | umount /tmp/config |
| | </pre> |
|
| |
|
| This section is here only to make sure existing anchor links continue to work. The meat is in the section [[#MTD-based_method|MTD-based method]].
| | All HAL-based Intel and AMD NAS use ... |
| | <pre>mount $(/sbin/hal_app --get_boot_pd port_id=0)6 /tmp/config |
| | touch /tmp/config/autorun.sh |
| | chmod +x /tmp/config/autorun.sh |
| | $EDITOR /tmp/config/autorun.sh |
| | umount /tmp/config</pre> |
|
| |
|
| == QPKG-based method (new) ==
| | TAS-x68, TS-x28 use ... |
| | <pre>/bin/mount -t ext4 /dev/mmcblk0p7 /tmp/config |
| | vi /tmp/config/autorun.sh |
| | chmod +x /tmp/config/autorun.sh |
| | echo . |
| | echo "unmounting /tmp/config..." |
| | umount /tmp/config |
| | </pre> |
|
| |
|
| This section is here only to make sure existing anchor links continue to work. The meat is in the section [[#QPKG-based_method|QPKG-based method]]
| | All AL-based NAS(TS-x31+ and TS-x31X) and TS-x31 use ... |
| | | <pre>ubiattach -m 6 -d 2 |
| == Trick & tips ==
| | /bin/mount -t ubifs ubi2:config /tmp/config |
| | vi /tmp/config/autorun.sh |
| | chmod +x /tmp/config/autorun.sh |
| | echo . |
| | echo "unmounting /tmp/config..." |
| | umount /tmp/config |
| | ubidetach -m 6 |
| | </pre> |
|
| |
|
| === Waiting for encrypted partitions ===
| | |
|
| |
|
| If your data partition is encrypted, you might have some script that has to wait until the encrypted partition is available. I added a script called waitforenc.sh in my autorun-directory:
| |
| <pre>#! /bin/sh
| |
|
| |
|
| # This script ends after the encrypted filesystem has been mounted.
| |
|
| |
|
| # The following exits successfully (0) if MD0 is mounted
| | === '''Using "init" script to mount the flash''' === |
| cat /etc/mtab | grep -q MD0
| |
| while [[ $? -ne 0 ]] ; do
| |
| sleep 5
| |
| cat /etc/mtab | grep -q MD0
| |
| done</pre>
| |
| And now I'm able to call scripts *after* the encrypted partition is available, without blocking other scripts:
| |
| <pre>(./waitforenc.sh; /etc/init.d/ldap_server.sh restart ) &</pre>
| |
| === Calling all scripts in a certain directory ===
| |
|
| |
|
| Place a file called listoffiles.sh in a directory, create a subdirectory called scripts, add listoffiles.sh to your autorun:
| | The QNAP GUI has the ability to view the autorun.sh content. As at V4.5.1.1540 on a TS-831XU-RP this is how the GUI does that: |
| <pre>#! /bin/sh | | <pre>/etc/init.d/init_disk.sh mount_flash_config |
| # listoffiles.sh
| | (displays /tmp/nasconfig_tmp/autorun.sh) |
| | /etc/init.d/init_disk.sh umount_flash_config |
| | </pre> |
|
| |
|
| BASEDIR=$(dirname $0)
| | Using these commands, you can create/edit the "autorun.sh" in the location given. |
|
| |
|
| echo "" > log/userfiles.log
| | |
|
| |
|
| for i in scripts/*.sh ; do
| | === '''Allow running autorun.sh during startup''' === |
| if [[ -x $i ]] ; then
| |
| echo -n "$i " >> log/userfiles.log
| |
| echo `date` >> log/userfiles.log
| |
| $i 2>&1 >> log/userfiles.log
| |
| cd $BASEDIR
| |
| fi
| |
| done</pre>
| |
| === Optimized networking === | |
|
| |
|
| *You can also try different values from <a href="http://www.speedguide.net/read_articles.php?id=121">SpeedGuide.net</a>
| | After completing the autorun.sh, please don't forget to enable the option to allow running autorun.sh during the system startup. [[File:AllowAutorun2.png|RTENOTITLE]] |
| <pre>ifconfig eth0 txqueuelen 50000
| |
| ifconfig eth1 txqueuelen 50000
| |
| echo 1 > /proc/sys/net/ipv4/tcp_rfc1337
| |
| echo 2 > /proc/sys/net/ipv4/tcp_frto
| |
| echo 2 > /proc/sys/net/ipv4/tcp_frto_response
| |
| echo 1 > /proc/sys/net/ipv4/tcp_mtu_probing
| |
| echo 1 > /proc/sys/net/ipv4/tcp_window_scaling
| |
| echo 1 > /proc/sys/net/ipv4/tcp_workaround_signed_windows
| |
| echo 1 > /proc/sys/net/ipv4/tcp_tw_reuse
| |
| echo 0 > /proc/sys/net/ipv4/tcp_tw_recycle
| |
| echo 1 > /proc/sys/net/ipv4/tcp_low_latency
| |
| echo 1 > /proc/sys/net/ipv4/tcp_ecn
| |
| </pre>
| |
| [[Category:Installation_and_Setup]] | |
Some advanced uses of your NAS may require you to run custom applications at boot-time. Even though QNAP NAS are Linux-based, you cannot use the usual Linux methods for launching an application at startup: default config files are reset on every startup.
Skills required
- must be able to remote login via ssh or telnet (e.g. use SSH PuTTY)
- must know how to edit files using nano, vi, or edit via SFTP (e.g. use WinSCP)
MTD-based method
autorun.sh is a script which will be executed on every startup of the TS-x09, TS-x19 and TS-x39. Editing this file allows you to start your own programs or overwrite config files with your own copies.
Manual edit of autorun.sh
- Log into your QNAP device using SSH or Telnet, for instance by using Putty
- Optional: install nano; use ipkg install nano & edit with nano instead of vi
- Mount config ramblock by finding your specific model below:
TS-201: Mount the config ramblock /dev/mtdblock4:
- mount -t ext2 /dev/mtdblock4 /tmp/config
TS-109, TS-109P, TS-110, TS-119,TS-209, TS-209P, TS-212, TS-219 (TS-219P II:since the new firmware update you maybe have to use ext4 instead of ext2), TS-409 (Marvell ARM), TS-412, TS-419P:
Mount the config ramblock /dev/mtdblock5:
mount -t ext2 /dev/mtdblock5 /tmp/config
TS-439, TS-509, TS-639, TS-809, TS-809U (x86):
Mount the config ramblock /dev/sdx6:
mount -t ext2 /dev/sdx6 /tmp/config
TS-269L: Mount the config ramblock /dev/sdc6:
mount -t ext2 /dev/sdc6 /tmp/config
TS-212P3, TS-230: Mount the config ramblock /dev/mmcblk0p5:
mount -t ext2 /dev/mmcblk0p5 /tmp/config
All HAL-based Intel and AMD NAS:
Starting from QTS 4.3.3 it's required to enable the autorun.sh processing in the Control Panel -> Hardware -> General: Run user defined startup processes (autorun.sh)
mount $(/sbin/hal_app --get_boot_pd port_id=0)6 /tmp/config
Create/Edit /tmp/config/autorun.sh.
- either using vi:
# vi /tmp/config/autorun.sh
- Get vi editor into edit mode: press a
- Edit whatever you need to
- Exit edit mode: press ESC
- Save and exit: x
- or editing it using a desktop PC and e.g. SFTP
- Ensure that /tmp/config/autorun.sh is executable
# chmod +x /tmp/config/autorun.sh
- IMPORTANT: Unmount the mounted flash partition:
# umount /tmp/config
editautorun.sh: script to ease autorun.sh edit
If you edit this file regularly you can save some time by creating a shell script (e.g. editautorun.sh) to automate the process. You can call the script by either putting it in the environment path, or add its folder to the path or call it by an alias.
The script contents are:
For TS-201 use ...
mount -t ext2 /dev/mtdblock4 /tmp/config
vi /tmp/config/autorun.sh
chmod +x /tmp/config/autorun.sh
echo .
echo "unmounting /tmp/config..."
umount /tmp/config
For TS-109, TS-109P, TS-119, TS-209, TS-209P, TS-219, TS-412, TS-409 (Marvell ARM) use ...
mount -t ext2 /dev/mtdblock5 /tmp/config
vi /tmp/config/autorun.sh
chmod +x /tmp/config/autorun.sh
echo .
echo "unmounting /tmp/config..."
umount /tmp/config
TS-439, TS-509, TS-639, TS-809, TS-809U (x86) use ...
mount -t ext2 /dev/sdx6 /tmp/config
vi /tmp/config/autorun.sh
chmod +x /tmp/config/autorun.sh
echo .
echo "unmounting /tmp/config..."
umount /tmp/config
TS-230 use ...
mount -t ext2 /dev/mmcblk0p5 /tmp/config
vi /tmp/config/autorun.sh
chmod +x /tmp/config/autorun.sh
echo .
echo "unmounting /tmp/config..."
umount /tmp/config
All HAL-based Intel and AMD NAS use ...
mount $(/sbin/hal_app --get_boot_pd port_id=0)6 /tmp/config
touch /tmp/config/autorun.sh
chmod +x /tmp/config/autorun.sh
$EDITOR /tmp/config/autorun.sh
umount /tmp/config
TAS-x68, TS-x28 use ...
/bin/mount -t ext4 /dev/mmcblk0p7 /tmp/config
vi /tmp/config/autorun.sh
chmod +x /tmp/config/autorun.sh
echo .
echo "unmounting /tmp/config..."
umount /tmp/config
All AL-based NAS(TS-x31+ and TS-x31X) and TS-x31 use ...
ubiattach -m 6 -d 2
/bin/mount -t ubifs ubi2:config /tmp/config
vi /tmp/config/autorun.sh
chmod +x /tmp/config/autorun.sh
echo .
echo "unmounting /tmp/config..."
umount /tmp/config
ubidetach -m 6
Using "init" script to mount the flash
The QNAP GUI has the ability to view the autorun.sh content. As at V4.5.1.1540 on a TS-831XU-RP this is how the GUI does that:
/etc/init.d/init_disk.sh mount_flash_config
(displays /tmp/nasconfig_tmp/autorun.sh)
/etc/init.d/init_disk.sh umount_flash_config
Using these commands, you can create/edit the "autorun.sh" in the location given.
Allow running autorun.sh during startup
After completing the autorun.sh, please don't forget to enable the option to allow running autorun.sh during the system startup.