PhpXMail Configuration
STEP BY STEP “PHPXMAIL” CONFIGURATION
By AdNovea – Jan 2009 – version 1.2
This page is a section of XDove configuration
Source(s): PhpXMail solutions
PHPXMail manual configuration
NOTE: The XDove Quick Start Assistant (QSA) is able to automatically configured XMail. Nevertheless, you may choose to manually configure XMail. Official XMail documentation is available under the "Documentation" link in "XMail POP/ESMTP server". Manual installation instructions may be found in the XDove "Documentation" center.
Source(s): PhpXMail solutions
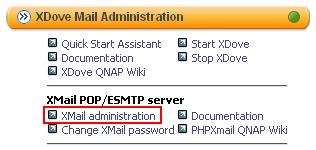
Access PHPXMail:
- with a click on "XMail administration" from the XDove interface (first, drop the XDove Mail administration section)
- by typing the URL in your browser: http://<your_nas>/phpxmail
Source(s): PhpXMail solutions
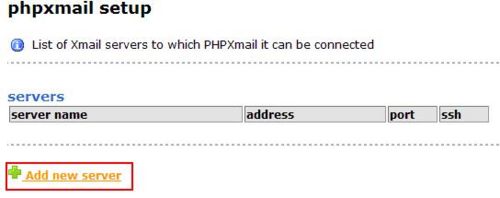
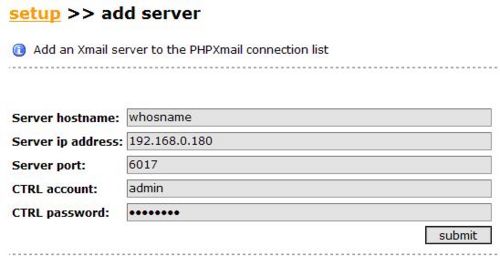
1. Click on “Add new server” and set the server parameters (default parameters are)
CTRL account: admin
CTRL password: password
CTRL password can be changed later on
Source(s): PhpXMail solutions
This creates the “<your_nas>/Qweb/phpxmail/servers.php” file that has one line (separators are tabulations):
- whosname 192.168.0.180 6017 admin 15041616120a1701 0
- 15041616120a1701 is the MD5 encryption for a password set to “password”.
2. Try to logout and login with the admin/password
NOTE: I have very frequently observed that PHPXMail tends to crash. So be prepared! When a command ends with an error, just go back and retry. It normally works the second time.
Source(s): PhpXMail solutions
Troubleshooting
If you cannot login into PHPXMail here are the possible reasons:
- Are sure, I mean really sure about the admin / password (you MUST have used admin as CTRL account and password as CTRL password)
- You have got an error during step 1. You better retry and to do so, first delete the “servers.php” from /phpxmail. Reconnect and you will be prompted again to configure PHPXMail
- The XMail server is not started: Please check that “Enable” is displayed in XDove in the QPKG page. If so, check the XMail server is really running (open a console and type: ps –ax | grep –i xmail). You must have a line with (xxxx xmail XXX S /usr/bin/XMail -X-etc…)
- See Troubleshooting section for “Install XDove package”
Source(s): PhpXMail solutions
INFO: if the XMail server is running, you will get with ps –ax something like:
30933 xmail 668 S /usr/bin/XMail -X- -B- -Mr 24 -SX 2 -Qn 1 -Yt 1 -Yi 1-Ln 1
-PX 1 -CX 2 -Ph -Ql -Sl -Pl -Yl -Fl -Cl -Ll -Sp 50025 -Pp 50110 -Fp 50
More information about the command line parameters can be found : here.
All the parameters above are not mandatory.
[XMail] -Mr 24 Set log rotate hours step
[POP3]
-Pl Enable POP3 logging.
-Ph Hang the connection in bad login response.
-Pp 50110 Set POP3 server port (if you change this you must know what you're doing).
-PX 1 Set the maximum number of threads for POP3 server.
[POP3S]
-B- Disable the service
[SMTP]
-Sl Enable SMTP logging.
-Sp 50025 Set SMTP server port (if you change this you must know what you're doing).
-SX 2 Set the maximum number of threads for SMTP server.
[SMTPS]
-X- Disable the service.
[SMAIL]
-Ql Enable SMAIL logging.
-Qn 1 Set the number of mailer threads.
[PSYNC]
-Yi 1 Set external POP3 accounts sync interval. Setting this to zero will disable the PSYNC task. Default 120.
-Yl Enable PSYNC logging.
-Yt 1 Set the number of POP3 sync threads.
[FINGER]
-Fl Enable FINGER logging.
-Fp 50 Set FINGER server port (if you change this you must know what you're doing).
[CTRL]
-Cl Enable CTRL logging.
-CX 2 Set the maximum number of threads for CTRL server.
[LMAIL]
-Ln 1 Set the number of local mailer threads.
-Ll Enable local mail logging.
Source(s): PhpXMail solutions
Adding a new Domain and Users
NOTE: The « xmailserver.test » domain is not always available.
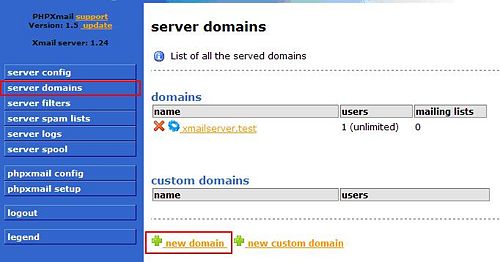
We assume that you have a Domain name (e.g. mydomain.com) and you will redirect the mails to your server (see Few words about Domain and MX Record).

NOTE: I have experienced crash at this step. If so, delete the domain and retry.
Source(s): PhpXMail solutions
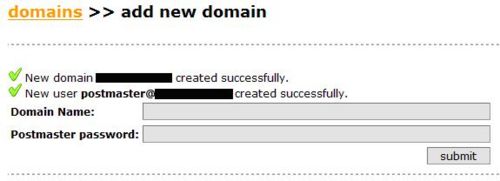
By a click on the “server domains” button we can check the setting for our new domains.
A click on our new domain enables us to verify that the “postmaster” account has been created.
Source(s): PhpXMail solutions
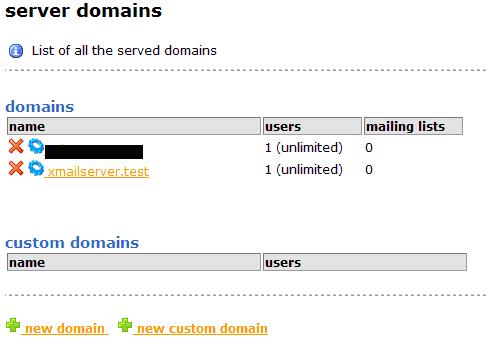
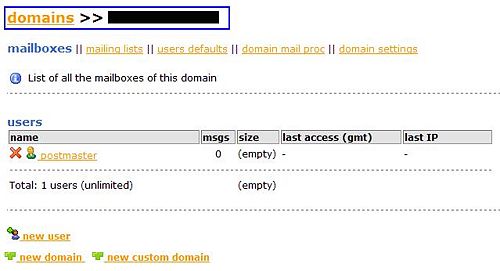
=> NOW: add the user mailboxes that you need.
Trick: Use the navigation bar (blue rectangle) to go back and navigate
Source(s): PhpXMail solutions
Troubleshooting
If you cannot create Domain and/or account or the postmaster account is not created, here are the possible solutions:
- phpXMail tends to crash (even more when the permissions are not correct) so, apply the “chmod –R 777 phpxmail” command (at least to see how it will go)
- When crashes occur, part of the command may be executed leaving the installation into an unstable state. Please delete (red cross) the account/domain and redo the process.
Source(s): PhpXMail solutions
XMail server configuration
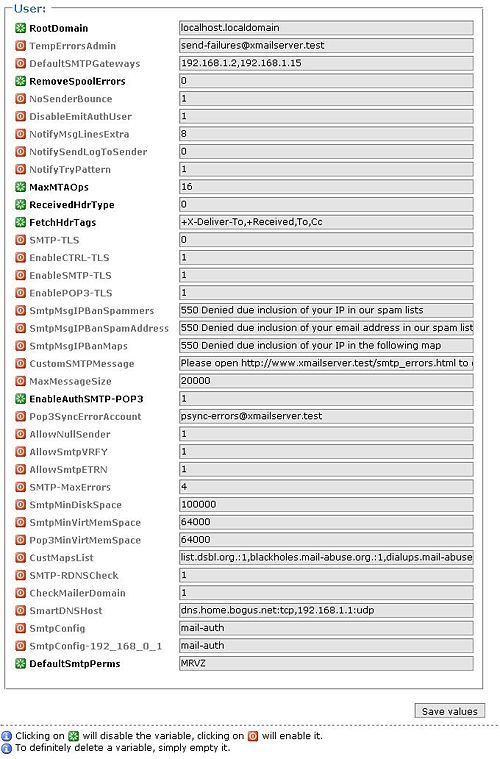
1. Click on the server config on phpXMail interface:
2. With XDove on QNAP there is no need to change the default parameters.
Source(s): PhpXMail solutions
3. You may want to use your ISP as DefautlSMTPgateways (eg. smtp.aol.com) to route your mails instead of XMail. In order to do so, you must:
- Remove the port forwarding from 50025 and set it to 25 (ISP use default port 25 for SMTP - Please check with your ISP)
- Check that your ISP has enabled the outgoing SMTP (port 25).
4. To avoid too much SPAM, you can enable (remove # in front of the line in the XDove/xmail/var/MailRoot/ server.tab file or press the * opposite to in the PHPXMail interface). Nevertheless, because it is better to check your server against open relay (see Security section), and spammers have changed theirs methods, most of these servers have gone.
- CustMapsList
- and fill it with (I have checked the availability of these spam lists as of Dec 22nd, 2008):
- blackholes.mail-abuse.org.:1,dialups.mail-abuse.org.:0
Source(s): PhpXMail solutions
Few words about "Security"
When you choose to route your mails with XMail instead of using your ISP SMTP, you are more exposed to spammers.
Spammers may try to use your XMail SMTP server as a SMTP relay.
To avoid your mail system to become an opened relay and to take the risk to get your IP address blacklisted as a spammer yourself, you need to run few checks.
- Limit the use to the scope of your subnetwork. This can be set into /var/MailRoot/smtprelay.tab.
My recommendation is to empty this file. Nevertheless it can be left with "127.0.0.1"[TAB]"255.0.0.0" - Do not enable mail-auth in the server config. In /var/MailRoot/server.tab the line shall be commented #"SmtpConfig"[TAB]"mail-auth"
- Check/var/MailRoot/smtp.ipmap.tab to be "0.0.0.0"[TAB]"0.0.0.0"[TAB]"ALLOW"[TAB]"1"[NEWLINE]
- Restart your XMail server
Now, it can be a good thing to check for security breaches.
You can test your mail server at [http://www.abuse.net/relay.html]
Source(s): PhpXMail solutions
POP3 attacks
Shall your mail server suffers from POP3 attacks such as a bot trying several accounts with login failure (e.g. ELOGIN in the Pop3 Server log records) the easiest way to discourage it is to enable a password login failure timeout that is doubled each time. Just add -Pw 180 in the command line where 180 stands for a 3 minutes delay before retry is allowed.
More about XMail command line parameters can be fount at here
Source(s): PhpXMail solutions
[OPTIONAL] Advanced XMail server configuration
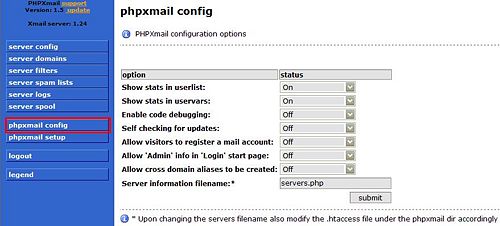
1- Setup accesses to PHPXMail.
Only administrator may access the full PHPXMail interface.
Users can only change their password.
2- Start, check if the XMail server is running and stop it
Console: # ps –ax | grep-i xmail
Will return something like :
- 16383 xmail 704 S /usr/bin/XMail -X- -B- -Mr 24 -SX 2 -Qn 1 -Yt 1 -Yi 1 -Ln 1 -PX 1 -CX 2 -Ph -Ql -Sl -Pl -Yl -Fl -Cl -Ll -Sp 50025 -Pp 50110 -Fp 50
XMail checks every second (-Yi 1), the SMTP port is 50025 (-Sp 50025) and the POP port is 50110 (-Pp 50110)
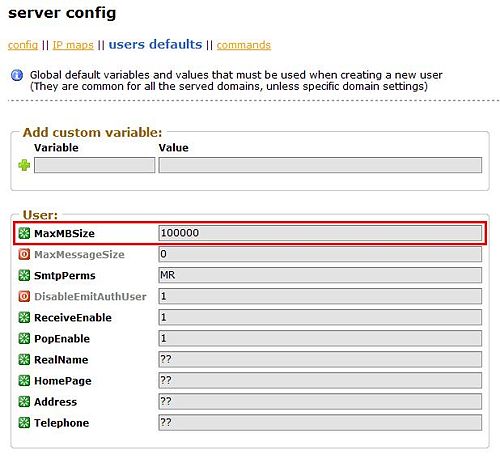
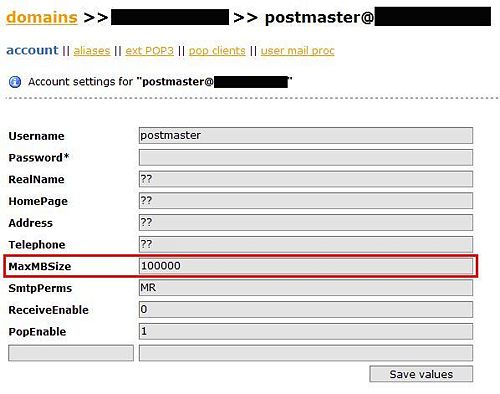
3- Increase the mailboxes maximum size
a) By default for all new accounts (Default mailbox size is set to 10 Mega-Bytes)
b) For a specific, already created account.
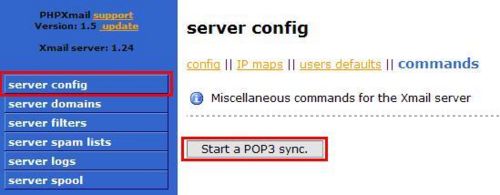
5- Start manually a POP for previously define external mailboxes to collect e-mails.
Source(s): PhpXMail solutions
Back-up your XMail server (data + config)
To backup your mail system you will have to:
=> Save the Configuration and the Data :
- In PHPXMail, the ".qpkg/XDove/phpxmail/servers.php" file
- in XMail, the directory ".qpkg./XDove/xmail/var/MailRoot/" but the/spool subdirectory
- in RoundCube, the 2 files in ".qpkg./XDove/roundcube/config/" db.inc.php & main.inc.php as well as the MySQL database (using phpMyAdmin for example)
- in UebiMiau, the ".qpkg./XDove/uebimiau/inc/config/" and “.qpkg./XDove/uebimiau/database/" directories but the /cache_templates subdirectory.
- in XDove, the ".qpkg./XDove/xdove/archives/" directory that contains your archives
Refer also to the Wiki page XMail Backup & Restore
WARNING: If you are using a Microsoft Windows based backup application you may encounter problems due to directory recursiveness that may been introduced by the linux symbolic links.
Source(s): PhpXMail solutions
POP external mailboxes into your user account
Click on the mail account to collect the “external POP” and click on “new POP3”.

The remote username is the fully qualified (username@domainename) of the remote account to pop.
The pop3 server is the remote server from a provider.
The password is the one to access your remote mailbox.
For authentication use APOP, if the server supports it, otherwise CLR. (CLR transfers the password in cleartext, whereas APOP uses a MD5-hash of the password)
WARNING:
There may be problems with some accounts: HOTMAIL: You cannot download directly from Hotmail into XDove for free. (You have to register to a 3rd party to do it) GMAIL: It requires authentication (but I have not yet succeeded)
Source(s): PhpXMail solutions
You can activate (enable) or not this remote pop configuration. This is useful to keep the configuration but put it on hold.
=> For other options about phpXMail, please have a look on the XMail forums
Source(s): PhpXMail solutions
Changing XMail & PHPXMail Admin Password
With the XDove interface
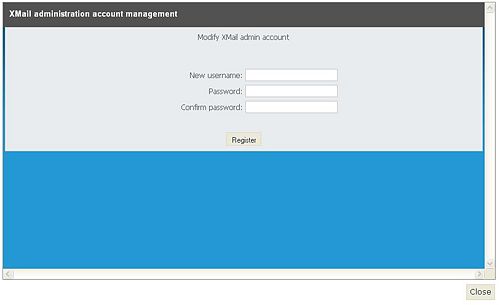
In the XDove interface, select XDove Mail administration then under XMail POP/ESMTP server click on Change XMail password. This will pop-up a window to enter the new username and password. Password lenght by default must be longer than 5 characters.
You may also use the second page of the Quick Start Assistant (QSA) to change the password. Submit the page and close the QSA.
Source(s): PhpXMail solutions
Source(s): PhpXMail solutions
Manually
1- Delete “<your_nas>/Qweb/phpxmail/servers.php” file et re-enter the server parameters with new login username and password (simply access the PHPXMail page that will go into install again)
- NAS_NAME 192.168.xxx.xxx 6017 admin 15041616120a1701 0
- Each field is separated by a tabulation
2- in “<your_nas>/.qpkg/XDove/xmail/var/MailRoot/ctrlaccounts.tab” replace the ID and PWD fields with those from in “Qweb\phpxmail/servers.php”
- "admin" "15041616120a1701"
- Each field is separated by a tabulation
15041616120a1701 is the encrypted default value "password".
NOTE: if the ctrlaccounts.tab file is not visible in the directory under Windows file explorer, disable in the Windows file explorer options the hiding of system files as mentioned above.
Source(s): PhpXMail solutions
Changing Mailbox user Password
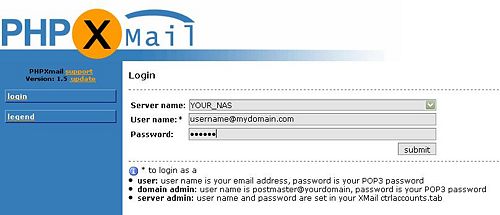
Each user is entitled to connect to "<your_nas>/Qweb/phpxmail/" to change his/her password.
The user shall logon using his/her username@domain_name and password.
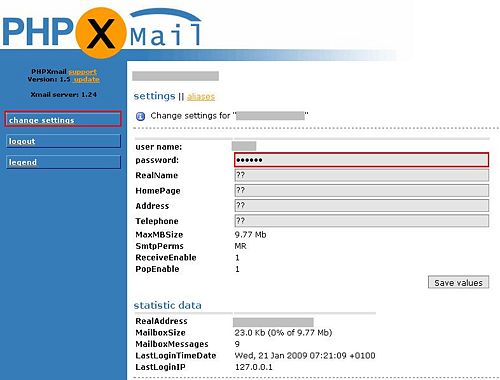
Click on change settings top access the parameters screen. Each user can also add personal information to his/her mail account.
Some statistics regarding the mailbox uses are also displayed.
Source(s): PhpXMail solutions