Filesystem not clean: Difference between revisions
No edit summary |
mNo edit summary |
||
| Line 7: | Line 7: | ||
---- | ---- | ||
There are two series of NAS, legacy and | There are two series of NAS, legacy and HAL models and there are some differences in the web GUI of the storage management. You can refer to below screenshots to find the proper one for you. | ||
[Legacy model] | [Legacy model]<br/>TS-110, TS-112, TS-112P, TS-119, TS-119P+, TS-119P II, TS-120, TS-121,<br/>TS-210, TS-212, TS-212-E, TS-212P, TS-219, TS-219P, TS-219P+, TS-219P II, TS-220, TS-221, TS-239 Pro, TS-239 Pro II, TS-239 Pro II+, TS-259 Pro, TS-259 Pro+, HS-210, TS-269H,<br/>TS-410, TS-410U, TS-412, TS-412U, TS-419P, TS-419P+, TS-419P II, TS-419U, TS-419U+, TS-419U II, TS-420, TS-420U, TS-421, TS-421U, TS-439 Pro, TS-439 Pro II, TS-439 Pro II+, TS-439U-RP/SP, TS-459 Pro, TS-459 Pro II, TS-459 Pro+, TS-459U-RP/SP, TS-459U-RP+/SP+,<br/>TS-509 Pro, TS-559 Pro, TS-559 Pro+, TS-559 Pro II,<br/>TS-639 Pro, TS-659 Pro, TS-659 Pro+, TS-659 Pro II,<br/>TS-809 Pro, TS-809U-RP, TS-859 Pro, TS-859U-RP+, TS-859 Pro+, TS-859U-RP, SS-439 Pro, SS-839 Pro<br/><br/>Please login QTS web page and go to Control Panel --> System Settings --> Storage Management --> Volume Management. Click on [Check File System] button to start the file system check.<br/>[[File:Fscheck legacy.png|858x313px|Fscheck legacy.png]] | ||
<br/>[HAL model]<br/>( TS-131, TS-128, TS-231, TS-231+, TS-251, TS-251+, HS-251, HS-251+, TS-253A, TS-253 Pro, TS-251C, TS-269L, TS-269 Pro, TS-228, TS-431, TS-431U, TS-431+, TS-451, TS-451+, TS-451S, TS-451U, TS-453A, TS-453S Pro, TS-453 Pro, TS-463U, TS-463U-RP, TS-469 Pro, TS-469L, TS-469U-RP, TS-469U-SP, TS-470, TS-470U-RP, TS-470U-SP, TS-470 Pro, TVS-463, TVS-471, TVS-471U, TVS-471U-RP, TS-453U, TS-453U-RP, TS-453mini, IS-453S, TS-569 Pro, TS-569L, TS-563, TS-651, TS-653A, TS-653 Pro, TS-669 Pro, TS-669L, TS-670 Pro, TS-670, TVS-663, TVS-671, TS-851, TS-853A , TS-853 Pro, TS-853S Pro, TS-853U, TS-853U-RP, TS-863U, TS-863U-RP, TS-869 Pro, TS-869L, TS-869U-RP, TS-870 Pro, TS-870, TS-870U-RP, TS-879 Pro, TS-879U-RP, TVS-EC880, TVS-871, TVS-871U-RP, TVS-863, TVS-863+, TS-EC880U-RP, TS-EC880 Pro, TS-EC879U-RP, TS-1079 Pro, TVS-EC1080+, TVS-EC1080, TS-EC1080 Pro, TS-1253U, TS-1253U-RP, TS-1263U, TS-1263U-RP, TS-1269U-RP, TS-1270U-RP, TVS-1271U-RP, TS-1279U-RP, TS-EC1279U-RP, TS-EC1279U-SAS-RP, SS-EC1279U-SAS-RP, TS-EC1280U-RP, TVS-EC1280U-SAS-RP, TVS-EC1580U-SAS-RP, TS-1679U-RP, TS-EC1679U-RP, TS-EC1679U-SAS-RP, TS-EC1680U-RP, TVS-EC1680U-SAS-RP, SS-EC1879U-SAS-RP, SS-EC2479U-SAS-RP, TS-EC2480U-RP, TVS-EC2480U-SAS-RP<br/><br/>Please login QTS web page and go to Control Panel --> System Settings --> Storage Management --> Storage Space. At the right panel, please click on the storage pool to expand it. Select on the data volume and click [Manage] button. It will popup the data volume management dialog. Click [Actions] button and select '''Check File System''' to start the file system check.<br/>[[File:Fscheck hal.png|849x397px|Fscheck hal.png]] | |||
<br/> | |||
Please login QTS web page and go to Control Panel --> System Settings --> Storage Management --> Storage Space. At the right panel, please click on the storage pool to expand it. Select on the data volume and click [Manage] button. It will popup the data volume management dialog. Click [Actions] button and select '''Check File System''' to start the file system check.<br/>[[File:Fscheck hal.png|849x397px|Fscheck hal.png]] | |||
Revision as of 13:52, 24 December 2015
This message is to notice the user to do the file system check to make sure the data integrity. Generally, it happens when the data volume is not un-mounted properly. It could be:
- The abnormal shutdown or force power off the NAS.
- Some services are not stopped properly during the shutdown.
- Other unexpected cases cause the data volume is not un-mounted properly.
There are two series of NAS, legacy and HAL models and there are some differences in the web GUI of the storage management. You can refer to below screenshots to find the proper one for you.
[Legacy model]
TS-110, TS-112, TS-112P, TS-119, TS-119P+, TS-119P II, TS-120, TS-121,
TS-210, TS-212, TS-212-E, TS-212P, TS-219, TS-219P, TS-219P+, TS-219P II, TS-220, TS-221, TS-239 Pro, TS-239 Pro II, TS-239 Pro II+, TS-259 Pro, TS-259 Pro+, HS-210, TS-269H,
TS-410, TS-410U, TS-412, TS-412U, TS-419P, TS-419P+, TS-419P II, TS-419U, TS-419U+, TS-419U II, TS-420, TS-420U, TS-421, TS-421U, TS-439 Pro, TS-439 Pro II, TS-439 Pro II+, TS-439U-RP/SP, TS-459 Pro, TS-459 Pro II, TS-459 Pro+, TS-459U-RP/SP, TS-459U-RP+/SP+,
TS-509 Pro, TS-559 Pro, TS-559 Pro+, TS-559 Pro II,
TS-639 Pro, TS-659 Pro, TS-659 Pro+, TS-659 Pro II,
TS-809 Pro, TS-809U-RP, TS-859 Pro, TS-859U-RP+, TS-859 Pro+, TS-859U-RP, SS-439 Pro, SS-839 Pro
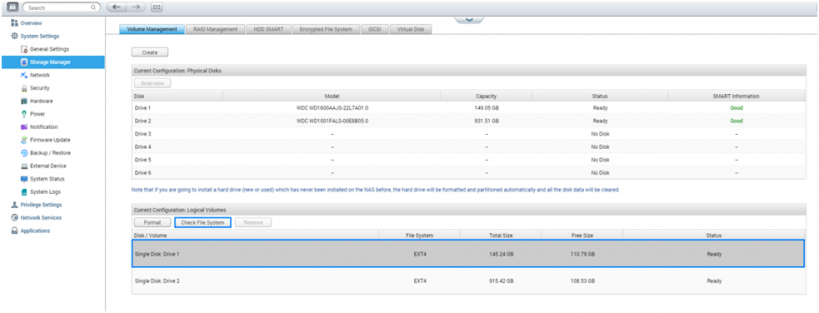
Please login QTS web page and go to Control Panel --> System Settings --> Storage Management --> Volume Management. Click on [Check File System] button to start the file system check.
[HAL model]
( TS-131, TS-128, TS-231, TS-231+, TS-251, TS-251+, HS-251, HS-251+, TS-253A, TS-253 Pro, TS-251C, TS-269L, TS-269 Pro, TS-228, TS-431, TS-431U, TS-431+, TS-451, TS-451+, TS-451S, TS-451U, TS-453A, TS-453S Pro, TS-453 Pro, TS-463U, TS-463U-RP, TS-469 Pro, TS-469L, TS-469U-RP, TS-469U-SP, TS-470, TS-470U-RP, TS-470U-SP, TS-470 Pro, TVS-463, TVS-471, TVS-471U, TVS-471U-RP, TS-453U, TS-453U-RP, TS-453mini, IS-453S, TS-569 Pro, TS-569L, TS-563, TS-651, TS-653A, TS-653 Pro, TS-669 Pro, TS-669L, TS-670 Pro, TS-670, TVS-663, TVS-671, TS-851, TS-853A , TS-853 Pro, TS-853S Pro, TS-853U, TS-853U-RP, TS-863U, TS-863U-RP, TS-869 Pro, TS-869L, TS-869U-RP, TS-870 Pro, TS-870, TS-870U-RP, TS-879 Pro, TS-879U-RP, TVS-EC880, TVS-871, TVS-871U-RP, TVS-863, TVS-863+, TS-EC880U-RP, TS-EC880 Pro, TS-EC879U-RP, TS-1079 Pro, TVS-EC1080+, TVS-EC1080, TS-EC1080 Pro, TS-1253U, TS-1253U-RP, TS-1263U, TS-1263U-RP, TS-1269U-RP, TS-1270U-RP, TVS-1271U-RP, TS-1279U-RP, TS-EC1279U-RP, TS-EC1279U-SAS-RP, SS-EC1279U-SAS-RP, TS-EC1280U-RP, TVS-EC1280U-SAS-RP, TVS-EC1580U-SAS-RP, TS-1679U-RP, TS-EC1679U-RP, TS-EC1679U-SAS-RP, TS-EC1680U-RP, TVS-EC1680U-SAS-RP, SS-EC1879U-SAS-RP, SS-EC2479U-SAS-RP, TS-EC2480U-RP, TVS-EC2480U-SAS-RP
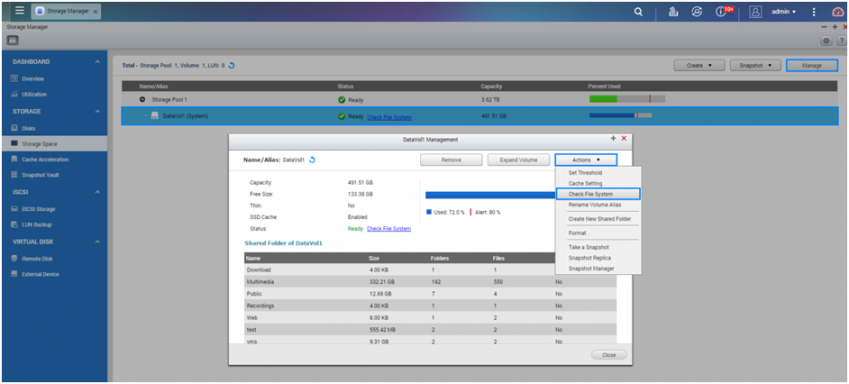
Please login QTS web page and go to Control Panel --> System Settings --> Storage Management --> Storage Space. At the right panel, please click on the storage pool to expand it. Select on the data volume and click [Manage] button. It will popup the data volume management dialog. Click [Actions] button and select Check File System to start the file system check.
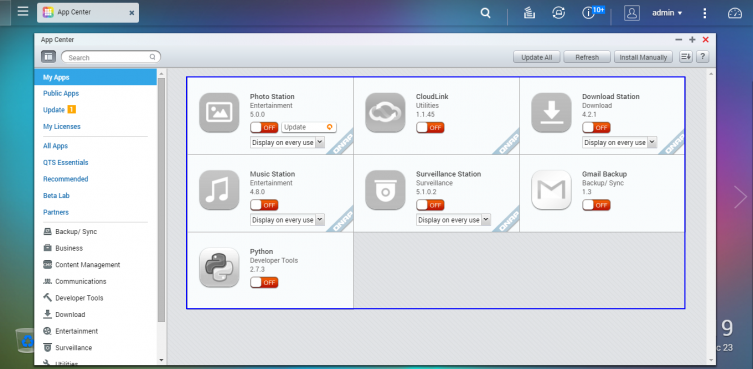
If you encountered problems to run the filesystem check, like failed to umount volume, you may try to stop all qpkg services in AppCenter like below.
Then run the filesystem check again.
In addition, if you encounter this issue every time after rebooting the NAS, you may try to install Qumount QPKG application in AppCenter.
Below is the link for the download:
http://eu1.qnap.com/Storage/tsd/utility/Qumount_0.2.zip
If you still have the same issue after the file system check and reboot properly, you can report the issue with below link.
https://www.qnap.com/i/en/before_buy/con_show.php?op=showone&cid=2