MLDonkey Installation: Difference between revisions
m 1 revision imported |
No edit summary |
||
| Line 1: | Line 1: | ||
== What is MLDonkey? | == What is MLDonkey? == | ||
MLDonkey is a door to the ''''donkey'''' world (on Windows it's normally called '''eMule'''), a multi-network, multi-platform open source P2P application used to exchange big files on the Internet and present most features of the basic Windows donkey client (eMule client) and additionally supports overnet, fasttrack, bittorrent and gnutella protocols (and more)! So how does it work with QNAP NAS? Take a look at the scenario below: | MLDonkey is a door to the ''''donkey'''' world (on Windows it's normally called '''eMule'''), a multi-network, multi-platform open source P2P application used to exchange big files on the Internet and present most features of the basic Windows donkey client (eMule client) and additionally supports overnet, fasttrack, bittorrent and gnutella protocols (and more)! So how does it work with QNAP NAS? Take a look at the scenario below: | ||
[[ | [[File:Mldonkey-topology.jpg|thumb|none|550px|Mldonkey-topology.jpg]] | ||
Below's the installation guide and basic usage for MLDonkey on QNAP NAS using QPKG software package. '''Please note that firmware version 2.1.0 build 0530 onwards is required.''' | |||
#Go to administration web login - Applications - QPKG Center and click on the AVAILABLE tab. | |||
#Find MLDonkey and click on the "Install" link (on the right side). | == Step 1 - Install & Start MLDonkey via QPKG Platform == | ||
#Scroll up and click on the INSTALLED tab. | |||
=== New GUI === | |||
#Go to administration web login - Applications - QPKG Center and click on the AVAILABLE tab. | |||
#Find MLDonkey and click on the "Install" link (on the right side). | |||
#Scroll up and click on the INSTALLED tab. | |||
#Find MLDonkey and click on the "Enable" link. | #Find MLDonkey and click on the "Enable" link. | ||
Please note that the default username and password for MLDonkey is admin/admin. | Please note that the default username and password for MLDonkey is admin/admin. | ||
Before you start using MLDonkey you will have to forward 2 ports for incoming connections from other clients in order to gain better connection rate. QNAP has default this port to 15000 (TCP) and 15004 (UDP), and users should ensure forwarding both ports on your router to the internal IP address of your NAS that's running the MLDonkey. If you are unsure whether or not these ports are forwarded properly you may go to [http://tdn.no-ip.org/connection_test this site] and enter your WAN IP to test them. | Before you start using MLDonkey you will have to forward 2 ports for incoming connections from other clients in order to gain better connection rate. QNAP has default this port to 15000 (TCP) and 15004 (UDP), and users should ensure forwarding both ports on your router to the internal IP address of your NAS that's running the MLDonkey. If you are unsure whether or not these ports are forwarded properly you may go to [http://tdn.no-ip.org/connection_test this site] and enter your WAN IP to test them. | ||
=== Old GUI | === Old GUI === | ||
Go to ''''System Tools'''' - | Go to ''''System Tools'''' -> ''''QPKG'''' and click on button ''''Get QPKG'''' to get a list a currently available software packages. | ||
[[ | [[File:Mldonkey-01.jpg|thumb|none|320px|Mldonkey-01.jpg]] | ||
Once downloaded first unzip the file archive then go to ''''System Tools'''' -> ''''System Update'''' and install the mldonkey.qpkg file the same way as if you were updating the system firmware. | |||
[[File:Mldonkey-02.jpg|thumb|none|320px|Mldonkey-02.jpg]] | |||
Upon successful installation you should see a QPKG entry like the screen below. Now click 'Enable' to start the MLDonkey service. Once you see the status becomes ''''Enabled'''' you may continue to the next step. Please note that '''the default username and password for MLDonkey is admin/admin'''. | |||
[[File:Mldonkey-03.jpg|thumb|none|320px|Mldonkey-03.jpg]] | |||
Before you start using MLDonkey you will have to forward 2 ports for incoming connections from other clients in order to gain better connection rate. QNAP has default this port to '''15000 (TCP)''' and '''15004 (UDP)''', and users should ensure forwarding both ports on your router to the internal IP address of your NAS that's running the MLDonkey. If you are unsure whether or not these ports are forwarded properly you may go to [http://tdn.no-ip.org/connection_test this site] and enter your WAN IP to test them. | |||
*Windows [http://sancho-gui.sourceforge.net/files/1bbl3y03zixuj/sancho-0.9.4-58-win32-java.exe here], | |||
*Linux [http://sancho-gui.sourceforge.net/files/1bbl3y03zixuj/sancho-0.9.4-58-linux-gtk-java.sh here]. | |||
== Step 2 - Download, Install & Configure Sancho == | |||
Download the latest stable version (0.9.4-58 at the time of writing) for: | |||
*Windows [http://sancho-gui.sourceforge.net/files/1bbl3y03zixuj/sancho-0.9.4-58-win32-java.exe here], | |||
*Linux [http://sancho-gui.sourceforge.net/files/1bbl3y03zixuj/sancho-0.9.4-58-linux-gtk-java.sh here]. | |||
*Mac [http://sancho-gui.sourceforge.net/files/1bbl3y03zixuj/sancho-0.9.4-58-macosx-carbon-java.zip here] and [http://www.mac-how.net/ here]. | *Mac [http://sancho-gui.sourceforge.net/files/1bbl3y03zixuj/sancho-0.9.4-58-macosx-carbon-java.zip here] and [http://www.mac-how.net/ here]. | ||
(The guide below will mainly be based on Windows installation) | (The guide below will mainly be based on Windows installation) | ||
Once downloaded double-click the setup file and install as normal Windows software installation. After successful installation start the program and first of all you will be taken through a few steps for configuration. Now you should see a setup screen like below. Click on ''''Next'''' to continue. | |||
[[File:Mldonkey-04.jpg|thumb|none|320px|Mldonkey-04.jpg]] | |||
Simple ingore this step and hit 'Next' to continue. | |||
[[File:Mldonkey-05.jpg|thumb|none|320px|Mldonkey-05.jpg]] | |||
<br/>Configure the required settings according to the suggestions in red. | |||
[[File:Mldonkey-06.jpg|thumb|none|320px|Mldonkey-06.jpg]] | |||
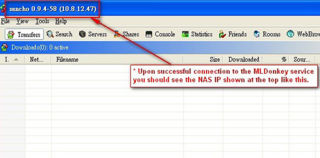
<br> | <br/>If you can see the NAS IP address at the top you are now connected to the MLDonkey. | ||
[[File:Mldonkey-07.jpg|thumb|none|320px|Mldonkey-07.jpg]] | |||
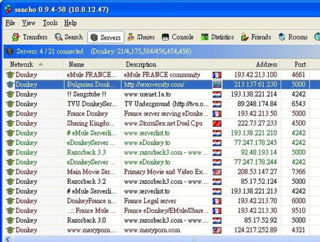
Now go to the 'Servers' tab, you need to connect to some servers if it did not do it for you automatically. | |||
[[File:Mldonkey-08.jpg|thumb|none|320px|Mldonkey-08.jpg]] | |||
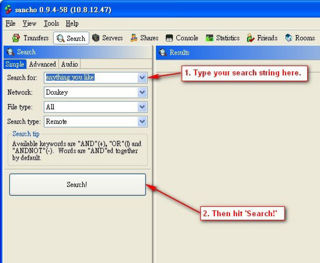
You may now fire some searches and start filling up your 'Transfer' list. | |||
[[File:Mldonkey-09.jpg|thumb|none|320px|Mldonkey-09.jpg]] | |||
If you reach this step successfully, Congratulations! You've just turned your NAS into eMule/eDonkey downloader! You may shut down your PCs at any time for the same purpose. | |||
[[File:Mldonkey-10.jpg|thumb|none|Mldonkey-10.jpg]] | |||
= [Howto] Manually update QPKG to MLDonkey 3.X.X (x86 version) = | |||
The info comes from these threads: [http://forum.qnap.com/viewtopic.php?f=122&t=40036 http://forum.qnap.com/viewtopic.php?f=122&t=40036] and [http://forum.qnap.com/viewtopic.php?f=122&t=46389 http://forum.qnap.com/viewtopic.php?f=122&t=46389] | |||
"x86 version" means that your unit has an Intel processor. | |||
== | == Binaries == | ||
=== Binary for the x86 version of 3.1.5 === | |||
If you just want the mlnet 3.1.5 binary for the x86 version, you can get it from here: [http://wiki.qnap.com/w/images/3/3a/Mlnet3.1.5.tar.gz http://wiki.qnap.com/w/images/3/3a/Mlnet3.1.5.tar.gz] I use putty (tool for Windows, for more info, see last post here: [http://forum.qnap.com/viewtopic.php?f=91&t=5460#p26971 viewtopic.php?f=91&t=5460#p26971] ), but any similar tool works. I did more or less like this: | |||
First close down old MLDonkey (maybe "Disable" via the GUI on the administration web login), then: | |||
<br/><code>cd /opt/tmp/<br/>wget [http://wiki.qnap.com/w/images/3/3a/Mlnet3.1.5.tar.gz http://wiki.qnap.com/w/images/3/3a/Mlnet3.1.5.tar.gz]<br/>tar xvfz Mlnet3.1.5.tar.gz<br/>mv /share/MD0_DATA/.qpkg/MLDonkey/mlnet /share/MD0_DATA/.qpkg/MLDonkey/mlnet.old.3.1.3<br/>cp /opt/tmp/mlnet /share/MD0_DATA/.qpkg/MLDonkey/</code> | |||
Now you can start the new MLDonkey (maybe "Enable" via the GUI on the administration web login). | |||
=== Binary for the x86 version of 3.1.3 === | |||
If you just want the mlnet 3.1.3 binary for the x86 version, you can get it from here: [http://wiki.qnap.com/w/images/c/c5/Mlnet3.1.3.tar.gz http://wiki.qnap.com/w/images/c/c5/Mlnet3.1.3.tar.gz] I use putty (tool for Windows, for more info, see last post here: [http://forum.qnap.com/viewtopic.php?f=91&t=5460#p26971 viewtopic.php?f=91&t=5460#p26971] ), but any similar tool works. I did more or less like this: First close down old MLDonkey (maybe "Disable" via the GUI on the administration web login), then: | |||
<br/><code>cd /opt/tmp/<br/>wget [http://wiki.qnap.com/w/images/c/c5/Mlnet3.1.3.tar.gz http://wiki.qnap.com/w/images/c/c5/Mlnet3.1.3.tar.gz]<br/>tar xvfz Mlnet3.1.3.tar.gz<br/>mv /share/MD0_DATA/.qpkg/MLDonkey/mlnet /share/MD0_DATA/.qpkg/MLDonkey/mlnet.old<br/>cp /opt/tmp/mlnet /share/MD0_DATA/.qpkg/MLDonkey/</code> | |||
Now you can start the new MLDonkey (maybe "Enable" via the GUI on the administration web login). | |||
=== Binaries and libs for the x86 version of 3.0.7 === | |||
If you just want the mlnet 3.0.7 binaries and libs for the x86 version, you can get them from internaut19 (Cristian) here [http://forum.qnap.com/viewtopic.php?f=122&t=40036&start=15#p203075 http://forum.qnap.com/viewtopic.php?f=122&t=40036&start=15#p203075] The only file I used was the mlnet file. I renamed the old one and copied the new one to same folder, and all worked well. I use putty (tool for Windows, for more info, see last post here: [http://forum.qnap.com/viewtopic.php?f=91&t=5460#p26971 viewtopic.php?f=91&t=5460#p26971] ), but any similar tool works. I did more or less like this: First close down old MLDonkey (maybe "Disable" via the GUI on the administration web login), then: | |||
<code>cd /opt/tmp/<br/>wget [http://db.tt/qzFIvAp http://db.tt/qzFIvAp]<br/>tar -xvf archive.tgz<br/>mv /share/MD0_DATA/.qpkg/MLDonkey/mlnet /share/MD0_DATA/.qpkg/MLDonkey/mlnet.old<br/>cp /opt/tmp/mldonkey/bin/mlnet /share/MD0_DATA/.qpkg/MLDonkey/</code> | |||
You need Optware/IPKG<br>a. Go to administration web login and go to Applications - QPKG Center and install Optware, also read http://wiki.qnap.com/wiki/Install_Optware_IPKG<br>b. Don't forget to enable Optware in administration web login - Applications - QPKG Center (click 'Enable' ) after installation and then restart the NAS. If you have not restarted, you need at least to do | |||
Now you can start the new MLDonkey (maybe "Enable" via the GUI on the administration web login). | |||
== Manually update to 3.0.7, 3.1.0, 3.1.3 or 3.1.5 == | |||
I think these are the steps to compile (so far). All thanks to '''internaut19 (Cristian)''' and '''denis.gz''' . | |||
=== 0. At least install original 3.1.0 (or 3.0.0) MLdonkey (& Optware/IPKG via QPKG): === | |||
You need Optware/IPKG<br/>a. Go to administration web login and go to Applications - QPKG Center and install Optware, also read [http://wiki.qnap.com/wiki/Install_Optware_IPKG http://wiki.qnap.com/wiki/Install_Optware_IPKG]<br/>b. Don't forget to enable Optware in administration web login - Applications - QPKG Center (click 'Enable' ) after installation and then restart the NAS. If you have not restarted, you need at least to do | |||
<pre>PATH=$PATH:/opt/bin:/opt/sbin | <pre>PATH=$PATH:/opt/bin:/opt/sbin | ||
</pre> | </pre> | ||
And you need at least the old 3.1.0 installed (or 3.0.0) from QPKG Plugins. Log in to the GUI on the administration web login and go to Applications - QPKG Plugins - Get QPKG and install MLDonkey. Read more about this above (maybe start from http://wiki.qnap.com/wiki/MLDonkey_Installation#Step_1_-_Install_.26.C2.A0Start_MLDonkey.C2.A0via_QPKG_Platform ) | |||
And you need at least the old 3.1.0 installed (or 3.0.0) from QPKG Plugins. Log in to the GUI on the administration web login and go to Applications - QPKG Plugins - Get QPKG and install MLDonkey. Read more about this above (maybe start from [http://wiki.qnap.com/wiki/MLDonkey_Installation#Step_1_-_Install_.26.C2.A0Start_MLDonkey.C2.A0via_QPKG_Platform http://wiki.qnap.com/wiki/MLDonkey_Installation#Step_1_-_Install_.26.C2.A0Start_MLDonkey.C2.A0via_QPKG_Platform] ) | |||
=== 1. Read here to get some background info: === | |||
First, read [http://mldonkey.sourceforge.net/OfficialFaq#Building_mldonkey http://mldonkey.sourceforge.net/OfficialFaq#Building_mldonkey] for more info about compiling MLDonkey. | |||
=== 2. Install stuff we need === | |||
Remember, first you need both MLdonkey & Optware/IPKG via QPKG, see "'''0. At least install original 3.1.0 (or 3.0.0) MLdonkey & Optware/IPKG via QPKG'''" above | |||
With putty (tool for Windows, for more info, see last post here: [http://forum.qnap.com/viewtopic.php?f=91&t=5460#p26971 viewtopic.php?f=91&t=5460#p26971] ), or similar tool, go to /opt/tmp (or similar folder or create it with <code>mkdir /opt/tmp</code> ) and install stuff | |||
<code>cd /opt/tmp<br/>ipkg update<br/>ipkg install sed<br/>ipkg install grep<br/>ipkg install zlib<br/>ipkg install bzip2<br/>ipkg install gawk<br/>ipkg install optware-devel</code> | |||
=== 3. Get MLDonkey source === | |||
'''Examples''' | |||
'''Get the source with your computer''' | |||
Get MLDonkey source mldonkey-3.x.x.tar.bz2 from [http://sourceforge.net/projects/mldonkey/files/ http://sourceforge.net/projects/mldonkey/files/] , maybe like this: | |||
''' | #Download the file to your computer (or maybe download directly to the shared folder 'Public' (e.g. same as /share/Public) on your Qnap device). | ||
#Copy the file to your Qnap device, maybe to the shared folder 'Public' (e.g. same as /share/Public). | |||
#On your Qnap device, you move the file to your 'working' folder (so it's easier to delete all littering files when your are done). E.g. do something like this:<br/><br/><code>mv /share/Public/mldonkey-3.1.5.tar.bz2 /opt/tmp</code> | |||
'''Get the source with your | <br/>If you want to check if you got the file to the right place, you can use 'ls -la', like this: | ||
<blockquote><code>[~] # cd /opt/tmp<br/>[/opt/tmp] # ls -la<br/>drwxr-xr-x 2 admin administ 4096 Aug 28 08:08 ./<br/>drwxr-xr-x 19 admin administ 4096 Jul 16 19:46 ../<br/>-rw-r--r-- 1 admin administ 2847382 Mar 22 12:13 mldonkey-3.1.5.tar.bz2<br/>[/opt/tmp] #</code><br/></blockquote> | |||
<br/>'''Get the source with your Qnap device''' | |||
Get MLDonkey source mldonkey-3.x.x.tar.bz2 from http://sourceforge.net/projects/mldonkey/files/ , | Get the MLDonkey source file mldonkey-3.x.x.tar.bz2 from [http://sourceforge.net/projects/mldonkey/files/ http://sourceforge.net/projects/mldonkey/files/] . To see what URL it is to the file, right click on the file URL and copy the link adress. After that you can write 'wget ' and then paste the link into Putty (or whatever you use) by right clicking where the cursor is to download the file. E.g. it will look something like this in putty: | ||
<code>cd /opt/tmp</code><br/><code>wget [http://sourceforge.net/projects/mldonkey/files/mldonkey/3.1.5/mldonkey-3.1.5.tar.bz2/download http://sourceforge.net/projects/mldonkey/files/mldonkey/3.1.5/mldonkey-3.1.5.tar.bz2/download]</code> | |||
<code> | On your screen you will something like this: | ||
<blockquote><code>[/opt/tmp] # wget [http://sourceforge.net/projects/mldonkey/files/mldonkey/3.1.5/mldonkey-3.1.5.tar.bz2/download http://sourceforge.net/projects/mldonkey/files/mldonkey/3.1.5/mldonkey-3.1.5.tar.bz2/download]<br/>--2014-08-28 08:08:43-- [http://sourceforge.net/projects/mldonkey/files/mldonkey/3.1.5/mldonkey-3.1.5.tar.bz2/download http://sourceforge.net/projects/mldonkey/files/mldonkey/3.1.5/mldonkey-3.1.5.tar.bz2/download]<br/>Resolving sourceforge.net... 216.34.181.60<br/>Connecting to sourceforge.net|216.34.181.60|:80... connected.<br/>HTTP request sent, awaiting response... 302 Found<br/>Location: [http://downloads.sourceforge.net/project/mldonkey/mldonkey/3.1.5/mldonkey-3.1.5.tar.bz2?r=&ts=1409206127&use_mirror=cznic http://downloads.sourceforge.net/project/mldonkey/mldonkey/3.1.5/mldonkey-3.1.5.tar.bz2?r=&ts=1409206127&use_mirror=cznic] [following]<br/>--2014-08-28 08:08:44-- [http://downloads.sourceforge.net/project/mldonkey/mldonkey/3.1.5/mldonkey-3.1.5.tar.bz2?r=&ts=1409206127&use_mirror=cznic http://downloads.sourceforge.net/project/mldonkey/mldonkey/3.1.5/mldonkey-3.1.5.tar.bz2?r=&ts=1409206127&use_mirror=cznic]<br/>Resolving downloads.sourceforge.net... 216.34.181.59<br/>Connecting to downloads.sourceforge.net|216.34.181.59|:80... connected.<br/>HTTP request sent, awaiting response... 302 Found<br/>Location: [http://cznic.dl.sourceforge.net/project/mldonkey/mldonkey/3.1.5/mldonkey-3.1.5.tar.bz2 http://cznic.dl.sourceforge.net/project/mldonkey/mldonkey/3.1.5/mldonkey-3.1.5.tar.bz2] [following]<br/>--2014-08-28 08:08:44-- [http://cznic.dl.sourceforge.net/project/mldonkey/mldonkey/3.1.5/mldonkey-3.1.5.tar.bz2 http://cznic.dl.sourceforge.net/project/mldonkey/mldonkey/3.1.5/mldonkey-3.1.5.tar.bz2]<br/>Resolving cznic.dl.sourceforge.net... 217.31.202.30<br/>Connecting to cznic.dl.sourceforge.net|217.31.202.30|:80... connected.<br/>HTTP request sent, awaiting response... 200 OK<br/>Length: 2847382 (2.7M) [application/octet-stream]<br/>Saving to: `mldonkey-3.1.5.tar.bz2' 100%[======================================>] 2,847,382 4.88M/s in 0.6s 2014-08-28 08:08:45 (4.88 MB/s) - `mldonkey-3.1.5.tar.bz2' saved [2847382/2847382]</code></blockquote> | |||
If you want to check if you got the file, you can use 'ls -la', like this: | |||
<blockquote><code>[~] # cd /opt/tmp<br/>[/opt/tmp] # ls -la<br/>drwxr-xr-x 2 admin administ 4096 Aug 28 08:08 ./<br/>drwxr-xr-x 19 admin administ 4096 Jul 16 19:46 ../<br/>-rw-r--r-- 1 admin administ 2847382 Mar 22 12:13 mldonkey-3.1.5.tar.bz2<br/>[/opt/tmp] #</code><br/><br/></blockquote> | |||
=== 4. Unpack and go to MLDonkey folder === | |||
<br> | <code>cd /opt/tmp<br/>tar -xvf mldonkey-3.1.5.tar.bz2<br/>cd mldonkey-3.1.5</code> | ||
=== 5. Hide/remove ocaml === | |||
You want it to install ocaml locally, so you need to remove or hide it. I did | |||
<code>ipkg remove ocaml</code> | |||
=== 6. Configure === | |||
When it asks | |||
<blockquote>"Do you want this script to try to download and install ocaml LOCALLY in mldonkey directory ?"</blockquote> | |||
Answer y ''(and then press [Enter] ;-)'' | |||
<code>cd /opt/tmp/mldonkey-3.1.5<br/>mkdir /share/Public/mldonkey<br/>PATH=/opt/bin:$PATH<br/>./configure --prefix=/share/Public/mldonkey --disable-fasttrack CPPFLAGS="-I/opt/include" LDFLAGS="-L/opt/lib"</code> | |||
< | |||
< | <br/>Now wait... And wait.... | ||
=== 7. Change config file | === 7. Change config file === | ||
Open '''/opt/tmp/mldonkey-3.1.5/config/Makefile.config''' and change | Open '''/opt/tmp/mldonkey-3.1.5/config/Makefile.config''' and change | ||
'''CFLAGS=-g -O2'''<br>to<br>'''CFLAGS=-g -Os''' | '''CFLAGS=-g -O2'''<br/>to<br/>'''CFLAGS=-g -Os''' | ||
and<br>'''CXXFLAGS=-g -O2'''<br>to<br>'''CXXFLAGS=-g -Os''' | and<br/>'''CXXFLAGS=-g -O2'''<br/>to<br/>'''CXXFLAGS=-g -Os''' | ||
Here is some info about editing files, scroll to last post: [http://forum.qnap.com/viewtopic.php?f=88&t=3628#p142945 viewtopic.php?f=88&t=3628#p142945] | |||
=== 8. Compile === | |||
Then you run make (I would say it's optional to run 'make depend' before 'make', but you can do it if you wish) | |||
<code>cd /opt/tmp/mldonkey-3.1.5<br/>make</code> | |||
Now you should have the file '''mlnet '''in '''/opt/tmp/mldonkey-3.1.5''' | |||
=== 9. Use the new mlnet === | |||
Again, you need at least the old 3.1.0 installed (or 3.0.0) from QPKG Plugins.Close down the old MLDonkey (maybe "Disable" via the GUI on the administration web login), rename old mlnet and then copy the new one to the right place | |||
<code>mv /share/MD0_DATA/.qpkg/MLDonkey/mlnet /share/MD0_DATA/.qpkg/MLDonkey/mlnet.old.3.1.3<br/>cp /opt/tmp/mldonkey-3.1.5/mlnet /share/MD0_DATA/.qpkg/MLDonkey/</code> | |||
<br/>Start the new MLDonkey binary (maybe "Enable" via the GUI on the administration web login). You can check the version of MLDonkey with this command in the console: | |||
< | <code>version</code> | ||
= [Howto] Email notification with SSL SMTP = | |||
<br>And change to '''client = yes''' in the global part, so it all looks like this: | In this example I use '''stunnel '''and email via a '''Hotmail '''account (as a 'relay' server) to the email account to where really I want the notifications (mrman@surfnet.com).. | ||
So for the Hotmail account (as a 'relay' server) I use: | |||
<blockquote>SMTP server: smtp.live.com:587<br/>Account to log in on the SMTP: mrtheman@hotmail.com (use your own Hotmail/Live account)<br/>Password: In the picture it looks like ******, but in reality the password will be written i clear text, like: mysecretpassword. So if you are afraid someone will be able to see this password, create a new account that you don't care about.<br/></blockquote> | |||
You can also use a Google account to relay the noticications, I think Googles SMTP server is smtp.gmail.com:465 | |||
Add a smtp part like this in '''/etc/stunnel/stunnel.conf'''<br/><code>[smtp]<br/>accept = 127.0.0.1:55525<br/>connect = smtp.live.com:587<br/>protocol = smtp</code> | |||
<br/>And change to '''client = yes''' in the global part, so it all looks like this: | |||
<pre>; Sample stunnel configuration file by Michal Trojnara 2002-2006 | <pre>; Sample stunnel configuration file by Michal Trojnara 2002-2006 | ||
; Some options used here may not be adequate for your particular configuration | ; Some options used here may not be adequate for your particular configuration | ||
| Line 356: | Line 356: | ||
TIMEOUTconnect = 2 | TIMEOUTconnect = 2 | ||
</pre | </pre> | ||
<br/>In MLdonkey I have this: | |||
[[File:MLDonkeyEmailWithSSL.png|RTENOTITLE]] | |||
Then restart stunnel<br/><code>/etc/init.d/stunnel.sh restart</code> | |||
= External Resource & Links = | |||
[http:// | [http://mldonkey.sourceforge.net/Main_Page Official MLDonkey wiki] | ||
[http://mldonkey.sourceforge.net/ | [http://mldonkey.sourceforge.net/MLdonkeyOptionsExplained MLDonkey options explained] | ||
[http:// | [http://mackeeper.zeobit.com/macbook-pro-running-slow slow macbook] | ||
[http:// | [http://mldonkey.sourceforge.net/Simple_configuration MLDonkey simple configuration] provided by Fabtar | ||
[http:// | [http://mldonkey.sourceforge.net/Simple_guide MLDonkey simple guide] Provided by Fabtar | ||
[http://wiki.qnap.com/w/images/c/c5/Mlnet3.1.3.tar.gz mlnet binary version 3.1.3 for x86 (Intel)] Provided by raffe | |||
[[Category:QPKG]] [[Category: | [http://wiki.qnap.com/w/images/3/3a/Mlnet3.1.5.tar.gz mlnet binary version 3.1.5 for x86 (Intel)] Provided by raffe | ||
[[Category:Pages with broken file links]] [[Category:QPKG]] [[Category:BitTorrent / MLDonkey|_MLDonkey]] [[Category:Download Station and QGet]] [[Category:Installation and Setup]] [[Category:Miscellaneous]] | |||
Revision as of 17:13, 5 August 2015
What is MLDonkey?
MLDonkey is a door to the 'donkey' world (on Windows it's normally called eMule), a multi-network, multi-platform open source P2P application used to exchange big files on the Internet and present most features of the basic Windows donkey client (eMule client) and additionally supports overnet, fasttrack, bittorrent and gnutella protocols (and more)! So how does it work with QNAP NAS? Take a look at the scenario below:
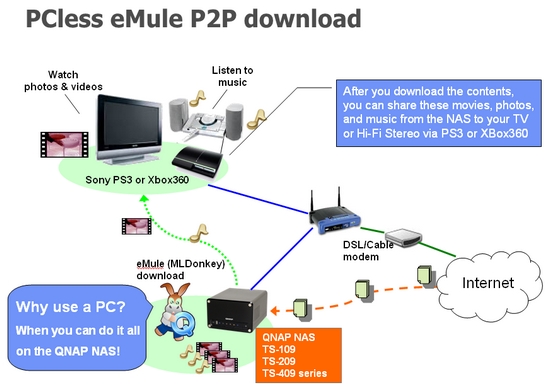
Below's the installation guide and basic usage for MLDonkey on QNAP NAS using QPKG software package. Please note that firmware version 2.1.0 build 0530 onwards is required.
Step 1 - Install & Start MLDonkey via QPKG Platform
New GUI
- Go to administration web login - Applications - QPKG Center and click on the AVAILABLE tab.
- Find MLDonkey and click on the "Install" link (on the right side).
- Scroll up and click on the INSTALLED tab.
- Find MLDonkey and click on the "Enable" link.
Please note that the default username and password for MLDonkey is admin/admin.
Before you start using MLDonkey you will have to forward 2 ports for incoming connections from other clients in order to gain better connection rate. QNAP has default this port to 15000 (TCP) and 15004 (UDP), and users should ensure forwarding both ports on your router to the internal IP address of your NAS that's running the MLDonkey. If you are unsure whether or not these ports are forwarded properly you may go to this site and enter your WAN IP to test them.
Old GUI
Go to 'System Tools' -> 'QPKG' and click on button 'Get QPKG' to get a list a currently available software packages.
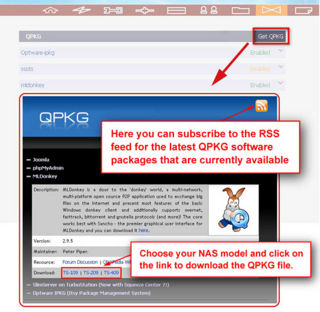
Once downloaded first unzip the file archive then go to 'System Tools' -> 'System Update' and install the mldonkey.qpkg file the same way as if you were updating the system firmware.
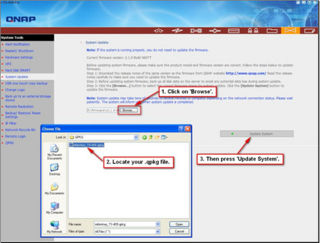
Upon successful installation you should see a QPKG entry like the screen below. Now click 'Enable' to start the MLDonkey service. Once you see the status becomes 'Enabled' you may continue to the next step. Please note that the default username and password for MLDonkey is admin/admin.
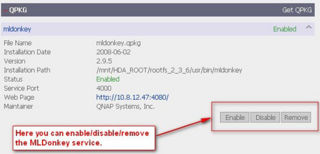
Before you start using MLDonkey you will have to forward 2 ports for incoming connections from other clients in order to gain better connection rate. QNAP has default this port to 15000 (TCP) and 15004 (UDP), and users should ensure forwarding both ports on your router to the internal IP address of your NAS that's running the MLDonkey. If you are unsure whether or not these ports are forwarded properly you may go to this site and enter your WAN IP to test them.
Step 2 - Download, Install & Configure Sancho
Download the latest stable version (0.9.4-58 at the time of writing) for:
(The guide below will mainly be based on Windows installation)
Once downloaded double-click the setup file and install as normal Windows software installation. After successful installation start the program and first of all you will be taken through a few steps for configuration. Now you should see a setup screen like below. Click on 'Next' to continue.
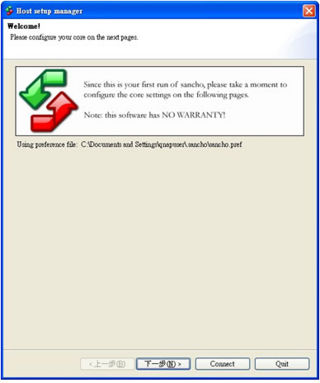
Simple ingore this step and hit 'Next' to continue.
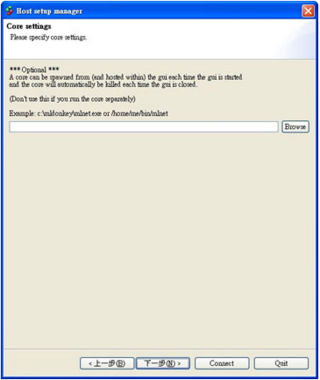
Configure the required settings according to the suggestions in red.
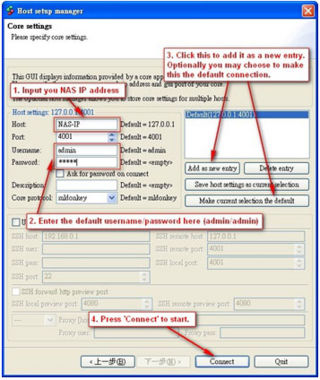
If you can see the NAS IP address at the top you are now connected to the MLDonkey.
Now go to the 'Servers' tab, you need to connect to some servers if it did not do it for you automatically.
You may now fire some searches and start filling up your 'Transfer' list.
If you reach this step successfully, Congratulations! You've just turned your NAS into eMule/eDonkey downloader! You may shut down your PCs at any time for the same purpose.
[Howto] Manually update QPKG to MLDonkey 3.X.X (x86 version)
The info comes from these threads: http://forum.qnap.com/viewtopic.php?f=122&t=40036 and http://forum.qnap.com/viewtopic.php?f=122&t=46389
"x86 version" means that your unit has an Intel processor.
Binaries
Binary for the x86 version of 3.1.5
If you just want the mlnet 3.1.5 binary for the x86 version, you can get it from here: http://wiki.qnap.com/w/images/3/3a/Mlnet3.1.5.tar.gz I use putty (tool for Windows, for more info, see last post here: viewtopic.php?f=91&t=5460#p26971 ), but any similar tool works. I did more or less like this:
First close down old MLDonkey (maybe "Disable" via the GUI on the administration web login), then:
cd /opt/tmp/
wget http://wiki.qnap.com/w/images/3/3a/Mlnet3.1.5.tar.gz
tar xvfz Mlnet3.1.5.tar.gz
mv /share/MD0_DATA/.qpkg/MLDonkey/mlnet /share/MD0_DATA/.qpkg/MLDonkey/mlnet.old.3.1.3
cp /opt/tmp/mlnet /share/MD0_DATA/.qpkg/MLDonkey/
Now you can start the new MLDonkey (maybe "Enable" via the GUI on the administration web login).
Binary for the x86 version of 3.1.3
If you just want the mlnet 3.1.3 binary for the x86 version, you can get it from here: http://wiki.qnap.com/w/images/c/c5/Mlnet3.1.3.tar.gz I use putty (tool for Windows, for more info, see last post here: viewtopic.php?f=91&t=5460#p26971 ), but any similar tool works. I did more or less like this: First close down old MLDonkey (maybe "Disable" via the GUI on the administration web login), then:
cd /opt/tmp/
wget http://wiki.qnap.com/w/images/c/c5/Mlnet3.1.3.tar.gz
tar xvfz Mlnet3.1.3.tar.gz
mv /share/MD0_DATA/.qpkg/MLDonkey/mlnet /share/MD0_DATA/.qpkg/MLDonkey/mlnet.old
cp /opt/tmp/mlnet /share/MD0_DATA/.qpkg/MLDonkey/
Now you can start the new MLDonkey (maybe "Enable" via the GUI on the administration web login).
Binaries and libs for the x86 version of 3.0.7
If you just want the mlnet 3.0.7 binaries and libs for the x86 version, you can get them from internaut19 (Cristian) here http://forum.qnap.com/viewtopic.php?f=122&t=40036&start=15#p203075 The only file I used was the mlnet file. I renamed the old one and copied the new one to same folder, and all worked well. I use putty (tool for Windows, for more info, see last post here: viewtopic.php?f=91&t=5460#p26971 ), but any similar tool works. I did more or less like this: First close down old MLDonkey (maybe "Disable" via the GUI on the administration web login), then:
cd /opt/tmp/
wget http://db.tt/qzFIvAp
tar -xvf archive.tgz
mv /share/MD0_DATA/.qpkg/MLDonkey/mlnet /share/MD0_DATA/.qpkg/MLDonkey/mlnet.old
cp /opt/tmp/mldonkey/bin/mlnet /share/MD0_DATA/.qpkg/MLDonkey/
Now you can start the new MLDonkey (maybe "Enable" via the GUI on the administration web login).
Manually update to 3.0.7, 3.1.0, 3.1.3 or 3.1.5
I think these are the steps to compile (so far). All thanks to internaut19 (Cristian) and denis.gz .
0. At least install original 3.1.0 (or 3.0.0) MLdonkey (& Optware/IPKG via QPKG):
You need Optware/IPKG
a. Go to administration web login and go to Applications - QPKG Center and install Optware, also read http://wiki.qnap.com/wiki/Install_Optware_IPKG
b. Don't forget to enable Optware in administration web login - Applications - QPKG Center (click 'Enable' ) after installation and then restart the NAS. If you have not restarted, you need at least to do
PATH=$PATH:/opt/bin:/opt/sbin
And you need at least the old 3.1.0 installed (or 3.0.0) from QPKG Plugins. Log in to the GUI on the administration web login and go to Applications - QPKG Plugins - Get QPKG and install MLDonkey. Read more about this above (maybe start from http://wiki.qnap.com/wiki/MLDonkey_Installation#Step_1_-_Install_.26.C2.A0Start_MLDonkey.C2.A0via_QPKG_Platform )
1. Read here to get some background info:
First, read http://mldonkey.sourceforge.net/OfficialFaq#Building_mldonkey for more info about compiling MLDonkey.
2. Install stuff we need
Remember, first you need both MLdonkey & Optware/IPKG via QPKG, see "0. At least install original 3.1.0 (or 3.0.0) MLdonkey & Optware/IPKG via QPKG" above
With putty (tool for Windows, for more info, see last post here: viewtopic.php?f=91&t=5460#p26971 ), or similar tool, go to /opt/tmp (or similar folder or create it with mkdir /opt/tmp ) and install stuff
cd /opt/tmp
ipkg update
ipkg install sed
ipkg install grep
ipkg install zlib
ipkg install bzip2
ipkg install gawk
ipkg install optware-devel
3. Get MLDonkey source
Examples
Get the source with your computer
Get MLDonkey source mldonkey-3.x.x.tar.bz2 from http://sourceforge.net/projects/mldonkey/files/ , maybe like this:
- Download the file to your computer (or maybe download directly to the shared folder 'Public' (e.g. same as /share/Public) on your Qnap device).
- Copy the file to your Qnap device, maybe to the shared folder 'Public' (e.g. same as /share/Public).
- On your Qnap device, you move the file to your 'working' folder (so it's easier to delete all littering files when your are done). E.g. do something like this:
mv /share/Public/mldonkey-3.1.5.tar.bz2 /opt/tmp
If you want to check if you got the file to the right place, you can use 'ls -la', like this:
[~] # cd /opt/tmp
[/opt/tmp] # ls -la
drwxr-xr-x 2 admin administ 4096 Aug 28 08:08 ./
drwxr-xr-x 19 admin administ 4096 Jul 16 19:46 ../
-rw-r--r-- 1 admin administ 2847382 Mar 22 12:13 mldonkey-3.1.5.tar.bz2
[/opt/tmp] #
Get the source with your Qnap device
Get the MLDonkey source file mldonkey-3.x.x.tar.bz2 from http://sourceforge.net/projects/mldonkey/files/ . To see what URL it is to the file, right click on the file URL and copy the link adress. After that you can write 'wget ' and then paste the link into Putty (or whatever you use) by right clicking where the cursor is to download the file. E.g. it will look something like this in putty:
cd /opt/tmpwget http://sourceforge.net/projects/mldonkey/files/mldonkey/3.1.5/mldonkey-3.1.5.tar.bz2/download
On your screen you will something like this:
[/opt/tmp] # wget http://sourceforge.net/projects/mldonkey/files/mldonkey/3.1.5/mldonkey-3.1.5.tar.bz2/download
--2014-08-28 08:08:43-- http://sourceforge.net/projects/mldonkey/files/mldonkey/3.1.5/mldonkey-3.1.5.tar.bz2/download
Resolving sourceforge.net... 216.34.181.60
Connecting to sourceforge.net|216.34.181.60|:80... connected.
HTTP request sent, awaiting response... 302 Found
Location: http://downloads.sourceforge.net/project/mldonkey/mldonkey/3.1.5/mldonkey-3.1.5.tar.bz2?r=&ts=1409206127&use_mirror=cznic [following]
--2014-08-28 08:08:44-- http://downloads.sourceforge.net/project/mldonkey/mldonkey/3.1.5/mldonkey-3.1.5.tar.bz2?r=&ts=1409206127&use_mirror=cznic
Resolving downloads.sourceforge.net... 216.34.181.59
Connecting to downloads.sourceforge.net|216.34.181.59|:80... connected.
HTTP request sent, awaiting response... 302 Found
Location: http://cznic.dl.sourceforge.net/project/mldonkey/mldonkey/3.1.5/mldonkey-3.1.5.tar.bz2 [following]
--2014-08-28 08:08:44-- http://cznic.dl.sourceforge.net/project/mldonkey/mldonkey/3.1.5/mldonkey-3.1.5.tar.bz2
Resolving cznic.dl.sourceforge.net... 217.31.202.30
Connecting to cznic.dl.sourceforge.net|217.31.202.30|:80... connected.
HTTP request sent, awaiting response... 200 OK
Length: 2847382 (2.7M) [application/octet-stream]
Saving to: `mldonkey-3.1.5.tar.bz2' 100%[======================================>] 2,847,382 4.88M/s in 0.6s 2014-08-28 08:08:45 (4.88 MB/s) - `mldonkey-3.1.5.tar.bz2' saved [2847382/2847382]
If you want to check if you got the file, you can use 'ls -la', like this:
[~] # cd /opt/tmp
[/opt/tmp] # ls -la
drwxr-xr-x 2 admin administ 4096 Aug 28 08:08 ./
drwxr-xr-x 19 admin administ 4096 Jul 16 19:46 ../
-rw-r--r-- 1 admin administ 2847382 Mar 22 12:13 mldonkey-3.1.5.tar.bz2
[/opt/tmp] #
4. Unpack and go to MLDonkey folder
cd /opt/tmp
tar -xvf mldonkey-3.1.5.tar.bz2
cd mldonkey-3.1.5
5. Hide/remove ocaml
You want it to install ocaml locally, so you need to remove or hide it. I did
ipkg remove ocaml
6. Configure
When it asks
"Do you want this script to try to download and install ocaml LOCALLY in mldonkey directory ?"
Answer y (and then press [Enter] ;-)
cd /opt/tmp/mldonkey-3.1.5
mkdir /share/Public/mldonkey
PATH=/opt/bin:$PATH
./configure --prefix=/share/Public/mldonkey --disable-fasttrack CPPFLAGS="-I/opt/include" LDFLAGS="-L/opt/lib"
Now wait... And wait....
7. Change config file
Open /opt/tmp/mldonkey-3.1.5/config/Makefile.config and change
CFLAGS=-g -O2
to
CFLAGS=-g -Os
and
CXXFLAGS=-g -O2
to
CXXFLAGS=-g -Os
Here is some info about editing files, scroll to last post: viewtopic.php?f=88&t=3628#p142945
8. Compile
Then you run make (I would say it's optional to run 'make depend' before 'make', but you can do it if you wish)
cd /opt/tmp/mldonkey-3.1.5
make
Now you should have the file mlnet in /opt/tmp/mldonkey-3.1.5
9. Use the new mlnet
Again, you need at least the old 3.1.0 installed (or 3.0.0) from QPKG Plugins.Close down the old MLDonkey (maybe "Disable" via the GUI on the administration web login), rename old mlnet and then copy the new one to the right place
mv /share/MD0_DATA/.qpkg/MLDonkey/mlnet /share/MD0_DATA/.qpkg/MLDonkey/mlnet.old.3.1.3
cp /opt/tmp/mldonkey-3.1.5/mlnet /share/MD0_DATA/.qpkg/MLDonkey/
Start the new MLDonkey binary (maybe "Enable" via the GUI on the administration web login). You can check the version of MLDonkey with this command in the console:
version
[Howto] Email notification with SSL SMTP
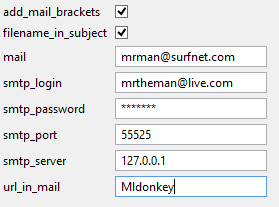
In this example I use stunnel and email via a Hotmail account (as a 'relay' server) to the email account to where really I want the notifications (mrman@surfnet.com)..
So for the Hotmail account (as a 'relay' server) I use:
SMTP server: smtp.live.com:587
Account to log in on the SMTP: mrtheman@hotmail.com (use your own Hotmail/Live account)
Password: In the picture it looks like ******, but in reality the password will be written i clear text, like: mysecretpassword. So if you are afraid someone will be able to see this password, create a new account that you don't care about.
You can also use a Google account to relay the noticications, I think Googles SMTP server is smtp.gmail.com:465
Add a smtp part like this in /etc/stunnel/stunnel.conf[smtp]
accept = 127.0.0.1:55525
connect = smtp.live.com:587
protocol = smtp
And change to client = yes in the global part, so it all looks like this:
; Sample stunnel configuration file by Michal Trojnara 2002-2006
; Some options used here may not be adequate for your particular configuration
; Please make sure you understand them (especially the effect of chroot jail)

; Certificate/key is needed in server mode and optional in client mode
cert = /etc/stunnel/stunnel.pem
;key = /usr/local/etc/stunnel/mail.pem

ciphers = ALL:!SSLv2:!LOW:!EXPORT40:@STRENGTH
;chroot = /usr/local/var/lib/stunnel/
setuid = admin
setgid = administrators
; PID is created inside chroot jail
pid = /stunnel.pid

; Some performance tunings
socket = l:TCP_NODELAY=1
socket = r:TCP_NODELAY=1
;compression = rle

; Workaround for Eudora bug
;options = DONT_INSERT_EMPTY_FRAGMENTS

; Authentication stuff
;verify = 2
; Don't forget to c_rehash CApath
; CApath is located inside chroot jail
;CApath = /certs
; It's often easier to use CAfile
;CAfile = /etc/stunnel/stunnel.pem
;CAfile = /usr/local/etc/stunnel/certs.pem
; Don't forget to c_rehash CRLpath
; CRLpath is located inside chroot jail
;CRLpath = /crls
; Alternatively you can use CRLfile
;CRLfile = /usr/local/etc/stunnel/crls.pem

; Some debugging stuff useful for troubleshooting
debug = 0
output = /dev/null
;output = /opt/var/hotmail.log

; Use it for client mode
;client = no
client = yes

; Service-level configuration

;[pop3s]
;accept = 995
;connect = 110

;[imaps]
;accept = 993
;connect = 143

;[ssmtp]
;accept = 465
;connect = 25

[smtp]
accept = 127.0.0.1:55525
connect = smtp.live.com:587
protocol = smtp

[https]
accept = 443
connect = 127.0.0.1:8080
TIMEOUTclose = 0
TIMEOUTconnect = 2
In MLdonkey I have this:
Then restart stunnel/etc/init.d/stunnel.sh restart
External Resource & Links
MLDonkey simple configuration provided by Fabtar
MLDonkey simple guide Provided by Fabtar
mlnet binary version 3.1.3 for x86 (Intel) Provided by raffe
mlnet binary version 3.1.5 for x86 (Intel) Provided by raffe
