Firmware Recovery: Difference between revisions
Albertshan (talk | contribs) Add TVS-675 Recovery image Tag: visualeditor |
Jerrylcclin (talk | contribs) No edit summary Tag: visualeditor |
||
| (18 intermediate revisions by 2 users not shown) | |||
| Line 573: | Line 573: | ||
== '''Firmware Recovery Guide for TS-251B, TS-x51D series, TS-x53B Series, TS-x53BU Series, TS-x51A Series, TS-x53U series, TS-x53A Series, TBS-453A, TBS-453DX, HS-453DX, TS-x53D series, TVS-x63 Series, TVS-x63+ Series, <!--TS-x63U Series, --> TVS-x71 Series, TVS-x71U Series, TVS-x72N Series, TVS-x72X Series, TVS-x72XT Series, TVS-x72XU Series, TVS-x73 Series, TVS-675, TS-x73U Series, TS-x77 Series, TS-x77XU Series, TS-hx77XU Series,TS-1685, TVS-ECx80 / TVS-ECx80+, TVS-ECx80U Series, TVS-x82 Series, TVS-x82T Series, TVS-x82ST Series, TVS-882BR, TVS-882BRT3, TVS-951X, TVS-1282T3, TVS-1582TU, TS-x83XU Series, TS-h1283XU, TDS-16489U, TDS-16489U R2, TES-x85U series, TS-hx88X series, TS-h3088XU NAS''' == | == '''Firmware Recovery Guide for TS-251B, TS-x51D series, TS-x53B Series, TS-x53BU Series, TS-x51A Series, TS-x53U series, TS-x53A Series, TBS-453A, TBS-453DX, HS-453DX, TS-x53D series, TVS-x63 Series, TVS-x63+ Series, <!--TS-x63U Series, --> TVS-x71 Series, TVS-x71U Series, TVS-x72N Series, TVS-x72X Series, TVS-x72XT Series, TVS-x72XU Series, TVS-x73 Series, TVS-675, TS-x73U Series, TS-x77 Series, TS-x77XU Series, TS-hx77XU Series,TS-1685, TVS-ECx80 / TVS-ECx80+, TVS-ECx80U Series, TVS-x82 Series, TVS-x82T Series, TVS-x82ST Series, TVS-882BR, TVS-882BRT3, TVS-951X, TVS-1282T3, TVS-1582TU, TS-x83XU Series, TS-h1283XU, TDS-16489U, TDS-16489U R2, TES-x85U series, TS-hx88X series, TS-h3088XU,TS-h1886XU-RP R2 NAS''' == | ||
=== '''Applied QNAP NAS models''' === | === '''Applied QNAP NAS models''' === | ||
TS-251B, TS-251D, TS-451D, TS-253B, TS-453B, TS-653B, TS-253Be, TS-453Be, TS-453BT3, TS-453BU, TS-853BU, TS-1253BU, TS-453U, TS-853U, TS-1253U, TS-251A, TS-451A, TBS-453A, TBS-453DX, HS-453DX, TS-253D, TS-453D, TS-653D, TS-253A, TS-453A, TS-653A, TS-853A, TVS-463, TVS-663, TVS-863, <!--TS-463U, TS-863U, TS-1263U, --> TVS-471, TVS-671, TVS-871, TVS-871T, TVS-471U, TVS-871U, TVS-1271U, TVS-672N, TVS-872N, TVS-672X, TVS-872X, TVS-472XT, TVS-672XT, TVS-872XT, TVS-872XU, TVS-972XU, TVS-1272XU, TVS-1672XU, TVS-473, TVS-673, TVS-873, TVS-675, TS-873U, TS-1273U, TS-1673U, TS-677, TS-877, TS-1277, TS-877XU, TS-977XU, TS-1277XU, TS-1677XU, TS-2477XU, TS-h977XU, TS-h1277XU, TS-1685, TVS-ECx80 / TVS-ECx80+ series, TVS-ECx80U Series, TVS-682, TVS-882, TVS-1282, TVS-682T, TVS-882T, TVS-1282T, TVS-882ST2, TVS-882ST3, TVS-882BR, TVS-882BRT3, TVS-951X, TVS-1282T3, TVS-1582TU, TS-883XU, TS-983XU, TS-1283XU, TS-1683XU, TS-2483XU, TS-h1283XU, TDS-16489U, TDS-16489U R2, TES-1885U, TES-3085U, TS-h1288X, TS-h1688X, TS-h3088XU | TS-251B, TS-251D, TS-451D, TS-253B, TS-453B, TS-653B, TS-253Be, TS-453Be, TS-453BT3, TS-453BU, TS-853BU, TS-1253BU, TS-453U, TS-853U, TS-1253U, TS-251A, TS-451A, TBS-453A, TBS-453DX, HS-453DX, TS-253D, TS-453D, TS-653D, TS-253A, TS-453A, TS-653A, TS-853A, TVS-463, TVS-663, TVS-863, <!--TS-463U, TS-863U, TS-1263U, --> TVS-471, TVS-671, TVS-871, TVS-871T, TVS-471U, TVS-871U, TVS-1271U, TVS-672N, TVS-872N, TVS-672X, TVS-872X, TVS-472XT, TVS-672XT, TVS-872XT, TVS-872XU, TVS-972XU, TVS-1272XU, TVS-1672XU, TVS-473, TVS-673, TVS-873, TVS-675, TS-873U, TS-1273U, TS-1673U, TS-677, TS-877, TS-1277, TS-877XU, TS-977XU, TS-1277XU, TS-1677XU, TS-2477XU, TS-h977XU, TS-h1277XU, TS-1685, TVS-ECx80 / TVS-ECx80+ series, TVS-ECx80U Series, TVS-682, TVS-882, TVS-1282, TVS-682T, TVS-882T, TVS-1282T, TVS-882ST2, TVS-882ST3, TVS-882BR, TVS-882BRT3, TVS-951X, TVS-1282T3, TVS-1582TU, TS-883XU, TS-983XU, TS-1283XU, TS-1683XU, TS-2483XU, TS-h1283XU, TDS-16489U, TDS-16489U R2, TES-1885U, TES-3085U, TS-h1288X, TS-h1688X, TS-h3088XU, TS-h1886XU-RP R2 | ||
| | ||
| Line 706: | Line 706: | ||
TVS-675 | TVS-675 | ||
https://download.qnap.com/Storage/tsd/fullimage/F_TS-X75_20210414-h1.3.0_UEFI.img | |||
TVS-872XU / TVS-972XU / TVS-1272XU / TVS-1672XU<br /> https://download.qnap.com/Storage/tsd/fullimage/F_TS-X72U_20180824-1.3.0.img | TVS-872XU / TVS-972XU / TVS-1272XU / TVS-1672XU<br /> https://download.qnap.com/Storage/tsd/fullimage/F_TS-X72U_20180824-1.3.0.img | ||
| Line 745: | Line 745: | ||
TS-h3088XU<br/> [https://download.qnap.com/Storage/tsd/fullimage/F_TS-X88U_20201217-h1.3.0_UEFI.img https://download.qnap.com/Storage/tsd/fullimage/F_TS-X88U_20201217-h1.3.0_UEFI.img] | TS-h3088XU<br/> [https://download.qnap.com/Storage/tsd/fullimage/F_TS-X88U_20201217-h1.3.0_UEFI.img https://download.qnap.com/Storage/tsd/fullimage/F_TS-X88U_20201217-h1.3.0_UEFI.img] | ||
TS-h1886XU-RP R2 | |||
https://download.qnap.com/Storage/tsd/fullimage/F_TS-X85U_20211224-h1.3.0.img | |||
<span style="line-height: 20.8px;">========================================================</span> | <span style="line-height: 20.8px;">========================================================</span> | ||
| Line 868: | Line 872: | ||
[[Category:Pages with broken file links]] | [[Category:Pages with broken file links]] | ||
== '''What to do if the startup problem persists''' == | == '''USB Firmware Recovery SOP for TS-435XeU series NAS''' == | ||
==== '''Applied QNAP NAS models''' ==== | |||
For TS-435XeU | |||
==== '''When to use the firmware recovery guide''' ==== | |||
This firmware recovery guide is intended for users who encounter system startup failure due to incomplete or unsuccessful firmware update caused by power outage or network disconnection during the process. | |||
==== '''Instructions for NAS Recovery''' ==== | |||
<br/> '''A. How to create a EXT4 USB drive.''' | |||
---- | |||
1. You need to prepare a USB drive and format it to EXT4 format<br/> | |||
Download the AOMEI Partition Assistant into your PC from the link below.:<br/> [https://www.diskpart.com/download-home.html#demo https://www.diskpart.com/download-home.html#demo] | |||
2. Download the NAS system image into your PC from the link below.<br/>TS-435XeU [https://download.qnap.com/Storage/tsd/fullimage/F_TS-X35EU_20220119-1.3.0_UEFI.img https://download.qnap.com/Storage/tsd/fullimage/F_TS-X35EU_20220119-1.3.0_UEFI.img] | |||
3. Plugin a USB drive into your PC.<br/> | |||
4. Install the AOMEI Partition Assistant from your PC and format the USB drive to EXT4 format<br/> | |||
5. Use Ubuntu(Linux) to copy NAS's image files into EXT4 USB drive.<br/> | |||
6. Rename the image name to emmc_recovery_fi.img (Make sure it save in USB drive partition 1) | |||
<br/> '''B. How to use USB boot drive to refresh the DOM for NAS.''' | |||
---- | |||
1. Power off the NAS and unplug the power cord.<br/> | |||
2. Remove the 5 screws with a screwdriver and unlock&open the NAS's case.<br/> | |||
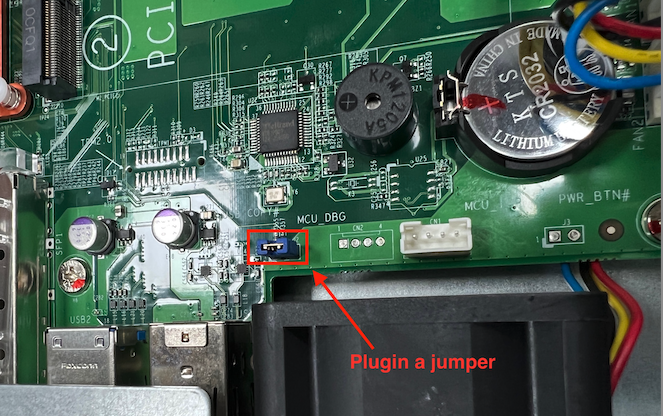
3. Find a pin near "USB COPY" text, plugin a jumper to that pin as below.(jumper is in blue color) <br/> | |||
[[File:jumper.png|RTENOTITLE]]<br/> | |||
4. Plugin the EXT4 USB drive to USB port(any of 4 USB ports are ok).<br/> | |||
5. Make sure no network cables plugin and no any HDD(s) plugin, only plugin the EXT4 USB drive and jumper.<br/> | |||
6. Plugin the power cord to power on the NAS.<br/> | |||
7. Front LED will have blink red(It's refresh DOM now).<br/> | |||
8. Wait for it finished, will shutdown the NAS automatically.<br/> | |||
9. Unplug the jumper.<br/> | |||
10. Unplug the EXT4 USB drive from USB port.<br/> | |||
11. Poewr on the NAS and have a PC connect to NAS directly via network port.<br/> | |||
12. Download the latest firmware from the QNAP website and use QNAP QFinder Pro to update the firmware to latest version.('''Note: Make sure you have done this step after the system recovery.''')<br/> | |||
12. Shutdown NAS and plug all HDD(s) back to NAS and power on NAS.<br/> | |||
13. Done.<br/> | |||
''' ''' | |||
[[Category:Pages with broken file links]] | |||
== '''What to do if the startup problem persists'''== | |||
If the startup problem persists after refresh the system on the DOM, please return the NAS to your local dealer or distributor for system repair immediately. | If the startup problem persists after refresh the system on the DOM, please return the NAS to your local dealer or distributor for system repair immediately. | ||
| | ||
[[Category:Pages with broken file links]] [[Category:How to do if encounter the system startup failure]] | [[Category:Pages with broken file links]] | ||
[[Category:How to do if encounter the system startup failure]] | |||
Latest revision as of 14:48, 9 August 2022
Firmware Recovery Guide for ARM based NAS
Applied QNAP NAS models
For firmware update of QNAP TS-110, TS-112, TS-119, TS-210, TS-212, TS-219, TS-219P, TS-410, TS-410U, TS-412, TS-412U, TS-419P, TS-419U, TS-419U+, TS-119P+, TS-219P+, TS-419P+, TS-120, TS-121, TS-220, TS-221, TS-420, TS-421, TS-420U, TS-421U Turbo NAS servers via recovery mode.
When to use the firmware recovery guide
This firmware recovery guide is intended for users who encounter system startup failure due to incomplete or unsuccessful firmware update caused by power outage or network disconnection during the process. To verify if this guide applies to your NAS, follow the steps below:
1. Power off the NAS.
2. Remove all the hard disks.
3. Power on the NAS.
4. Wait for ten seconds and check if you hear a short beep.
5. After the short beep, wait for two minutes to check if you hear a long beep.
6. If you only hear a short beep or do not hear any beep, follow the instructions of this guide to recover your NAS.
Instructions for NAS Recovery - Method 1 (VMware Player)
Follow the steps below to recover the NAS.
1. Download the live CD ISO image from the following links:
For all TS-x10, TS-x12, TS-x19, TS-x20, TS-x21 series, please use the folloiwng link:
http://eu1.qnap.com/Storage/tsd/live_cd/live-cd-20130730.iso
For TS-112P, TS-212P, TS-212E and HS-210, please use the following link:
http://eu1.qnap.com/Storage/tsd/live_cd/live-cd-20140212.iso
2. Download and install VMware Player:
http://www.vmware.com/go/downloadplayer/
3. Disconnect any wireless network connections on your PC
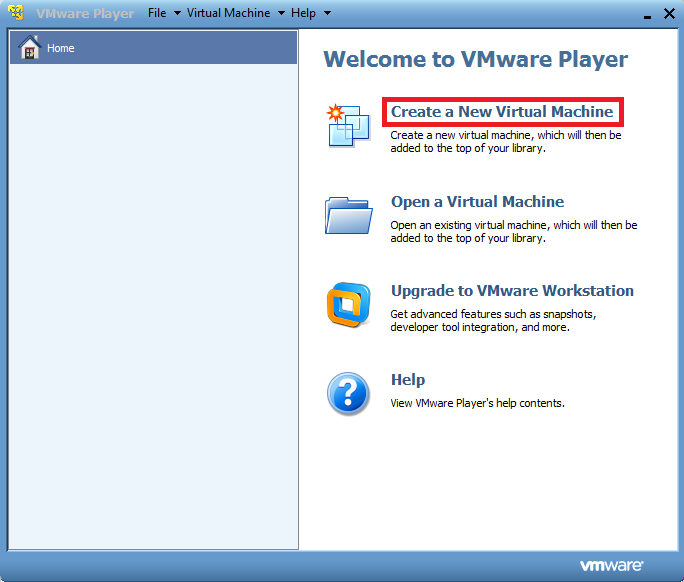
4. Run VMware Player, and click on "Create a New Virtual Machine"
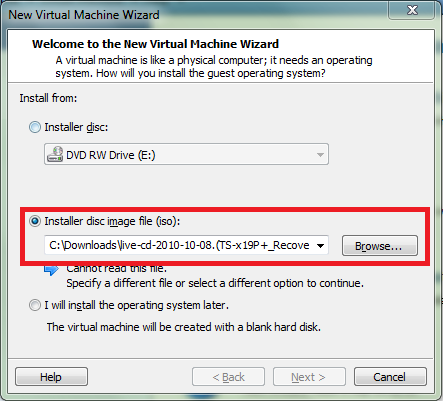
5. Select "Installer disc image file (iso)", and choose the ISO file downloaded in Step 1. Click "Next"
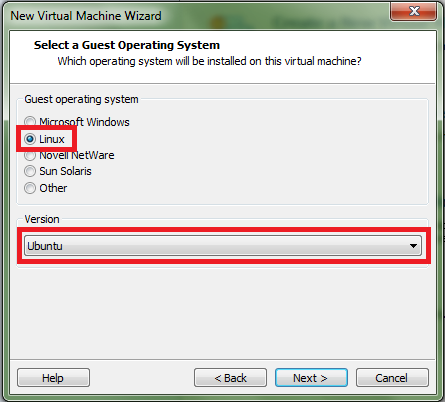
6. Select "Linux" and "Ubuntu", click "Next"
7. For virtual machine name and disk settings, click "Next".
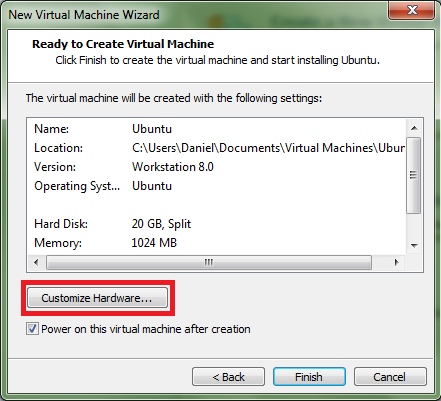
8. Click "Customize Hardware"
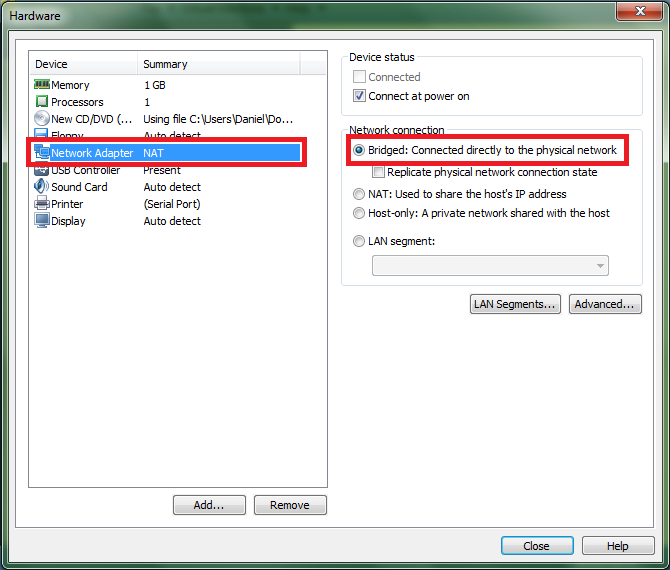
9. Under "Network Adapter", select Network Connection as "Bridged", then click "Close"
10. Click "Finish". The virtual machine will start booting in a window. (If you get a message about software updates, click "Remind Me Later")
11. When the login prompt is shown, go to next step. No login is required.
12. Power off the NAS and remove all hard disks.
13. Connect the NAS to the PC directly by an Ethernet cable. If your NAS includes two LAN ports, please connect LAN 2 of the NAS to the PC. If it doesn't work try it again with LAN 1
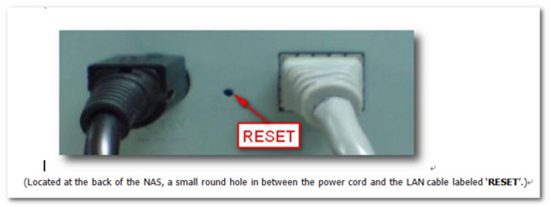
14. Find the RESET button of the NAS (see below).
15. Use a pen or any pointed object to press and hold the RESET button. Then press the Power button on the front panel to power on the NAS at the meanwhile.
16. Please keep holding the RESET button and Power button until you hear two short beeps in about 5-8 seconds. The Status LED of the NAS should be flashing red and green and then glows red.
17. The LED on the LAN port of the NAS should be flashing for the first few seconds and then glows green or orange.
18. LEAVE THE NAS ALONE AT THIS POINT! DO NOT TURN IT OFF OR UNPLUG THE POWER CORD. Wait for about 5 minutes.
Note: To make sure if the data has been delvering to NAS or not, you can login to the console by the username and password, root/root. Then, use the command "ifconfig" to see if the number of TX on eth0 is increasing or not.
19. Wait until you hear a long beep or two short beeps and see the Status LED flashing green. The NAS will then reboot. No intervention required during this stage.
20. The reboot should take about 3 minutes. After that you should hear a long beep.
21. Connect the NAS to your switch or router and use QNAP Finder to find the NAS.
22. Power off the NAS, plug the HDD(s) back by original order, then power it on.
23. Download the latest firmware from QNAP website(http://www.qnap.com/), unzip the file, and perform firmware upgrade through QNAP Finder.
24. On QNAP Finder, select the NAS, click Tools -> Update Firmware to update the NAS firmware.
What to do if the startup problem persists
If the startup problem persists, please return the NAS to your local dealer or distributor for system repair immediately.
NOTE: If the recover progress does not work at the first time, please try another PC and make sure all other network connections are disabled. If the number of TX on eth0 is not increasing, please use another Ethernet cable.
Instructions for NAS Recovery - Method 2 (Live CD)
Follow the steps below to recover the NAS.
1. Download the live CD ISO image from the following links and "BURN" it into an empty CD-R.
For all TS-x10, TS-x12, TS-x19, TS-x20, TS-x21 series, please use the folloiwng link:
http://eu1.qnap.com/Storage/tsd/live_cd/live-cd-20130730.iso
For TS-112P, TS-212P, TS-212E and HS-210, please use the following link:
http://eu1.qnap.com/Storage/tsd/live_cd/live-cd-20140212.iso
2. Burn the ISO file to a CD.
3. Insert the CD to a PC and boot up from the CD.
4. When the login prompt is shown, go to next step. No login is required.
5. Power off the NAS and remove all hard disks.
6. Connect the NAS to the PC directly by an Ethernet cable. If your NAS includes two LAN ports, please connect LAN 2 of the NAS to the PC. If it doesn't work try it again with LAN 1
7. Find the RESET button of the NAS (see below).
8. Use a pen or any pointed object to press and hold the RESET button. Then press the Power button on the front panel to power on the NAS at the meanwhile.
9. Please keep holding the RESET button and Power button until you hear two short beeps in about 5-8 seconds. The Status LED of the NAS should be flashing red and green and then glows red.
10. The LED on the LAN port of the NAS should be flashing for the first few seconds and then glows green or orange.
11. LEAVE THE NAS ALONE AT THIS POINT! DO NOT TURN IT OFF OR UNPLUG THE POWER CORD. Wait for about 5 minutes.
Note: To make sure if the data has been delvering to NAS or not, you can login to the console by the username and password, root/root. Then, use the command "ifconfig" to see if the number of TX on eth0 is increasing or not.
12. Wait until you hear a long beep or two short beeps and see the Status LED flashing green. The NAS will then reboot. No intervention required during this stage.
13. The reboot should take about 3 minutes. After that you should hear a long beep.
14. Connect the NAS to your switch or router and use QNAP Finder to find the NAS.
15. Power off the NAS, plug the HDD(s) back by original order, then power it on.
16. Download the latest firmware from QNAP website(http://www.qnap.com/download.asp), unzip the file, and perform firmware upgrade through QNAP Finder.
17. On QNAP Finder, select the NAS, click Tools -> Update Firmware to update the NAS firmware.
How to do if the startup problem persists
If the startup problem persists, please return the NAS to your local dealer or distributor for system repair immediately.
NOTE: If the recover progress does not work at the first time, please try another PC or reburn the ISO image.
Firmware Recovery Guide for x86-based NAS
Applied QNAP NAS models
TS-239 Pro, TS-239 Pro II, TS-239 Pro II+, TS-439 Pro, TS-439 Pro II, TS-439 Pro II+, TS-259 Pro, TS-259 Pro+, TS-459 Pro, TS-459 Pro+, TS-459 Pro II, TS-459U, TS-459U+, TS-559 Pro, TS-559 Pro+, TS-559 Pro II, TS-639 Pro, TS-659 Pro, TS-659 Pro+, TS-659 Pro II, TS-859 Pro, TS-859 Pro+, TS-859U, TS-859U+, TS-509, TS-809, TS-809U, SS-439, SS-839, HS-251, HS-251+, TS-x51 Series, TS-x51+ Series, TS-x51U Series, TS-453mini, TS-x53 Series
When to use the firmware recovery guide
This firmware recovery guide is intended for users who encounter system startup failure due to incomplete or unsuccessful firmware update caused by power outage or network disconnection during the process. To verify if this guide applies to your NAS, follow the steps below:
1. Power off the NAS.
2. Remove all the hard disks.
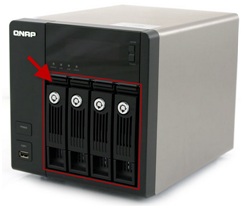
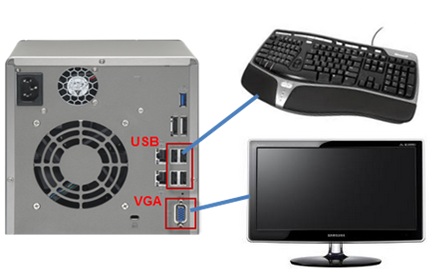
3. Connect the NAS with a VGA/HDMI monitor and a USB keyboard.
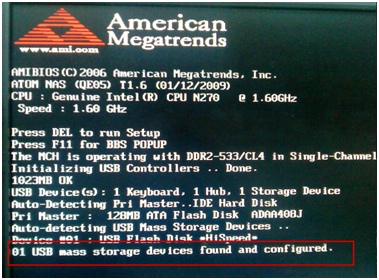
“AMI BIOS …”--> the following screen shows the BIOS can startup correctly
“1023MB OK” --> DRAM has been detected (DRAM size is depend on NAS model)
“128MB ATA Flash Disk ADAA408J” --> DOM has been detected (DOM size is depend on NAS model)
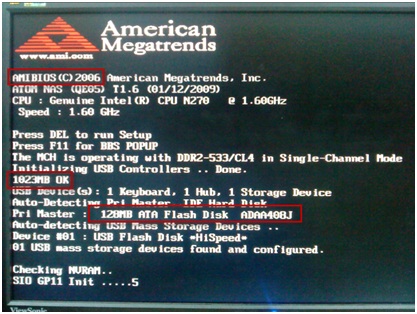
If the BIOS cannot be started or any component cannot be detected correctly, like DRAM, DOM, you need to contact with local distributor and send back the NAS for repair. If the NAS system can be startup correctly after HDD removed, you will need to replace the HDD as the startup failed issue should be caused by HDD.
5. When the screen will show "Uncompressing Linux..." .
At this stage, the system on the DOM is starting to boot up. However, if the system is corrupted, some error message might occur on the screen during the startup process. You can try to recover the system on the DOM by following steps.
6. To recover the system on the DOM, you need follow the step A and step B.
A. Create a USB boot disk
B. Use the USB boot disk to refresh the system on the DOM.
Instructions for NAS Recovery
A. How to create a USB boot disk.
1. Download the unetbootin utility and iso file from the link below:
http://unetbootin.sourceforge.net/ - e.g. please select “Download for windows” if you are using Windows platform on your PC.
http://distro.ibiblio.org/damnsmall/current/dsl-4.4.10-initrd.iso
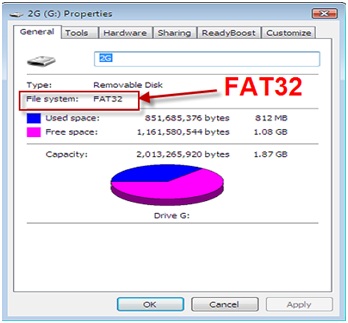
2. Plug a USB flash drive to your PC. The USB flash drive should be 1GB or 2GB. Please format the USB flash drive as FAT32.
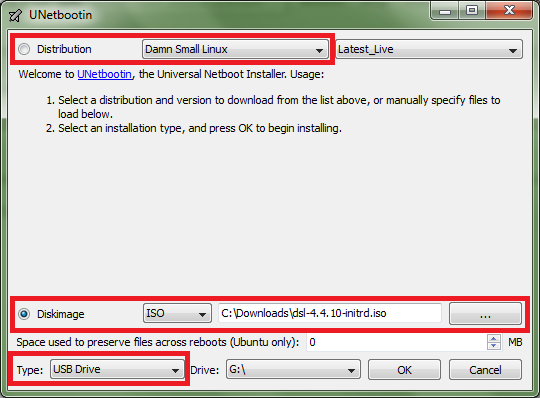
3. Install and run the unetbootin utility on your PC. Then select "Damn Small Linux" for Distribution.
4. Select “Diskimage”, and choose the iso file downloaded in step 1.
5. Make sure the Type is on “USB Drive”, and click “OK” to install the boot system on the USB drive.
6. Click “Exit” after process completed.
7. Check your NAs model and download the system full image from the link below.
8. Copy system image file to the root folder of USB flash drive and rename the file to “dom.img”.
Download System Full Image
========================================================
TS-239 Pro
http://eu1.qnap.com/Storage/tsd/fullimage/F_TS-239_20091014-3.1.2.img
TS-239Pro II
http://eu1.qnap.com/Storage/tsd/fullimage/F_TS-239PROII_20100928-1.0.6.img
TS-239 Pro II+
http://eu1.qnap.com/Storage/tsd/fullimage/F_TS-239PROII+_20110609-1.1.4.img
TS-259 Pro, TS-259 Pro+
http://eu1.qnap.com/Storage/tsd/fullimage/F_TS-259_20110609-1.1.4.img
TS-439 Pro
http://eu1.qnap.com/Storage/tsd/fullimage/F_TS-439_20091014-3.1.2.img
TS-439 Pro II
http://eu1.qnap.com/Storage/tsd/fullimage/F_TS-439PROII_20100928-1.0.6.img
TS-439 Pro II+
http://eu1.qnap.com/Storage/tsd/fullimage/F_TS-439PROII+_20110609-1.1.4.img
TS-439U
http://eu1.qnap.com/Storage/tsd/fullimage/F_TS-439U_20091014-3.1.2.img
TS-459 Pro, TS-459 Pro+, TS-459 Pro II
http://eu1.qnap.com/Storage/tsd/fullimage/F_TS-459_20110609-1.1.4.img
TS-459U, TS-459U+
http://eu1.qnap.com/Storage/tsd/fullimage/F_TS-459U_20110609-1.1.4.img
TS-469 Pro, TS-469L
http://eu1.qnap.com/Storage/tsd/fullimage/F_TS-469_20140516-1.2.8.img
TS-469U-RP
http://eu1.qnap.com/Storage/tsd/fullimage/F_TS-469U_20140516-1.2.8.img
TS-509 Pro
http://eu1.qnap.com/Storage/tsd/fullimage/TS-509PRO.img
TS-559 Pro, TS-559 Pro+, TS-559 Pro II
http://eu1.qnap.com/Storage/tsd/fullimage/F_TS-559_20110609-1.1.4.img
TS-569 Pro, TS-569L
http://eu1.qnap.com/Storage/tsd/fullimage/F_TS-569_20140516-1.2.8.img
TS-639 Pro
http://eu1.qnap.com/Storage/tsd/fullimage/F_TS-639_20091014-3.1.2.img
TS-659 Pro, TS-659 Pro+, TS-659 Pro II
http://eu1.qnap.com/Storage/tsd/fullimage/F_TS-659_20110609-1.1.4.img
TS-669 Pro, TS-669L
http://eu1.qnap.com/Storage/tsd/fullimage/F_TS-669_20140516-1.2.8.img
TS-809 Pro
http://eu1.qnap.com/Storage/tsd/fullimage/F_TS-809_20101119-1.0.9.img
TS-809U
http://eu1.qnap.com/Storage/tsd/fullimage/F_TS-809U_20101119-1.0.9.img
TS-859 Pro, TS-859 Pro+
http://eu1.qnap.com/Storage/tsd/fullimage/F_TS-859_20110609-1.1.4.img
TS-859U, TS-859U+
http://eu1.qnap.com/Storage/tsd/fullimage/F_TS-859U_20110609-1.1.4.img
TS-869 Pro, TS-869L
http://eu1.qnap.com/Storage/tsd/fullimage/F_TS-869_20140516-1.2.8.img
TS-869U-RP
http://eu1.qnap.com/Storage/tsd/fullimage/F_TS-869U_20140516-1.2.8.img
TS-1269U-RP
http://eu1.qnap.com/Storage/tsd/fullimage/F_TS-1269U_20140516-1.2.8.img
SS-439
http://eu1.qnap.com/Storage/tsd/fullimage/F_SS-439_20090627-3.1.0.img
SS-839
http://eu1.qnap.com/Storage/tsd/fullimage/F_SS-839_20091014-3.1.2.img
HS-251
http://eu1.qnap.com/Storage/tsd/fullimage/F_HS-251_20140711-1.2.8.img
HS-251+
http://eu1.qnap.com/Storage/tsd/fullimage/F_HS-251_20150605-1.3.0.img
TS-x51 Series
http://eu1.qnap.com/Storage/tsd/fullimage/F_TS-X51_20140916-1.2.8.img
TS-x51+ Series
http://eu1.qnap.com/Storage/tsd/fullimage/F_TS-X51_20150605-1.3.0.img
TS-x51U Series
http://eu1.qnap.com/Storage/tsd/fullimage/F_TS-X51U_20141128-1.2.8.img
TS-451S
http://eu1.qnap.com/Storage/tsd/fullimage/F_TS-X51_20141204-1.2.8.img
TS-x53 Series
http://eu1.qnap.com/Storage/tsd/fullimage/F_TS-X53_20140916-1.2.8.img
TS-x53U Series
http://eu1.qnap.com/Storage/tsd/fullimage/F_TS-X53U_20141125-1.2.8.img
TS-453mini
http://eu1.qnap.com/Storage/tsd/fullimage/F_TS-X53_20150206-1.3.0.img
TS-x53S Series
http://eu1.qnap.com/Storage/tsd/fullimage/F_TS-X53S_20150106-1.2.8.img
========================================================
B. How to use USB boot disk to refresh the DOM for x86 based NAS
1. Power off the NAS.
2. Remove all the hard disks.

3. Connect the NAS with a VGA/HDMI monitor, USB keyboard, and the bootable USB disk.
4. Power on the NAS and press F11 key repeatedly.
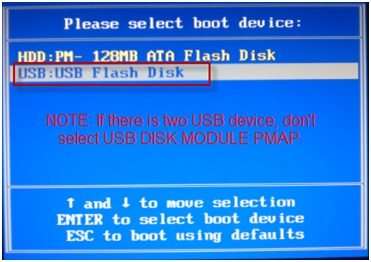
5. Select the USB flash drive as your boot device. If you didn’t the menu and the system continues to process with the command line mode, please reboot the NAS and repeat the step 4.
[NOTE]: If there are two USB devices, don't select “USB DISK MODULE PMAP”.
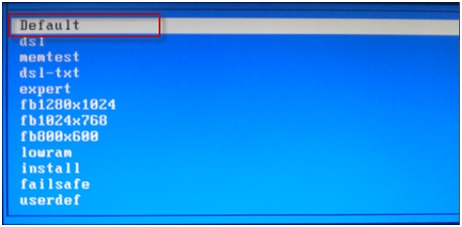
6. On the following menu, select Default for monitor setting. Then, press <SPACE> to continue.
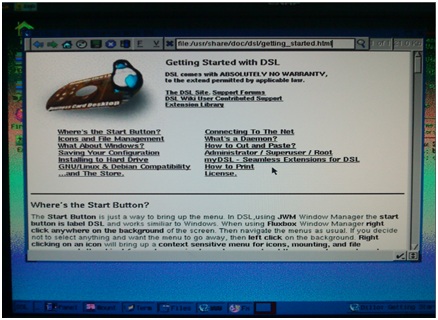
7. After boot up completely, you should see the following window.
8. Press Ctrl+Alt+Del to enter command line.
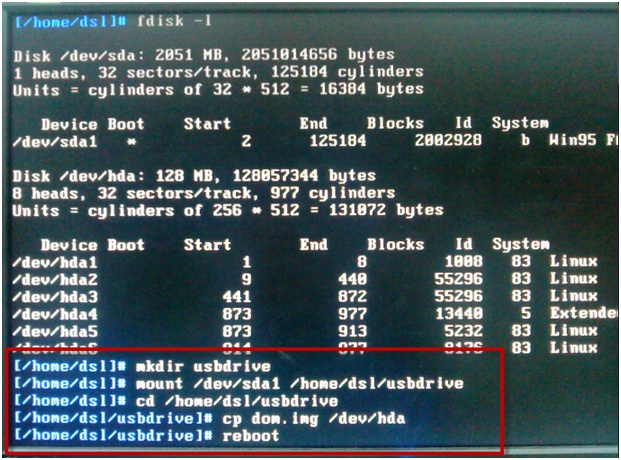
9. Input the following command:
# sudo su
# fdisk –l
/dev/sda is your flash drive.
/dev/sdb or /dev/hda is the DOM drive. The size should be 128 MB or 512 MB depend on the NAS model.
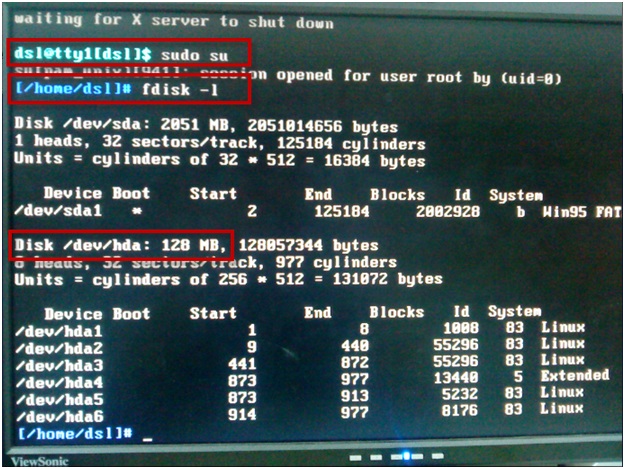
10. Then, input the following command:
# mkdir usbdrive
# mount /dev/sda1 /home/dsl/usbdrive
# cd /home/dsl/usbdrive
11. Input the following command:
# cp dom.img /dev/sdb
“/dev/sdb” or “/dev/hda” is the DOM drive.
"dom.img" is your firmware name.
/dev/sdb or /dev/hda is the drive name of your dom. (depend on NAS model)
13. After the system has been recovered, the NAS should boot up correctly and can be found by QNAP Finder.
14. When the firmware version is on 1.x.x, it is factory test firmware. No HDD can be detected with this firmware. Need to update the firmware to official firmware first.
For TS-239, TS-439, TS-439U, TS-509, TS-639, TS-809, TS-809U, SS-439 and SS-839, please follow the procedures on the following link to update the firmware to 3.5.0.
http://wiki.qnap.com/wiki/NAS_Firmware_Update_When_No_HDD(s)_Installed
For other x-86 based NAS, please download the firmware 3.4.x from QNAP website and use QNAP Finder to update the firmware.
16. After firmware update by QNAP Finder, you can then plug the HDD(s) back to the NAS. After boot up,
- If the HDD(s) have been used on the NAS before, the firmware on the NAS and the HDDs may be inconsistent, you need to update the firmware again.
- If the HDD(s) is brand new, you can then start the initialization procedures.
Firmware Recovery Guide for TS-453Bmini, TS-269 Pro, TS-269L, TS-x79, TS-x70, TS-x80, TS-ECx80U, SS-ECx79U Series NAS
Applied QNAP NAS models
TS-453Bmini, TS-269 Pro, TS-269L, TS-879 Pro, TS-879U-RP, TS-1079 Pro, TS-1279U-RP, TS-EC879U-RP, TS-EC1279U-RP, TS-470, TS-470U-RP/SP, TS-670 Pro, TS-870 Pro, TS-870U-RP, TS-1270U-RP, TS-1679U-RP, TS-EC1679U-RP, TS-x80 Pro Series, TS-EXx80U, SS-ECx79U Series
When to use the firmware recovery guide
This firmware recovery guide is intended for users who encounter system startup failure due to incomplete or unsuccessful firmware update caused by power outage or network disconnection during the process. To verify if this guide applies to your NAS, follow the steps below:
1. Power off the NAS.
2. Remove all the hard disks.
3. Connect the NAS with a VGA/HDMI monitor and a USB keyboard.
The BIOS Date and Version should be displayed. This shows the BIOS can startup correctly
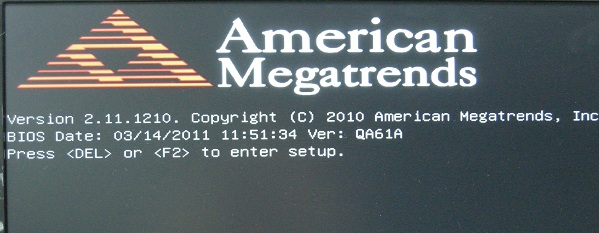
If the BIOS cannot be started, you need to contact with local distributor and send back the NAS for repair. If the NAS system can be started up correctly after removing HDD, you will need to replace the HDD as the startup failed issue is caused by HDD.
5. After the BIOS info, you will see status messages similar to below:
At this stage, the system on the DOM is starting to boot up. However, if the system is corrupted, some error message might occur on the screen during the startup process. You can try to recover the system on the DOM by following steps.
6. To recover the system on the DOM, you need follow the step A and step B.
A. Create a USB boot disk
B. Use the USB boot disk to refresh the system on the DOM.
Instructions for NAS Recovery
A. How to create a USB boot disk.
1. Download the unetbootin utility and iso file from the link below:
http://unetbootin.sourceforge.net/ - e.g. please select “Download for windows” if you are using Windows platform on your PC.
http://eu1.qnap.com/Storage/tsd/clonezilla-live-1.2.11-23-i486.iso
2. Plug a USB flash drive to your PC. The USB flash drive should be 1GB or 2GB. Please format the USB flash drive as FAT32.

3. Run the unetbootin utility on your PC. Then select "CloneZilla" for Distribution.
4. Select “Diskimage”, and choose the iso file downloaded in step 1.
5. Make sure the Type is on “USB Drive”, and click “OK” to install the boot system on the USB drive.
RTENOTITLE
6. Click “Exit” after process completed.
7. Check your NAS model and download the system full image from the link below.
8. Copy system image file to the root folder of USB flash drive and rename the file to “dom.img”.
Download System Full Image
========================================================
TS-453Bmini
http://eu1.qnap.com/Storage/tsd/fullimage/F_TS-X53B_20161116-1.3.0.img
TS-269 Pro, TS-269L
http://eu1.qnap.com/Storage/tsd/fullimage/F_TS-269_20140516-1.2.8.img
TS-879 Pro
http://eu1.qnap.com/Storage/tsd/fullimage/F_TS-879_20140516-1.2.8.img
TS-879U-RP, TS-EC879U-RP
http://eu1.qnap.com/Storage/tsd/fullimage/F_TS-879U_20140515-1.2.8.img
TS-1079 Pro
http://eu1.qnap.com/Storage/tsd/fullimage/F_TS-1079_20140516-1.2.8.img
TS-1279U-RP, TS-EC1279U-RP, TS-EC1279U-SAS-RP
http://eu1.qnap.com/Storage/tsd/fullimage/F_TS-1279U_20140516-1.2.8.img
TS-1679U-RP, TS-EC1679U-RP, TS-EC1679U-SAS-RP
http://eu1.qnap.com/Storage/tsd/fullimage/F_TS-1679U_20140516-1.2.8.img
TS-470 / TS-470 Pro
http://eu1.qnap.com/Storage/tsd/fullimage/F_TS-470_20140519-1.2.8.img
TS-470U-RP/SP
http://eu1.qnap.com/Storage/tsd/fullimage/F_TS-470U_20140520-1.2.8.img
TS-670 Pro
http://eu1.qnap.com/Storage/tsd/fullimage/F_TS-670_20140520-1.2.8.img
TS-870 Pro
http://eu1.qnap.com/Storage/tsd/fullimage/F_TS-870_20140519-1.2.8.img
TS-870U-RP
http://eu1.qnap.com/Storage/tsd/fullimage/F_TS-870U_20140520-1.2.8.img
TS-1270U-RP
http://eu1.qnap.com/Storage/tsd/fullimage/F_TS-1270U_20140520-1.2.8.img
TS-x80 Pro Series (Tower)
http://eu1.qnap.com/Storage/tsd/fullimage/F_TS-X80_20140911-1.2.8.img
TS-x80U Series (Rackmount)
http://eu1.qnap.com/Storage/tsd/fullimage/F_TS-X80U_20140911-1.2.8.img
SS-EC1279U
http://eu1.qnap.com/Storage/tsd/fullimage/F_SS-1279U_20130820-1.2.7.img
SS-EC1879U
http://eu1.qnap.com/Storage/tsd/fullimage/F_SS-1879U_20130820-1.2.7.img
SS-EC2479U
http://eu1.qnap.com/Storage/tsd/fullimage/F_SS-2479U_20130820-1.2.7.img
========================================================
B. How to use USB boot disk to refresh the DOM for TS-x79, TS-x70U, TS-x80 series NAS
1. Power off the NAS.
2. Remove all the hard disks.
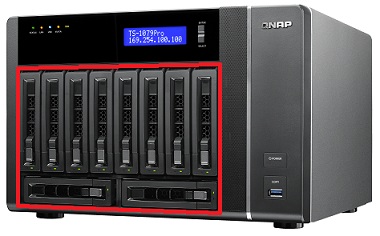
3. Connect the NAS with a VGA/HDMI monitor, USB keyboard, and the bootable USB disk.
4. Power on the NAS and press the or <F2> key when you see the message to enter setup.
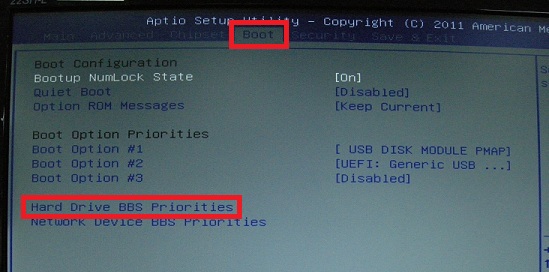
5. You will enter the BIOS Setup. Press the right arrow key to navigate to the Boot settings screen, and select "Hard Drive BBS Priorities"
6. Select "Boot Option #1"
7. Select "Generic USB Flash Disk" or similar name showing your USB disk
[NOTE]: If there are two USB devices, don't select “USB DISK MODULE PMAP”.
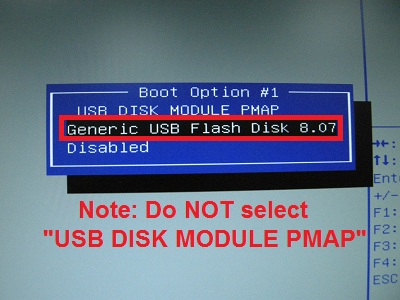
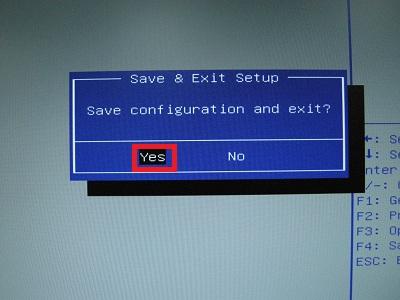
8. Press <F4> and select "Yes" to save and exit.
9. The CloneZilla loader will start up. Press <Enter>.
10. When asked to "Choose Language" and "Configuring Console-data", press <Enter>
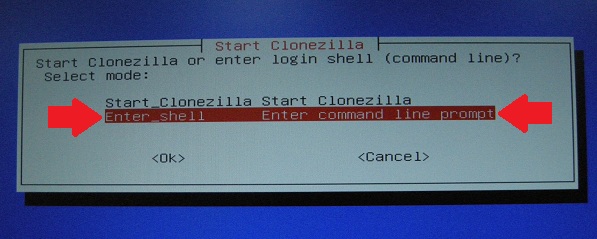
11. At the "Start Clonezilla" option, select "Enter_shell". Press <Enter> twice.
12. You will see the Linux command line. Enter the following commands:
# sudo su
# fdisk –l
/dev/sda is your flash drive.
/dev/sdb is the DOM drive. The size should be 515 MB.

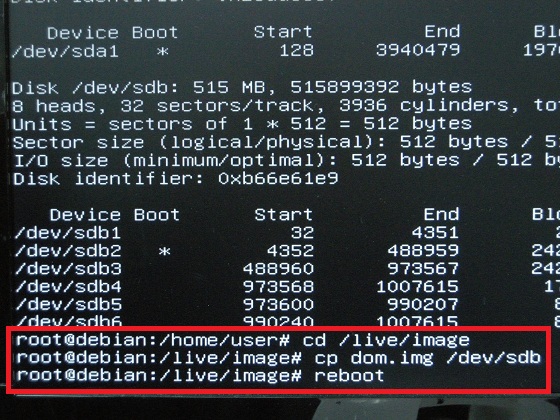
13. Then, input the following commands:
# cd /live/image
# cp dom.img /dev/sdb
"dom.img" is your firmware name.
/dev/sdb is the drive name of the DOM.
14. Reboot your NAS.
# reboot
15. After the system has been recovered, the NAS should boot up correctly and can be found by QNAP Finder.
16. Please download the latest firmware from the QNAP website and use QNAP Finder to update the firmware to latest version.
17. After firmware update by QNAP Finder, you can then plug the HDD(s) back to the NAS. After boot up:
- If the HDD(s) have been used on the NAS before, the firmware on the NAS and the HDDs may be inconsistent, you need to update the firmware again.
- If the HDD(s) is brand new, you can then start the initialization procedures.
Firmware Recovery Guide for TS-251B, TS-x51D series, TS-x53B Series, TS-x53BU Series, TS-x51A Series, TS-x53U series, TS-x53A Series, TBS-453A, TBS-453DX, HS-453DX, TS-x53D series, TVS-x63 Series, TVS-x63+ Series, TVS-x71 Series, TVS-x71U Series, TVS-x72N Series, TVS-x72X Series, TVS-x72XT Series, TVS-x72XU Series, TVS-x73 Series, TVS-675, TS-x73U Series, TS-x77 Series, TS-x77XU Series, TS-hx77XU Series,TS-1685, TVS-ECx80 / TVS-ECx80+, TVS-ECx80U Series, TVS-x82 Series, TVS-x82T Series, TVS-x82ST Series, TVS-882BR, TVS-882BRT3, TVS-951X, TVS-1282T3, TVS-1582TU, TS-x83XU Series, TS-h1283XU, TDS-16489U, TDS-16489U R2, TES-x85U series, TS-hx88X series, TS-h3088XU,TS-h1886XU-RP R2 NAS
Applied QNAP NAS models
TS-251B, TS-251D, TS-451D, TS-253B, TS-453B, TS-653B, TS-253Be, TS-453Be, TS-453BT3, TS-453BU, TS-853BU, TS-1253BU, TS-453U, TS-853U, TS-1253U, TS-251A, TS-451A, TBS-453A, TBS-453DX, HS-453DX, TS-253D, TS-453D, TS-653D, TS-253A, TS-453A, TS-653A, TS-853A, TVS-463, TVS-663, TVS-863, TVS-471, TVS-671, TVS-871, TVS-871T, TVS-471U, TVS-871U, TVS-1271U, TVS-672N, TVS-872N, TVS-672X, TVS-872X, TVS-472XT, TVS-672XT, TVS-872XT, TVS-872XU, TVS-972XU, TVS-1272XU, TVS-1672XU, TVS-473, TVS-673, TVS-873, TVS-675, TS-873U, TS-1273U, TS-1673U, TS-677, TS-877, TS-1277, TS-877XU, TS-977XU, TS-1277XU, TS-1677XU, TS-2477XU, TS-h977XU, TS-h1277XU, TS-1685, TVS-ECx80 / TVS-ECx80+ series, TVS-ECx80U Series, TVS-682, TVS-882, TVS-1282, TVS-682T, TVS-882T, TVS-1282T, TVS-882ST2, TVS-882ST3, TVS-882BR, TVS-882BRT3, TVS-951X, TVS-1282T3, TVS-1582TU, TS-883XU, TS-983XU, TS-1283XU, TS-1683XU, TS-2483XU, TS-h1283XU, TDS-16489U, TDS-16489U R2, TES-1885U, TES-3085U, TS-h1288X, TS-h1688X, TS-h3088XU, TS-h1886XU-RP R2
When to use the firmware recovery guide
This firmware recovery guide is intended for users who encounter system startup failure due to incomplete or unsuccessful firmware update caused by power outage or network disconnection during the process. To verify if this guide applies to your NAS, follow the steps below:
1. Power off the NAS.
2. Remove all the hard disks.

3a. Connect the NAS with a VGA/HDMI monitor and a USB keyboard
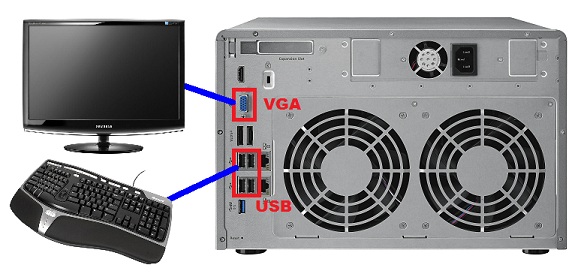
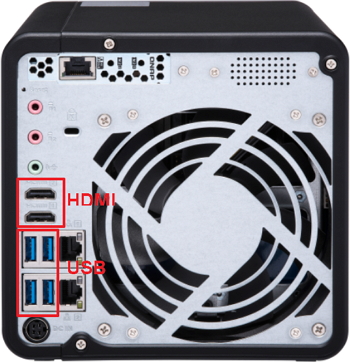
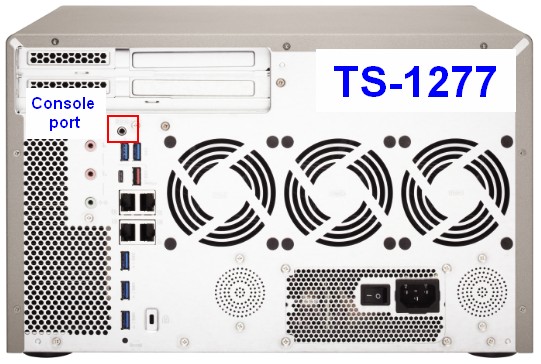
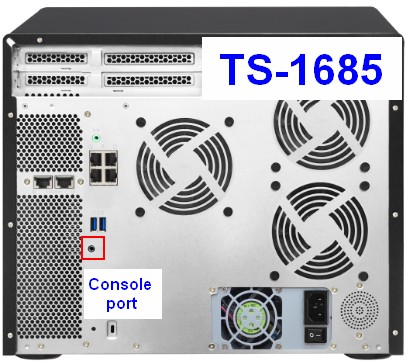
3b. For some NAS models, there is no VGA or HDMI port but there is a console port on the NAS, like TS-X77 series, TS-1685,...etc.
Please prepare console cable listed below and connect it between NAS console port and your PC.
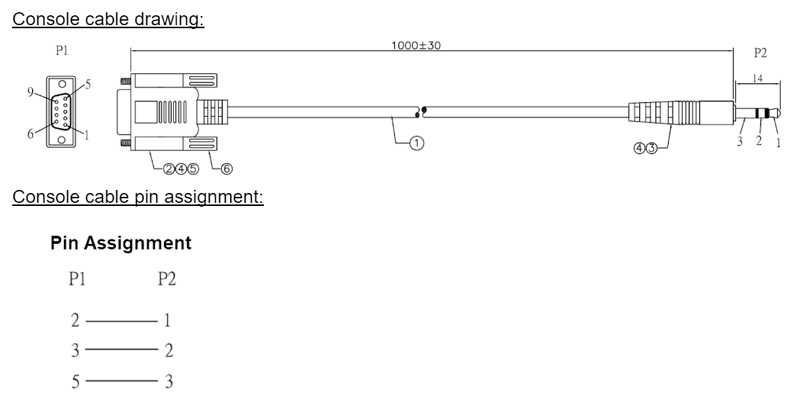
Console cable: D-SUB 9P female to 3.5mm stereo plug cable
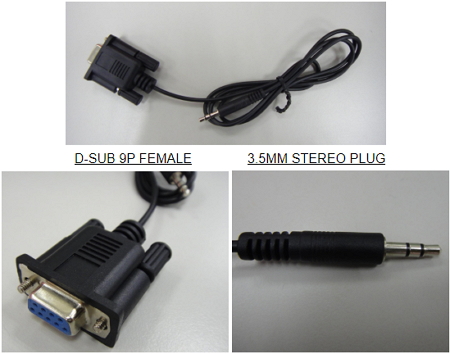
Console cable drawing and pin assignment:
You may also need below USB-to-RS232 cable if there is no RS-232 serial port on your PC.
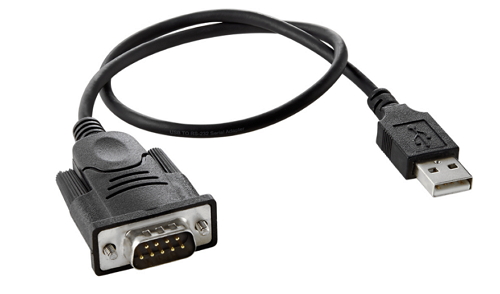
( If you are not able to get these cable(s) or don't know how to do it, please apply the RMA to return your NAS for maintenance. )
Next, you can check which COM port to be used in Windows Device Manager.
(Here, COM4 is used for connection.)
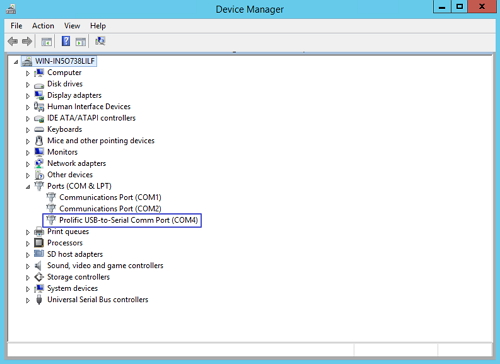
Then you can use the terminal utility, (ex: Putty) to connect to the console.
(Baud rate: 115200 bps)
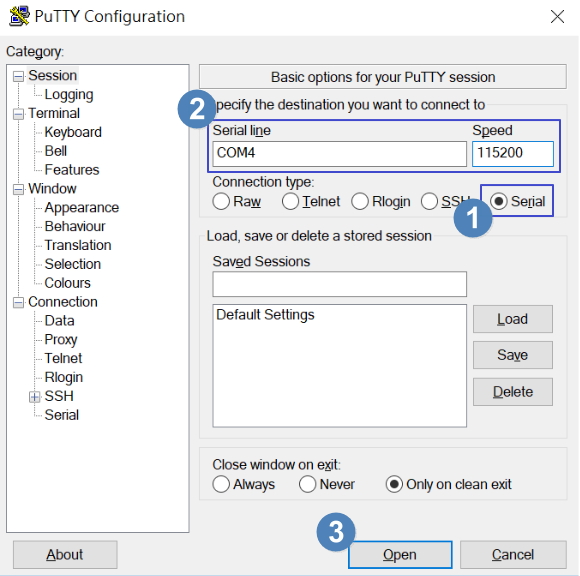
4. Power on the NAS
The BIOS Date and Version should be displayed. This shows the BIOS can startup correctly.

If the BIOS cannot be started, you need to contact with local distributor and send back the NAS for repair. If the NAS system can be started up correctly after removing HDD, you will need to replace the HDD as the startup failed issue is caused by HDD.
5. After the BIOS info, you will see status messages similar to below:
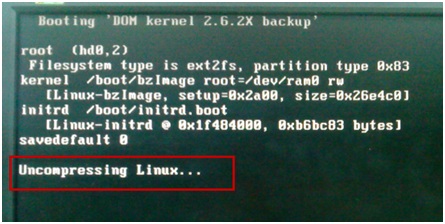
At this stage, the system on the DOM is starting to boot up. However, if the system is corrupted, some error message might occur on the screen during the startup process.
You can try to recover the system on the DOM by following steps.
6. To recover the system on the DOM, you need follow the step A and step B.
A. Create a USB boot disk
B. Use the USB boot disk to refresh the system on the DOM.
Instructions for NAS Recovery
A. How to create a USB boot disk.
1. Download the rufus utility and iso file from the link below:
https://github.com/pbatard/rufus/releases/download/v3.4/rufus-3.4.exe
http://sourceforge.net/projects/clonezilla/files/clonezilla_live_stable/2.4.2-10/clonezilla-live-2.4.2-10-amd64.iso/download
(for HS-453DX, TS-251D/TS-451D/TS-253D/TS-453D/TS-653D/TS-251B/TS-253B/TS-453B/TS-653B/TS-253Be/TS-453Be/TS-453BT3/TVS-675/TS-677/TS-877/TVS-951X/TS-1277 NAS, please download below version of clonezilla.)
https://sourceforge.net/projects/clonezilla/files/clonezilla_live_stable/2.5.0-25/clonezilla-live-2.5.0-25-amd64.iso/download
(for TS-x77 Series/TS-x77XU Series/TS-h977XU/TS-h1277XU/TS-x83XU Series/TS-h1283XU/TS-1685/TES-1885U/TES-3085U NAS, please download below version of clonezilla.)
http://download.qnap.com/Storage/tsd/live_cd/clonezilla-live-2.5.0-25-amd64_console.iso
(for TS-hx88X Series / TS-h3088XU NAS, please download below version of clonezilla.)
https://osdn.net/projects/clonezilla/downloads/74519/clonezilla-live-2.7.1-22-amd64.zip/
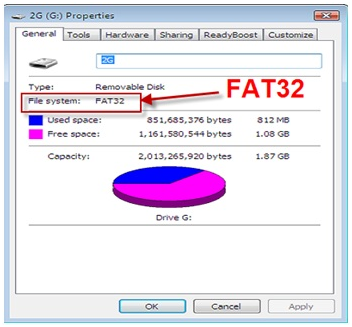
2. Plug a USB flash drive to your PC. Please format the USB flash drive as FAT32.
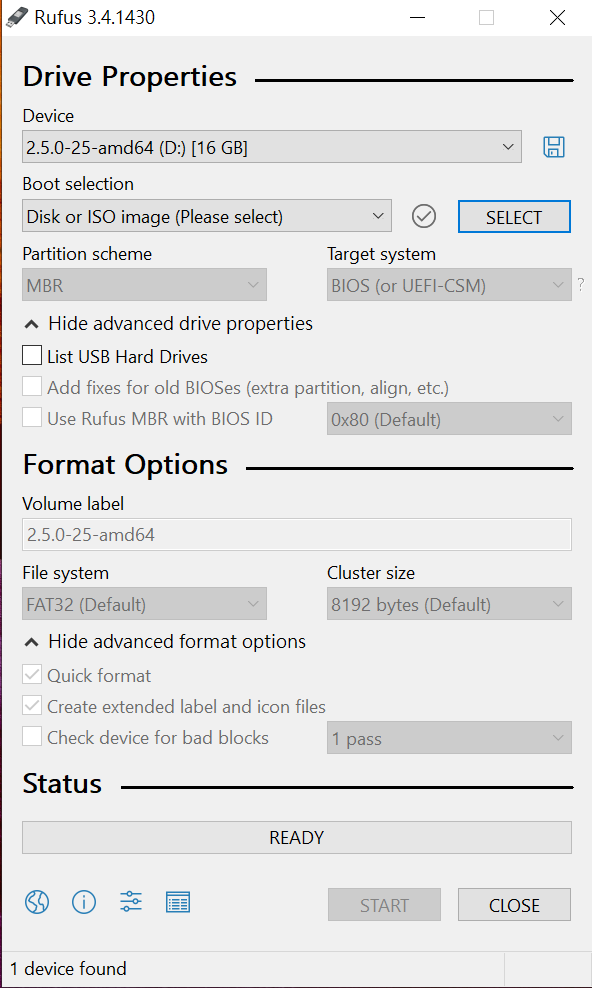
3. Run the rufus utility from your PC and click it to select
- "clonezilla-live-2.5.0-25-amd64.iso" as your ISO file. (for HS-453DX, TS-251D/TS-451D/TS-253D/TS-453D/TS-653D/TS-251B/TS-253B/TS-453B/TS-653B/TS-253Be/TS-453Be/TS-453BT3/TVS-675/TS-677/TS-877/TVS-951X/TS-1277 only)
- "clonezilla-live-2.5.0-25-amd64_console.iso" as your ISO file. (for TS-x77 Series/TS-x77XU Series/TS-h977XU/TS-h1277XU/TS-x83XU Series/TS-h1283XU/TS-1685/TES-1885U/TES-3085U only)
- "clonezilla-live-2.7.1-22-amd64.iso" as your ISO file. (for TS-h1288X / TS-h1688X / TS-h3088XU only)
- "clonezilla-live-2.4.2-10-amd64.iso" as your ISO file. (for other models)
4. Click Start button to start preparing the USB flash drive.
5. Check your NAS model and download the system full image from the link below.
6. Copy system image file to the root folder of USB flash drive and rename the file to "dom.img".
Download System Full Image
==============================================================================================
TS-1685
http://download.qnap.com/Storage/tsd/fullimage/F_TS-X85_20170210-1.3.0_512M.img
TS-677 / TS-877 / TS-1277
http://download.qnap.com/Storage/tsd/fullimage/F_TS-X77_20170908-1.3.0_4G.img
TS-877XU / TS-977XU / TS-1277XU / TS-1677XU / TS-2477XU
https://download.qnap.com/Storage/tsd/fullimage/F_TS-X77U_20181001-1.3.0.img
TS-h977XU / TS-h1277XU
https://download.qnap.com/Storage/tsd/fullimage/F_TS-X77U_20200507-1.3.0.img
TS-251B
https://download.qnap.com/Storage/tsd/fullimage/F_TS-X51B_20180417-1.3.0.img
TS-251D / TS-451D
https://download.qnap.com/Storage/tsd/fullimage/F_TS-X53D_20190919-1.3.0.img
TS-253B / TS-453B / TS-653B / TS-253Be / TS-453Be / TS-453BT3
http://eu1.qnap.com/Storage/tsd/fullimage/F_TS-X53B_20161212-1.3.0_EFI.img
TS-453BU / TS-853BU / TS-1253BU
https://download.qnap.com/Storage/tsd/fullimage/F_TS-X53BU_20180606-1.3.0.img
TS-453U / TS-853U / TS-1253U
https://download.qnap.com/Storage/tsd/fullimage/F_TS-X53U_20141125-1.2.8.img
TS-251A / TS-451A
http://eu1.qnap.com/Storage/tsd/fullimage/F_TS-X51A_20160429-1.3.0_EFI.img
TBS-453A
http://eu1.qnap.com/Storage/tsd/fullimage/F_TS-X53A_20160531-1.3.0_EFI.img
TBS-453DX / HS-453DX
https://download.qnap.com/Storage/tsd/fullimage/F_TS-X53D_20180510-1.3.0.img
TS-253D / TS-453D / TS-653D
https://download.qnap.com/Storage/tsd/fullimage/F_TS-X53D_20210303-1.3.0.img
TS-253A / TS-453A / TS-653A / TS-853A
http://eu1.qnap.com/Storage/tsd/fullimage/F_TS-X53II_20151028-1.3.0_TDS-special.img
TVS-471 / TVS-671 / TVS-871
http://eu1.qnap.com/Storage/tsd/fullimage/F_TVS-X71_20141126-1.2.8.img
TVS-871T
http://eu1.qnap.com/Storage/tsd/fullimage/F_TVS-X71_20150611-1.3.0.img
TVS-471U / TVS-871U
http://eu1.qnap.com/Storage/tsd/fullimage/F_TVS-X71U_20141126-1.2.8.img
TVS-1271U
http://eu1.qnap.com/Storage/tsd/fullimage/F_TS-X71U_20140925-1.2.8.img
TVS-463 / TVS-663 / TVS-863 / TVS-863+
http://eu1.qnap.com/Storage/tsd/fullimage/F_TVS-X63_20141224-1.2.8.img
TVS-472XT / TVS-672XT / TVS-872XT
http://download.qnap.com/Storage/tsd/fullimage/F_TS-X72_20190122-1.3.0.img
TVS-672N / TVS-872N / TVS-672X / TVS-872X
https://download.qnap.com/Storage/tsd/fullimage/F_TS-X72_20201210-1.3.0.img
TVS-675
https://download.qnap.com/Storage/tsd/fullimage/F_TS-X75_20210414-h1.3.0_UEFI.img
TVS-872XU / TVS-972XU / TVS-1272XU / TVS-1672XU
https://download.qnap.com/Storage/tsd/fullimage/F_TS-X72U_20180824-1.3.0.img
TVS-473 / TVS-673 / TVS-873
http://eu1.qnap.com/Storage/tsd/fullimage/F_TVS-X73_20160908-1.3.0.img
TVS-473e / TVS-673e / TVS-873e
https://download.qnap.com/Storage/tsd/fullimage/F_TVS-X73_20171208-1.3.0.img
TS-873U / TS-1273U / TS-1673U
http://eu1.qnap.com/Storage/tsd/fullimage/F_TS-X73U_20170526-1.3.0.img
TVS-ECx80 / TVS-ECx80+ Series
http://eu1.qnap.com/Storage/tsd/fullimage/F_TS-X80_20140930-1.2.8.img
TVS-ECx80U Series
http://eu1.qnap.com/Storage/tsd/fullimage/F_TVS-X80U_20150818-1.3.0.img
TVS-682 / TVS-882 / TVS-1282
http://eu1.qnap.com/Storage/tsd/fullimage/F_TS-X82_20160520-1.3.0.img
TVS-682T / TVS-882T / TVS-1282T
http://eu1.qnap.com/Storage/tsd/fullimage/F_TS-X82_20160824-1.3.0.img
TVS-882ST2 / TVS-882ST3
http://eu1.qnap.com/Storage/tsd/fullimage/F_TS-X82S_20170606-1.3.0.img
TVS-882BR / TVS-882BRT3
http://eu1.qnap.com/Storage/tsd/fullimage/F_TS-X82_20170512-1.3.0.img
TVS-951X
https://download.qnap.com/Storage/tsd/fullimage/F_TS-XA82_20180329-1.3.0.img
TVS-1282T3
http://eu1.qnap.com/Storage/tsd/fullimage/F_TS-X82_20170606-1.3.0.img
TS-883XU / TS-983XU / TS-1283XU-RP / TS-1683XU-RP / TS-2483XU-RP
https://download.qnap.com/Storage/tsd/fullimage/F_TS-X83XU_20181012-1.3.0.img
TS-h1283XU-RP
https://download.qnap.com/Storage/tsd/fullimage/F_TS-X83XU_20200416-1.3.0.img
TVS-1582TU
https://download.qnap.com/Storage/tsd/fullimage/F_TS-X82U_20170314-1.3.0.img
TDS-16489U (QTS)
http://eu1.qnap.com/Storage/tsd/fullimage/F_TS-X89U_20160408-1.3.0.img
TES-1885U / TES-3085U
http://download.qnap.com/Storage/tsd/fullimage/C_TESX85U_20190430.usb
TS-h1288X / TS-h1688X
https://download.qnap.com/Storage/tsd/fullimage/F_TS-X88_20210109-h1.3.0_UEFI.img
TS-h3088XU
https://download.qnap.com/Storage/tsd/fullimage/F_TS-X88U_20201217-h1.3.0_UEFI.img
TS-h1886XU-RP R2
https://download.qnap.com/Storage/tsd/fullimage/F_TS-X85U_20211224-h1.3.0.img
========================================================
B. How to use USB boot disk to refresh the DOM for NAS
1. Power off the NAS.
2. Remove all the hard disks.
3. Connect the NAS with a USB flash drive and
- VGA/HDMI monitor and a USB keyboard (if there is VGA or HDMI port on the NAS)
- Console cable (if there is only console port on the NAS)
4. Power on the NAS and press DEL key when you see the message to enter BIOS settings.
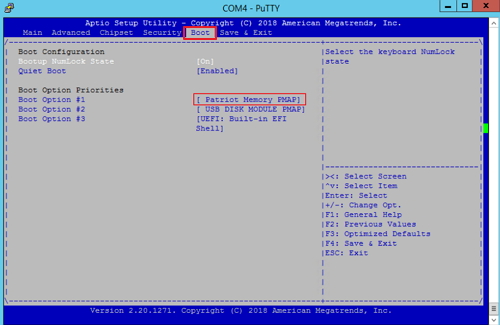
5. Press right arrow key to navigate to the Boot option and select your USB flash drive, like Patriot Memory.
(Do not select USB DISK MODULE because it is USB DOM in the system.)
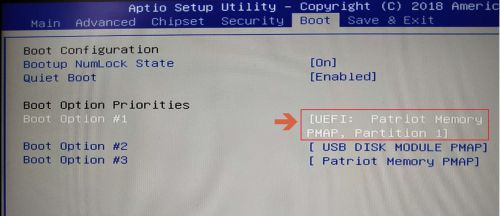
5a. Since some of new NAS model (like HS-453DX, TVS-951X, TS-h1288X, TS-h1688X, TS-h3088XU) is with UEFI BIOS, please choose select your USB flash drive at UEFI. Ex: [ UEFI: Patriot Memory ]
6. Save settings and exit BIOS.
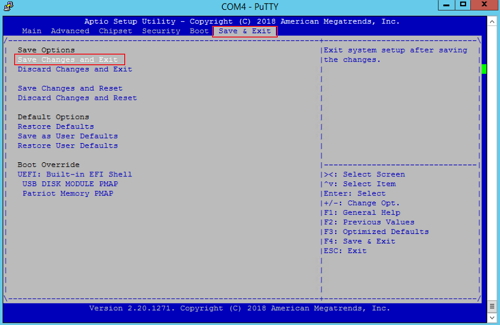
7. It will boot up with your USB flash drive.
7a. For NAS with console port only (like TS-677,TS-877,TS-1277,TS-1685,TES-1885U,TES-3085U,...etc.), select Clonezilla Live (Serial console) option.
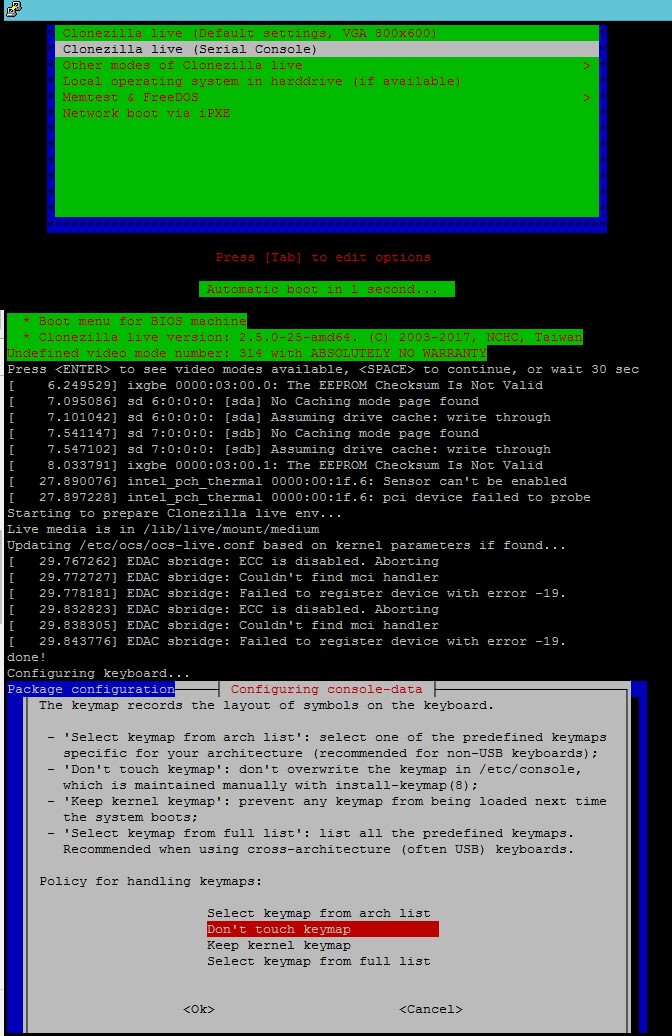
7b. For other NAS with VGA or HDMI port, select Clonezilla Live option.
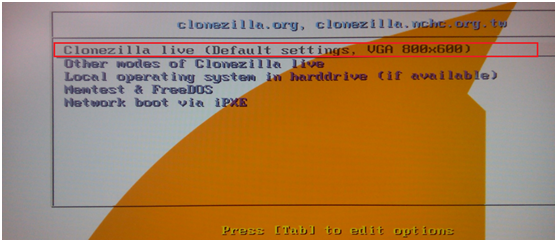
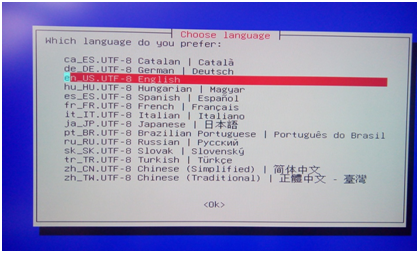
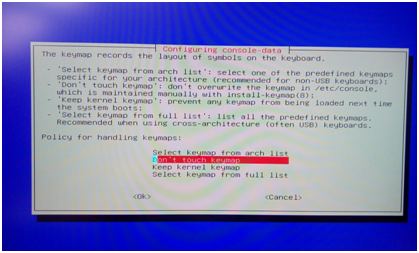
8. Follow below steps to enter the shell console.

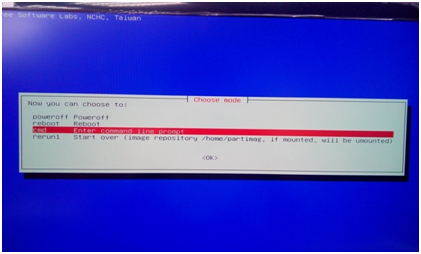
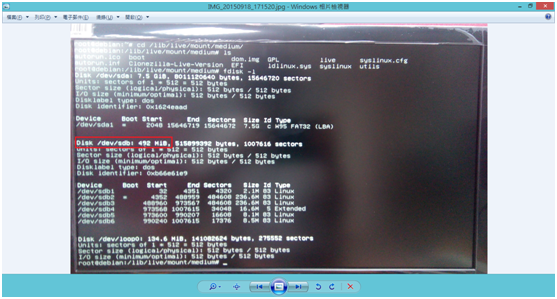
9. You will see the Linux command line. Enter the following commands:
[~]# sudo su
[~]# fdisk –l
/dev/sda is your flash drive.
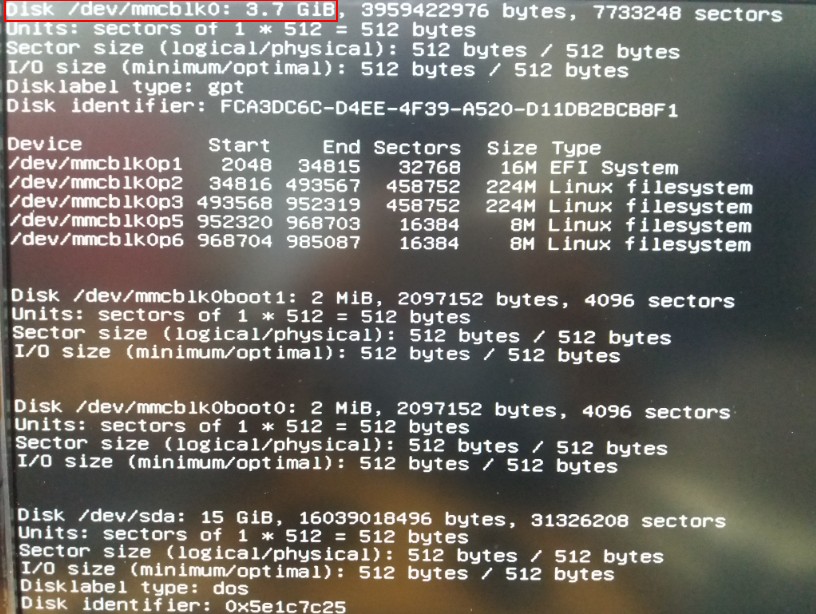
/dev/sdb is the DOM drive. The capacity is 492 MB.
For TDS-16489U R2 / TES-1885U / TES-3085U, /dev/sdb is the DOM drive. The capacity is 3.9GB.
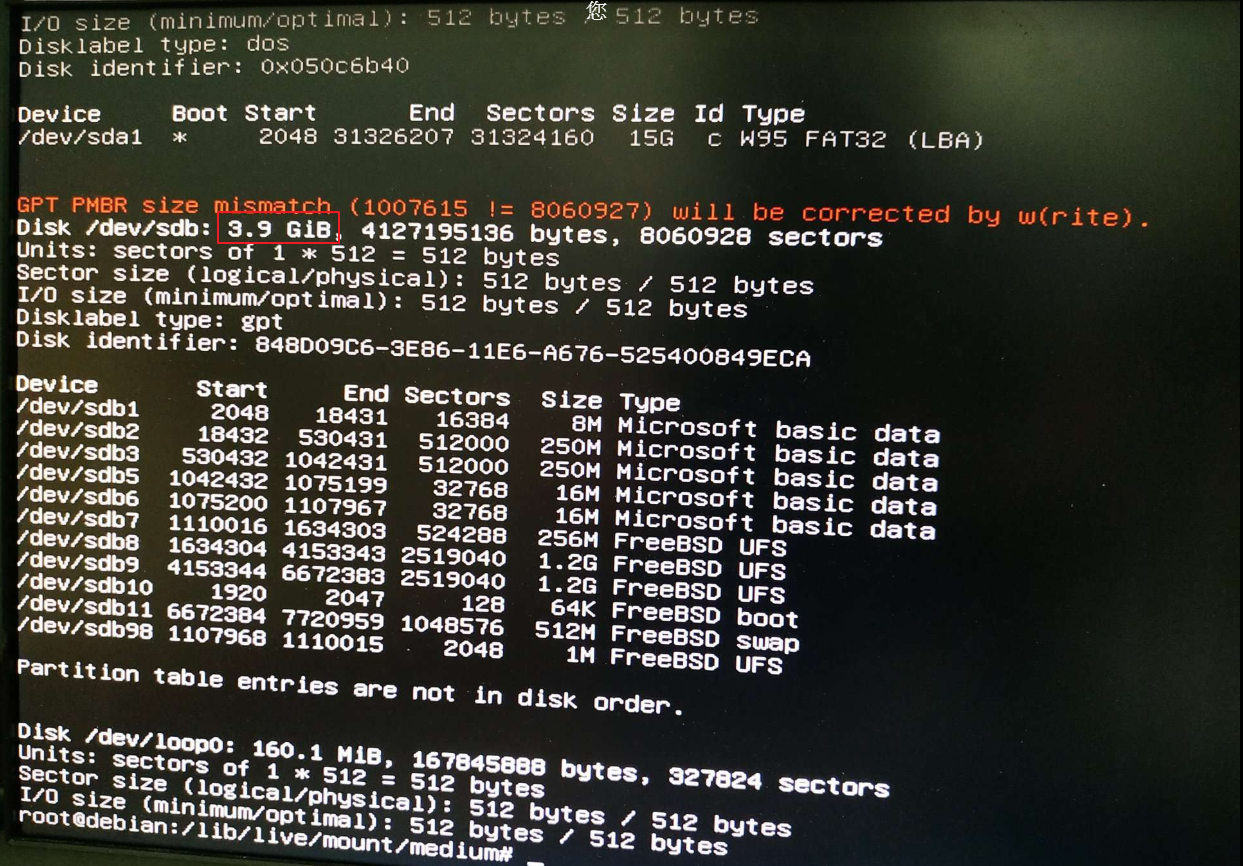
For TS-h1288X/TS-h1688X/TS-h3088XU, /dev/sdb is the DOM drive. The capacity is 4.64 GB.
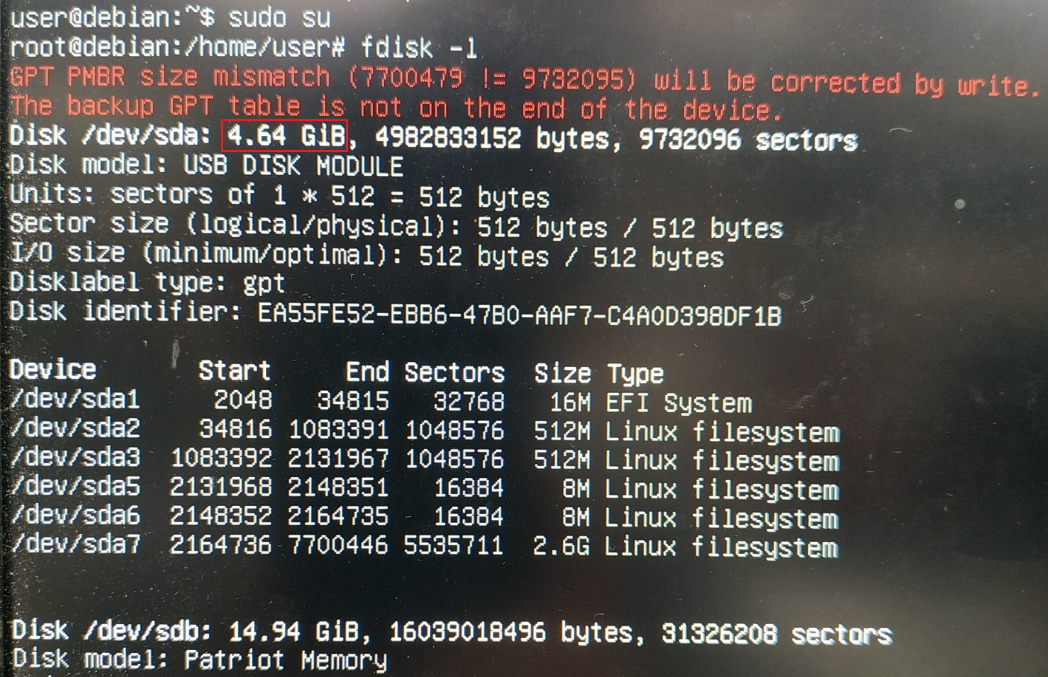
For TVS-675, /dev/sdb is the DOM drive. The capacity is 4.7 GB.
(For TS-251A/TS-451A/TBS-453A/TBS-453DX/HS-453DX, "/dev/mmcblk0" is your DOM drive)
(For TS-251B/TS-253B/TS-453B/TS-653B/TS-253Be/TS-453Be, "/dev/mmcblk1" is your DOM drive)
10. Execute below commands:
[~]# cd /lib/live/mount/medium/
(For TS-251A/TS-451A/TBS-453A/TBS-453DX/HS-453DX, please execute below command)
[~]# cp dom.img /dev/mmcblk0
(For TS-251B/TS-253B/TS-453B/TS-653B/TS-253Be/TS-453Be/TS-453BT3, please execute below command)
[~]# cp dom.img /dev/mmcblk1
(For TS-h1288X / TS-h1688X / TS-h3088XU, please execute below command)
[~]# cp dom.img /dev/sda
(For other models, please execute below command)
[~]# cp dom.img /dev/sdb
11. After the copy is completed, reboot the system.
[~]# reboot
12. Remove the USB flash drive from the system.
13. After the system has been recovered, the NAS should boot up correctly and can be found by QNAP Finder. (Note: Not completed yet.)
14. Please download the latest firmware from the QNAP website and use QNAP Finder to update the firmware to latest version.
(Note: Make sure you have done this step after the system recovery.)
15. After firmware update by QNAP Finder, you can then plug the HDD(s) back to the NAS.
After boot up:
- If the HDD(s) have been used on the NAS before, the firmware on the NAS and the HDDs may be inconsistent, you need to update the firmware again.
- If the HDD(s) is brand new, you can then start the initialization procedures.
Firmware Recovery Guide for AL (Annapurna Labs) based NAS
Applied QNAP NAS models
For QNAP TS-131P, TS-231P, TS-431P, TS-231P2, TS-231K, TS-431K, TS-431P2, TS-231+, TS-431+, TS-431X, TS-431X2, TS-531P, TS-531X, TS-831X, TS-832X, TS-932X, TS-431XU, TS-431XeU, TS-831XU, TS-1231XU, TS-1635, ,TS-832XU, TS-1232XU Turbo NAS.
When to use the firmware recovery guide
This firmware recovery guide is intended for users who encounter system startup failure due to incomplete or unsuccessful firmware update caused by power outage or network disconnection during the process.
Instructions for NAS Recovery
Prepare a Windows PC and configure the network port as a static IP: 169.254.100.177.
- Download and install tftp server software to the Windows PC.
For 32-bit Windows: http://tftpd32.jounin.net/download/tftpd32.452.zip
For 64-bit Windows: http://tftpd32.jounin.net/download/tftpd64.452.zip - Download firmware files:
TS-832X/TS-932X: http://download.qnap.com/Storage/tsd/fullimage/TS-X32X.zip
TS-832XU/TS-1232XU: http://download.qnap.com/Storage/tsd/fullimage/TS-X32XU_fw.zip
TS-231K/TS-431K: https://download.qnap.com/Storage/tsd/fullimage/TS-X31K_fw.zip
(If your NAS QTS firmware version is earlier than v4.3.4, please click below link to download.)
TS-431X/TS-531X/TS-831X/TS-431X2: http://download.qnap.com/Storage/tsd/fullimage/TS-X31X_fw.zip
TS-431XU/TS-431XeU/TS-831XU/TS-1231XU: http://download.qnap.com/Storage/tsd/fullimage/TS-X31XU_fw.zip
TS-531P: http://download.qnap.com/Storage/tsd/fullimage/TS-531P_fw.zip
TS-131P/231P/431P/X31+: http://download.qnap.com/Storage/tsd/fullimage/TS-X31P+_fw.zip
TS-231P2/TS-431P2: http://download.qnap.com/Storage/tsd/fullimage/TS-X31P2.zip
TS-1635: http://download.qnap.com/Storage/tsd/fullimage/TS-1635_fw.zip
(If your NAS QTS firmware version is equal or later than v4.3.4, please click below link to download.)
TS-431X/TS-531X/TS-831X/TS-431X2: http://download.qnap.com/Storage/tsd/fullimage/TS-X31X_434.zip
TS-431XU/TS-431XeU/TS-831XU/TS-1231XU: http://download.qnap.com/Storage/tsd/fullimage/TS-X31XU_434.zip
TS-531P: http://download.qnap.com/Storage/tsd/fullimage/TS-531P_434.zip
TS-131P/231P/431P/X31+: http://download.qnap.com/Storage/tsd/fullimage/TS-X31P+_434.zip
TS-231P2/TS-431P2: http://download.qnap.com/Storage/tsd/fullimage/TS-X31P2_434.zip
TS-1635: http://download.qnap.com/Storage/tsd/fullimage/TS-X35_434.zip - Launch tftp server application on the PC and configure the server settings like below.
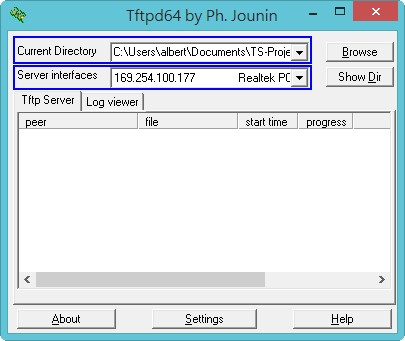
- Current Directory: Specify the directory where the firmware files are stored.
Server interfaces: Specify the network port on your PC which you configured IP address as 169.254.100.177. - Power off the NAS.
- Remove all of hard disks from the NAS.
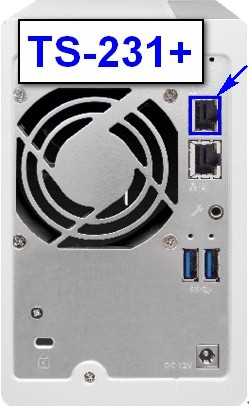
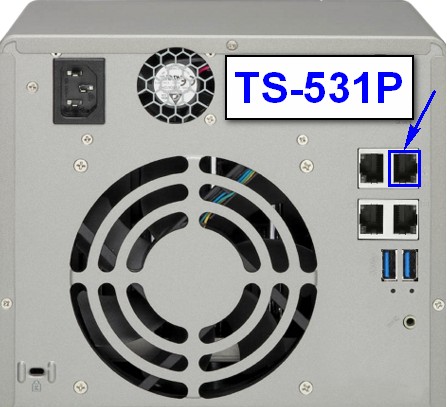
- Connect the network cable to the specific network port of NAS.
(Attention: Please refer to below NAS photos to connect to correct port marked in blue.)

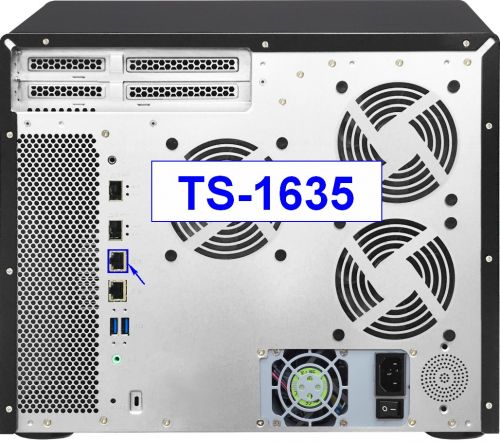


- Press and hold USB copy button and then press power button to power on the NAS. Wait about 6 seconds until the status LED turns RED. Then release USB copy button.
(PS: TS-531P is the exception that the status LED will not turn red.) - For the model, TS-431XU/TS-831XU/TS-1231XU/TS-832XU/TS-1232XU, which does not have USB copy button, please do below steps instead.
- Open the enclosure case.
- Find J2 pin shown in below figure.
- Connect a jumper on it.
- Power on the NAS.
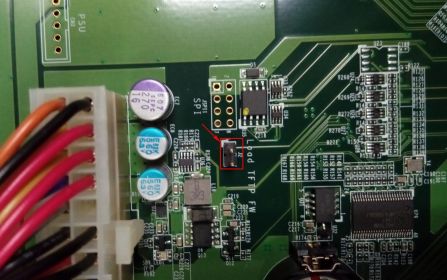
- The firmware recovery will automatically start and you can see firmware files downloaded from tftp server to NAS. (See below screenshot.)
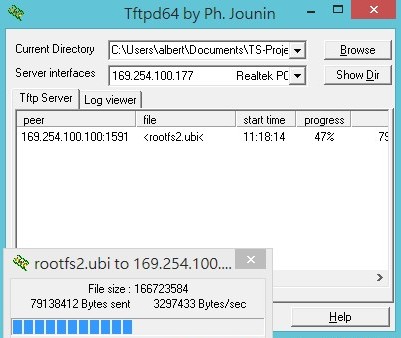
- Once the firmware recovery process is done, the NAS will shutdown automatically.
(PS: TS-531P is the exception that the NAS will reboot instead of shutdown.) - Remove the jumper from pin J2 (for TS-431XU/TS-831XU/TS-1231XU/TS-832XU/TS-1232XU only).
- Done.
USB Firmware Recovery SOP for TS-328, TS-X28A Series and TS-X30 series NAS
Applied QNAP NAS models
For TS-128A, TS-228A, TS-328 NAS, TS-130, TS-230
When to use the firmware recovery guide
This firmware recovery guide is intended for users who encounter system startup failure due to incomplete or unsuccessful firmware update caused by power outage or network disconnection during the process.
Instructions for NAS Recovery
A. How to create a USB boot disk.
1. Download the rufus utility into your PC from the link below.:
https://github.com/pbatard/rufus/releases/download/v3.4/rufus-3.4.exe
2. Download the NAS system image into your PC from the link below.
TS-128A / TS-228A
http://download.qnap.com/Storage/tsd/fullimage/F_TS-X28A_20171219-1.3.0.img
TS-328
http://download.qnap.com/Storage/tsd/fullimage/F_TS-XA28A_20180329-1.3.0.img
TS-130 / TS-230
https://download.qnap.com/Storage/tsd/fullimage/F_TS-XA28A_20190917-1.3.0.img
3. Plug in USB disk into your PC.
4. Run the rufus utility from your PC and click the button to select the system image file.
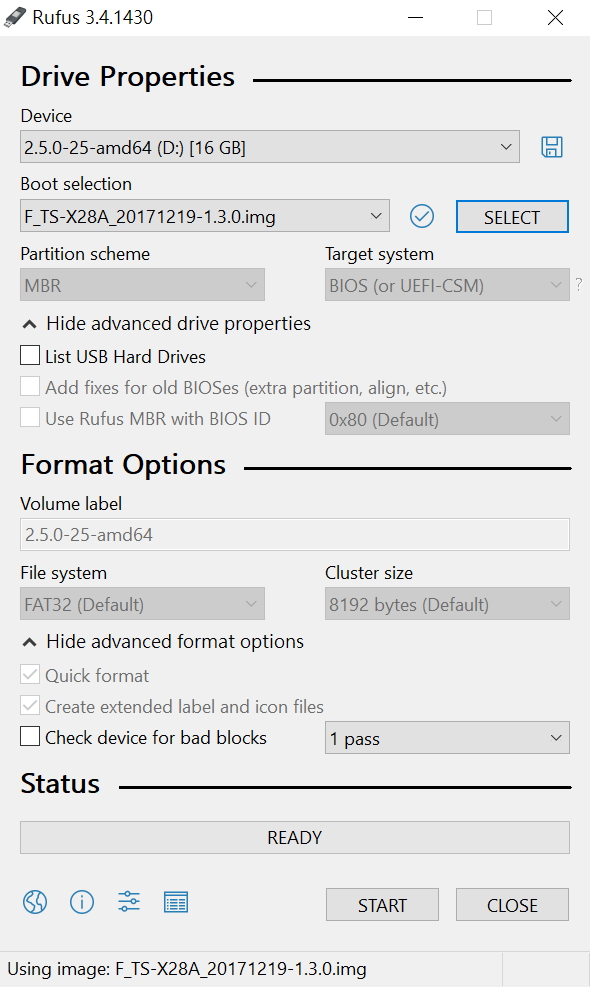
5. Click “Start” button to write the system image into USB disk.
B. How to use USB boot disk to refresh the DOM for NAS.
1. Power off the NAS.
2. Uninstall all of the disk drives from the NAS.
3. Connect the USB flash drive to rear USB port of the NAS.
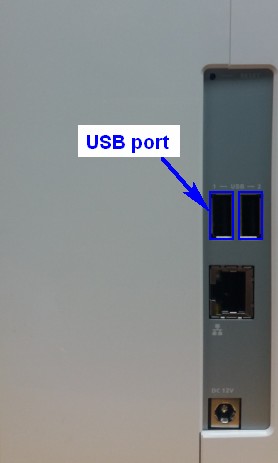

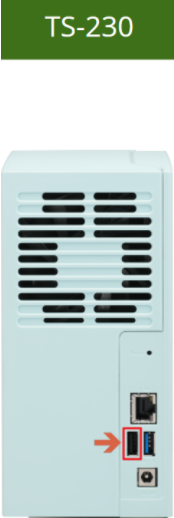
4. Press and hold the USB copy button and then press Power button to power on the NAS.
5. Keep holding the USB copy button till you hear a beep sound and then release it.
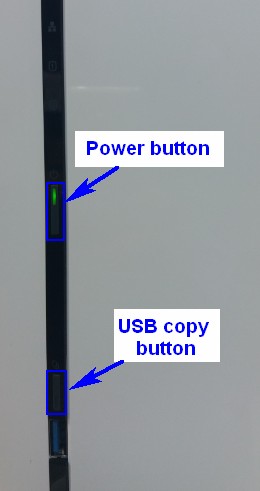
6. Once you hear 3 short beeps, it means the firmware recovery is being started. If not, please power off the NAS and redo it with the above steps 4 to 6.
7. After the firmware recovery is done, you will hear a long beep and then NAS will be shut down automatically. (Note: If you hear two long beeps or the NAS is not shutdown after 5 minutes, the firmware recovery might fail. Please redo the process again.)
8. Remove the USB flash drive from the NAS and power on the NAS.
9. The NAS should boot up correctly and can be found by QNAP Finder. (Note: Not completed yet.)
10. Please download the latest firmware from the QNAP website and use QNAP Finder to update the firmware to latest version.(Note: Make sure you have done this step after the system recovery.)
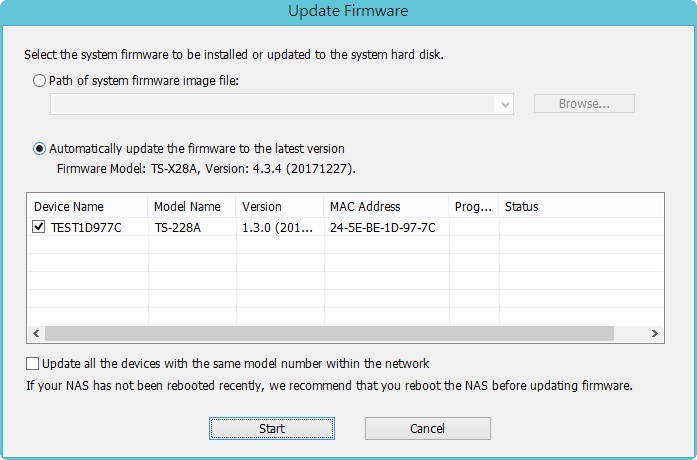
12. Shutdown NAS and plug all HDD(s) back to NAS and power on NAS.
13. Done.
USB Firmware Recovery SOP for TS-435XeU series NAS
Applied QNAP NAS models
For TS-435XeU
When to use the firmware recovery guide
This firmware recovery guide is intended for users who encounter system startup failure due to incomplete or unsuccessful firmware update caused by power outage or network disconnection during the process.
Instructions for NAS Recovery
A. How to create a EXT4 USB drive.
1. You need to prepare a USB drive and format it to EXT4 format
Download the AOMEI Partition Assistant into your PC from the link below.:
https://www.diskpart.com/download-home.html#demo
2. Download the NAS system image into your PC from the link below.
TS-435XeU https://download.qnap.com/Storage/tsd/fullimage/F_TS-X35EU_20220119-1.3.0_UEFI.img
3. Plugin a USB drive into your PC.
4. Install the AOMEI Partition Assistant from your PC and format the USB drive to EXT4 format
5. Use Ubuntu(Linux) to copy NAS's image files into EXT4 USB drive.
6. Rename the image name to emmc_recovery_fi.img (Make sure it save in USB drive partition 1)
B. How to use USB boot drive to refresh the DOM for NAS.
1. Power off the NAS and unplug the power cord.
2. Remove the 5 screws with a screwdriver and unlock&open the NAS's case.
3. Find a pin near "USB COPY" text, plugin a jumper to that pin as below.(jumper is in blue color)
4. Plugin the EXT4 USB drive to USB port(any of 4 USB ports are ok).
5. Make sure no network cables plugin and no any HDD(s) plugin, only plugin the EXT4 USB drive and jumper.
6. Plugin the power cord to power on the NAS.
7. Front LED will have blink red(It's refresh DOM now).
8. Wait for it finished, will shutdown the NAS automatically.
9. Unplug the jumper.
10. Unplug the EXT4 USB drive from USB port.
11. Poewr on the NAS and have a PC connect to NAS directly via network port.
12. Download the latest firmware from the QNAP website and use QNAP QFinder Pro to update the firmware to latest version.(Note: Make sure you have done this step after the system recovery.)
12. Shutdown NAS and plug all HDD(s) back to NAS and power on NAS.
13. Done.
What to do if the startup problem persists
If the startup problem persists after refresh the system on the DOM, please return the NAS to your local dealer or distributor for system repair immediately.
